Are you ready to make a statement this Halloween? Celebrate the spooky season with a creative DIY project that will bring your home to life! Learn how to make a thin pumpkin Halloween wreath. With just a few materials, some basic crafting skills, and a little bit of imagination, you can create something stunning for your front door or other area in your home.
This easy tutorial will walk you through everything you need to know on how to make the perfect thin pumpkin themed Halloween wreath. From gathering the right materials, to assembling it all together, we’ve got you covered! Get ready to put those crafty skills to work for a beautiful decoration that will be admired by all.
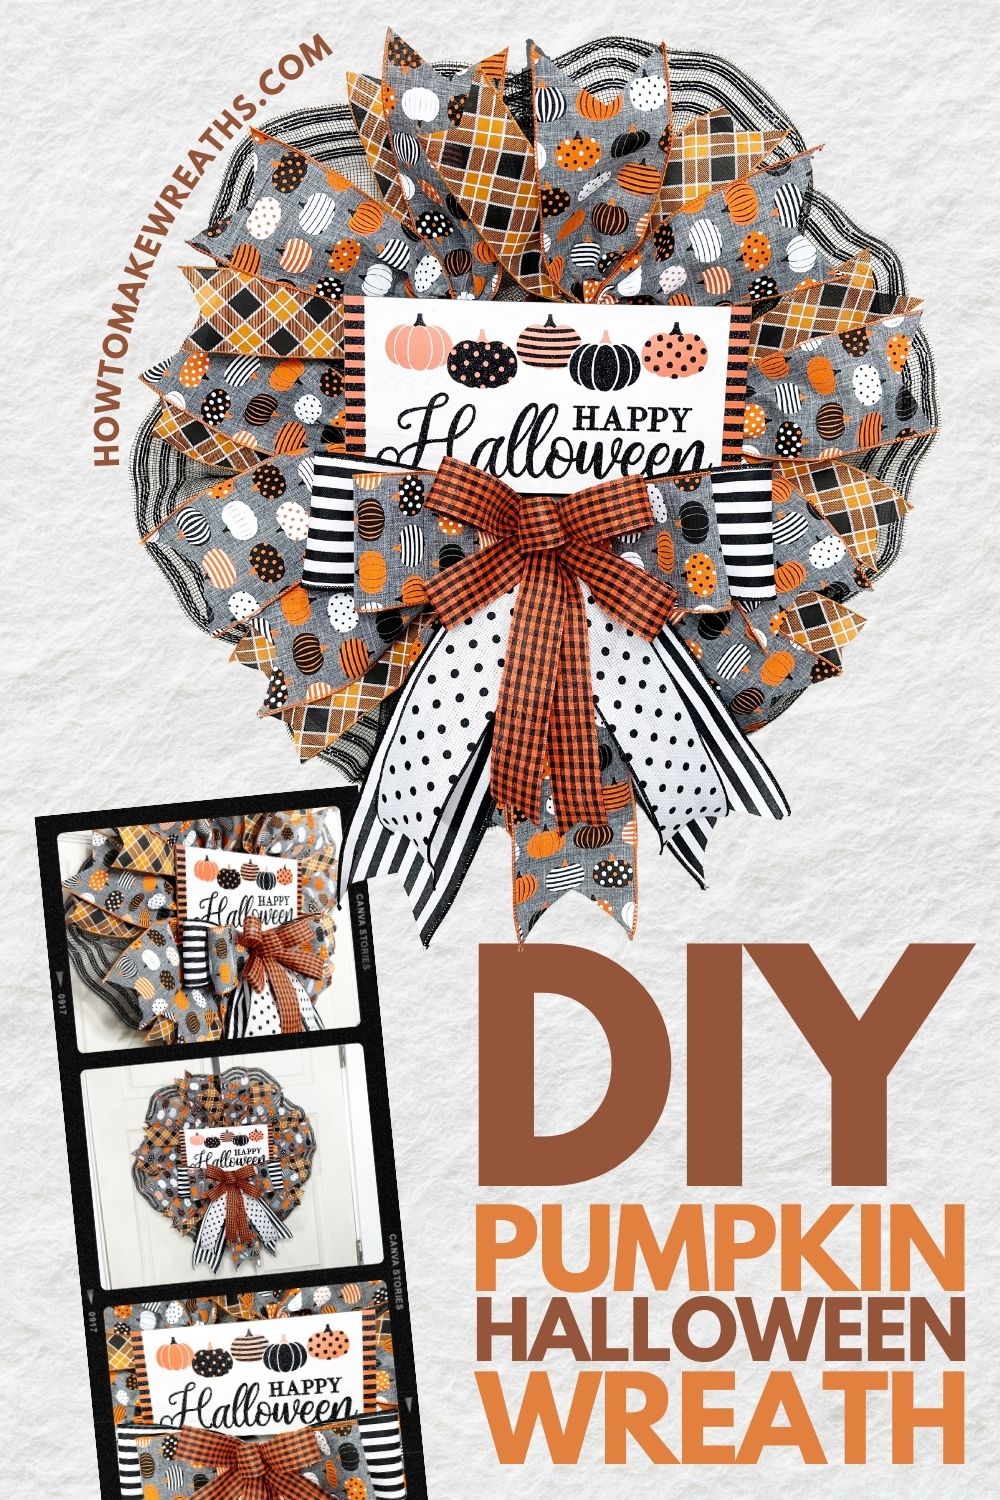
How to Make a Thin Pumpkin Halloween Wreath
You can use this how to tutorial beyond Halloween too! Just follow the instructions using ribbon, mesh, and a wreath sign that match another season or holiday.
That’s the beauty of any of the tutorials on How to Make Wreaths, you don’t have to married to the specific patterns, colors, or even florals!
Get creative and come up with your own final design.


Supplies
- 10 inch Pancake frame
- 6×12 wooden sign
- 10 inch black border stripe mesh
- 4 inch pumpkin mesh, RGC170610
- 2.5 inch mesh, RGC197220
- 4 inch black and white stripe, RGC156402
- 2.5 inch white with black polka dot, RGA105727
- 1.5 inch black and orange gingham, RGA1211P2
- 9 Pipe cleaners

Thin Pumpkin Themed Halloween Wreath
Materials
- 1 10" Pancake frame
- 1 6×12 wooden sign
- 1 10" black border stripe mesh
- 1 4" pumpkin ribbon RGC170610
- 1 2.5" mesh RGC197220
- 1 4" black and white stripe ribbon RGC156402
- 1 2.5" white with black polka dot ribbon RGA105727
- 1 1.5" black and orange gingham ribbon RGA1211P2
- 9 Pipe cleaners
Instructions
Prep your base.
- Start with a 10” pancake frame.
- Add 6 pipe cleaners to the outside of the frame.
- Take a 10” mesh and cut 6 pieces.
- Take the mesh and make ruffles by pinching the middle together.
- Add the ruffle to the pancake frame using the pipe cleaners.
Cut and add your ribbons.
- Take 4” ribbon and cut 6 pieces
- Dovetail the ends.
- Take 2.5” ribbon and cut 6 pieces
- Dovetail the ends.
- Layer the 4” ribbon on top of the 2.5” ribbon.
- Take the ribbon and add it to the ruffles using the pipe cleaners.
- Fluff out the ribbon.
Make your bow.
- Take 2 ribbons and make a bow with 2 loops each.
- Take 1 ribbon and cut a piece for a ribbon tail.
- Take 1 ribbon and make a bow with 5 loops.
- Layer your tale and bows.
- Secure your bows and tale with a pipe cleaner.
- Dovetail the ends.
- Fluff out your bow.
Add your sign.
- Take your wooden sign and staple 2 pipe cleaners to the back of it.
- Add your sign to the top center of the design using the pipe cleaners.
Add your bow.
- Add your bow to the bottom center of the design using a pipe cleaner.
Video