
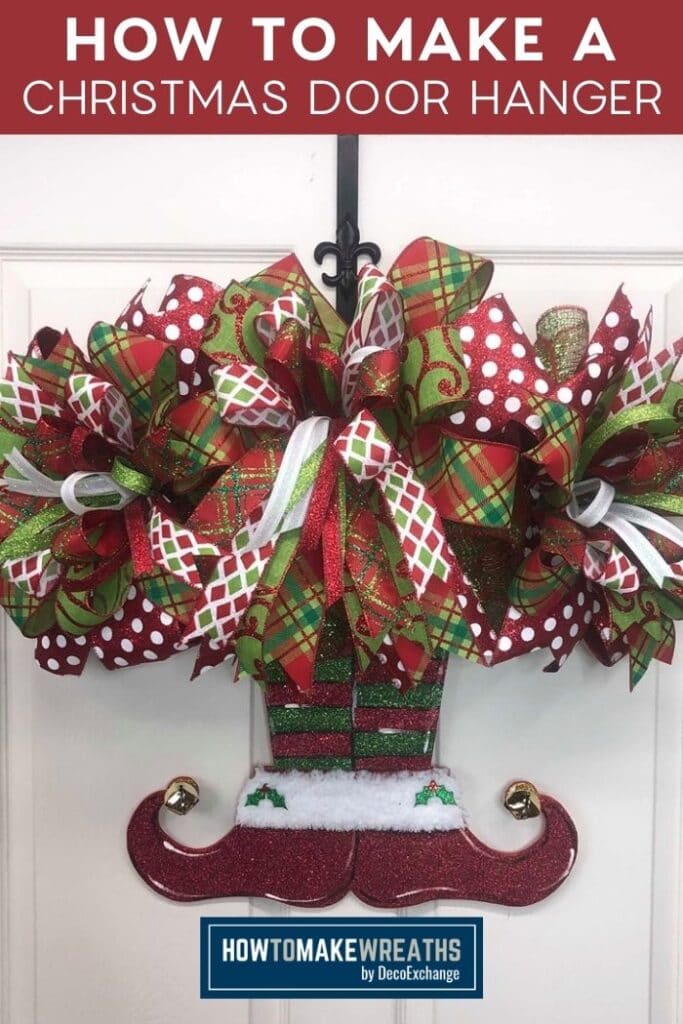
If you haven’t seen holiday wreaths everywhere you go yet, you will soon. That means it’s time to start building up your own inventory with easy-to-make items like this elf door hanger. Learn how to make this Christmas door hanger so you can get ready for those holiday sales quickly!
Y’all, if you’re a crafter then you know that craft show season and the Christmas seasons are upon us! If you’re new to this business, one of the first things you’ll learn is that this is our busiest time of year.
Know what you need for a busy holiday season? Christmas projects that take less than 30 minutes to complete and retail for over $100.00! This DIY Christmas door hanger fits the bill and you can sell it, gift it as a Christmas gift to friends or neighbors, or just keep it for your own door.
These elf boots are so fun and festive that everyone is sure to love them!
Complete your Christmas decor with a DIY Christmas Wreath, some Chandelier Christmas Decor, and a simple Christmas Centerpiece.
How To Make A Christmas Door Hanger
This do-it-yourself Christmas Elf door hanger is actually pretty easy to make and takes only a few supplies.
Check Out The Full Video Tutorial
I show you the entire step-by-step process in this video. It should make it so that you can quickly and easily replicate the process yourself. Feel free to watch it or join in and do it with me!
DIY Christmas Boot Door Hanger Supply & Tool List
- Elf Legs Door Hanger
- 1 roll of 10″ deco mesh
- 15 pipe cleaners or tinsel ties
- Cutting mat
- Rotary cutter
- EZ Bow Maker (If you need more help on making bows, check our EZ Bow Tutorials)
- A glue gun and hot glue.
- Scissors
For my bows I used the following ribbons:
- (1) 4″ Christmas ribbon
- (2) 2.5″ Christmas ribbon
- (2) 1.5″ Christmas ribbons
- (3) 5/8″ Christmas Ribbon
Christmas Door Hanger Instructions
This process is simple. Just follow these steps to decorate your door!
Step 1
Start by adding 9 pipe cleaners to the top of the door hanger. 5 should go across the top and 4 across the bottom.
Step 2
Hot glue the pipe cleaners in place.
Step 3
Take your 10″ mesh and cut 9 strips (using your rotary cutter), 18 inches long.
Step 4
Take one of the 18″ strips, roll the ends of each inside once or twice and then ruffle the mesh.
Add your first ruffle into a pipe cleaner on the frame.
Step 5
Now, create one normal wreath bow for the top center of your door hanger and attach it to the door hanger.
Step 6
Then, create two Terri-bows for each side of your door hanger and attach.
Step 7
Once your bows are attached its time to fluff out of the bows to make sure you have the best coverage. Trim and dovetail your ribbon tails on each bow.
Hang the door hanger on your front door and enjoy or list it for sale! (Before you list it for sale, make sure you’ve gone over our free tips to increase your picture quality!)
FAQs
Every craft has the potential to cause you to ask questions. If you have questions about this project, check below to see if the answer is below.
Can I find blank elf legs to decorate myself?
You sure can! You can buy these legs painted as you see in this project, or you can buy a pair unpainted by shopping at (Crafty Tessie on Etsy). Add your own twist to it to create a new look!
How do you hang a door hanger?
If you want to hang your completed door hanger on your door, you’ll need to gather a 3M Command Hook, fishing line, and your scissors. Are you ready for this? It’s going to blow your mind!
Put the Command Hook on the back of your door (or the INSIDE of your front door). Tie fishing line to the back of your decorative door hanger, then bring the fishing line up above the top of the door and tie it to your Command Hook.
Voila! A super easy way to hang your door hanger!
How To Paint Your Own Christmas Door Hanger
If you want to buy a blank elf legs door hanger so you can paint it yourself, watch our friend from Crafty Tessie teach you how to paint the blank Elf Legs.
https://www.facebook.com/craftytessiecreations/videos/416490862384748/
That’s it y’all! You can make this incredible DIY Christmas Elf Leg Door Hanger in less than 30 minutes or if you’re not the crafty type you can buy this one on Etsy!
If you love Christmas wreath designs, check out our other popular designs:
- Grapevine Christmas Pine Wreath
- Christmas Glitter Bow by Hand
- DIY Christmas Wrapped Candy Cane Wreath
- How to Make a Christmas Wreath With The UITC Triangle Board
- How To Make DIY Christmas Wreath With Vintage Santa
As always, feel free to leave us a comment below or share this post with a friend. We appreciate getting your feedback and can’t wait to provide y’all with more amazing content!
If you need any help with bow-making, wreath-making, or crafting in general, be sure to check out more of our tutorials on How to Make Wreaths.
Share your Christmas-themed wreaths with us over at the How To Make Wreaths Facebook Group. We’d love to see all your creations!
If you’re interested in more info on learning how to make wreaths, where to buy supplies, and being in a community of like-minded crafters, check out our Creative Coaching Subscription Group.


Elf Legs Christmas Door Hanger
Materials
Instructions
- Start by adding 9 pipe cleaners to the top of the door hanger. Put 5 across the top and 4 across the bottom.
- Use hot glue to secure the pipe cleaners in place.
- Cut 9 strips 18" long out of your 10″ mesh
- Take one of the 18″ strips, roll the ends of each inside once or twice and then ruffle the mesh. Add your first ruffle into a pipe cleaner on the frame.
- Now create one normal wreath bow for the top center of your door hanger and attach it to the door hanger.
- Now create two Terri-bows for each side of your door hanger and attach.
- Fluff out your bows and trim and dovetail the ribbon tails on each bow.
Just pin this Christmas door hanger tutorial to save these easy to follow instructions for later!

If you’re a dog lover or know someone who is, check out our Support Dog Rescue t-shirts and click on the picture below!


I love watching you
Beautiful. Do u make Xmas tree door hangers out of ribbon
You can.