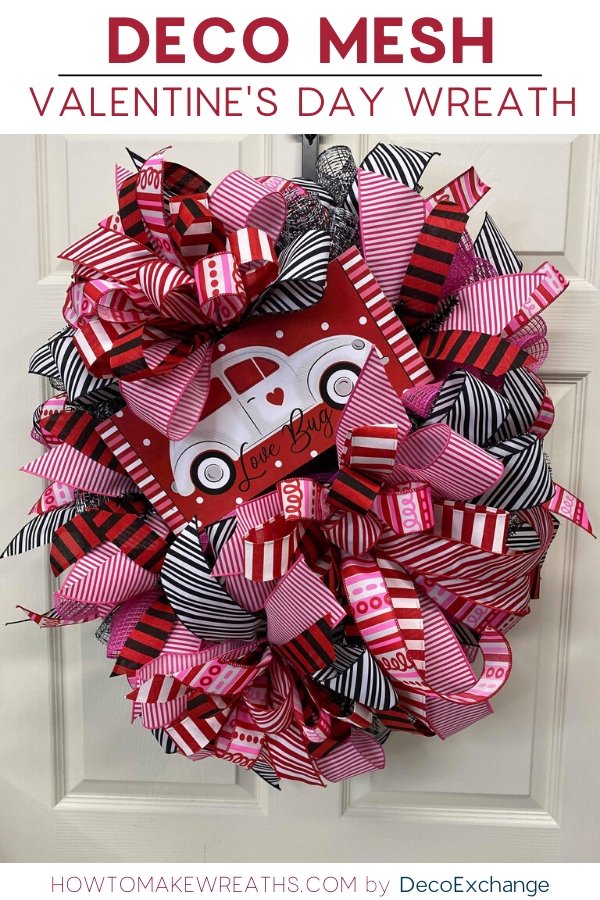
Hey y’all we are all sold out of our Valentine’s Day wreath kits featured in this post, but that don’t mean a thing when you can put together all the supplies. You know we love our video tutorials! Today’s creation is a deco mesh Valentine’s Day wreath with a cute sign attached.
We’ve shared a couple of Valentine’s designs recently and each one is unique. Some would think one tutorial would be good enough, but you know better, right? When you see how a few tweaks create an entirely different look it makes watching all of them worthwhile.
Placement, materials, attachments, and bows can take you through so many different variations. Retro, classy, vintage, quirky, so many different possibilities!
How to Make a Deco Mesh Valentine’s Day Wreath
When you’re picking out your ribbons for this deco mesh wreath I don’t want you to overthink it. All I care is that the ribbon matches my sign. That’s it. I don’t care about patterns, materials. So, no matter what theme you plan on creating just keep that in mind.

How to Use a Circle Wreath Frame for an Oval Wreath Design
In this tutorial, we did something a little different. Y’all, if you’ve ever tried to buy an oval frame, they’re super expensive. So no reason to do that when we can make our own like a
normal oval frame starts at around $10. All right?
Press your circle wreath frame down to create an oval shape. Note: Usually the outside ring will break, but the two inner rings will still hold so it won’t matter y’all.

Poly Burlap Deco Mesh Valentine’s Day Wreath
Materials
Instructions
How to Prepare Your Wreath Sign
- Glue (4) 1" mounting squares to the back of the wreath sign.
- Add a little more glue around the mounting squares to ensure they it'll stick no matter what.
- Allow to dry, while you start assembling your wreath.
How to Assemble Your Deco Mesh Valentine's Wreath
- Cut each style of Poly Burlap Deco Mesh into (9) 36" strips
- Fluff out your wreath frame.
- Make a ruffle by taking the two ends of a mesh strip and curl them inward a few times and then scrunch them down the middle.
- Attach the ruffles to the wreath frame as tight as possible, alternating between the two patterns.
How to Secure a Wreath Sign to Your Wreath
At this point, the super glue should be dry on your attachment sign. You can now add pipe cleaners to the back of the sign using the mounting squares. Now you can secure the sign to the wreath using the attached pipe cleaners.
For other options to secure your wreath sign, check out Easy Ways to Attach a Sign to a Wreath.

Crafting Your Bows for the Deco Mesh Valentine’s Wreath
It’s time to grab your EZ Bow Maker y’all!
You’ll be creating 3 different bows for this design – two large and one smaller basic bow.
Crafting Your Bows for the Deco Mesh Valentine's Wreath
Materials
Instructions
Large Bow Terri Bow
- We're going to start with a little bit longer tail. So this one is about a 13" long.
- For the first (2) loops, we're going to measure out 7" using the 2.5" ribbon on both sides.
- Next, we'll do a single loop on both sides with a different 2.5" ribbon style.
- Add, a tail using the same ribbon you used in step #3.
- Repeat step #2 using 1.5" ribbon.
- Repeat step #3 using another 1.5" ribbon
- Create a center loop using a different 1.5" ribbon
- Remove from EZ Bow Maker and tightly wrap with a pipe cleaner.
- Secure to wreath using the remaining slack on pipe cleaner.
Basic Bow
- Start with a 7" long.
- Single loop on each side, we're going to measure out 6" using the 2.5" ribbon.
- Repeat step #1 with a different 2.5" ribbon style.
- Repeat step #1 using 1.5" ribbon.
- Repeat step #1 with a different 1.5" ribbon style.
- Repeat step #1 with a different 1.5" ribbon style.
- Remove from EZ Bow Maker and tightly wrap with a pipe cleaner.
- Secure to wreath using the remaining slack on pipe cleaner.
- Make sure to fluff out your bows!
How to Add Ribbon Tails
- Using (1) 2.5" and (1) 1.5" ribbons into 14" strips of ribbon.
- Cut the ends at an angle.
- Lay two different ribbon styles on top of the other and attach to each wreath form tie.
That’s it y’all! We’re done. We can’t wait to see your creations! Make sure to share your photos over at How to Make Wreaths Facebook group. And show us some love in the comments below. If you are interested in more info on the private community mentioned in the video head over to Creative Coaching Subscription Group.
We think you’ll love these posts too!