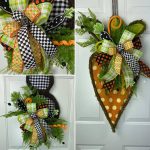
Need to freshen up your spring door decor selection? These spring door hangers are super quick to make so they can easily fill in the gaps of your spring supply.

Hey guys, it’s time to make your spring door hanger – or beef up your spring door decor for coming sales.
To do that, we’re going to do an easy DIY project together. These spring door hangers are so simple that we were able to make two in less than 25 minutes. Now that’s quick!
Tip: We have a ton of Spring themed goodies over at DecoExchange if you need any.
Keep in mind that you can use the video tutorial as a guide for making similar products that work for all seasons. It’s very easy to replace the carrot and bunny base we use in this post with other seasonal bases to get an entirely “new” seasonal door hanger.
Don’t forget to change out the ribbon patterns and colors to match your new bases, and VOILA! Quick and easy seasonal decor that you can make to keep or make to sell.

Supplies Needed To Make This Spring Door Decor
This list contains everything you’ll need in order to make this project as well as helpful links to make finding what you need quick and easy.
- Base or form (in this case we used a carrot and bunny base)
- Ribbons
- Greenery
- Wreath attachment/sign
- Pipe cleaners
- EZ Bow Maker
Watch The Video Tutorial
If you learn best by watching rather than reading instructions, this tutorial is for you! I’ll take you step by step. Scroll to the end of the post to see the video.
Don’t worry- if you prefer to follow along with written instructions, you can find those below.
How To Make Spring Door Decor Hangers
There may be several steps involved, but that’s just because I’ve broken it down so much for you. You’ll fly through these steps and have your spring decor ready to enjoy in just minutes.
Step 1
Using the EZ Bow Maker, start with a 12″ tail, you can always trim that back later.
Step 2
Make your bows loops approximately 5 ½”.
Step 3
Building your next layer on top. Make your tails the same length, but make 2 loops (for each side) that are about 4½ inches.
Step 4
Add another layer on top. The tails will still be 12″, but make 1 loop (for each side) that are about 3½ inches.
Step 5
Create your center loop (about 3 inches) with a 12″ tail.
Step 6
Pull your ribbon off of the EZ Bow Maker and secure it with a pipe cleaner.
Step 7
Take your greenery and cut it apart so that you can layer the pieces on top of each other.
Step 8
Take the greenery bush you just layered and secure the pieces together with a zip tie.
Step 9
Put the greenery on top of your base then top it with your bow. Use the pipe cleaner of your bow to attach both pieces to your base.
Step 10
Bend any long wired stems so they hide under bundle of greenery and ribbon. Spread out your arrangement and fluff your bow, then dovetail the tails.

Did you notice from the video that it took us less than 25 minutes to make both Spring door hangers?
I’ll probably list these for $100 a piece. I’ll let you do the math, but that’s not bad for 22 minutes of work. Of course, minus the cost of materials, but still that’s worth it!
Seasonal Door Hanger: Perfect For Spring!
Aren’t these spring door decor hangers adorable? If you love spring decor, check out this Spring Chick Wreath or this Spring Bike Wheel Wreath too!
We would love to see your Spring themed wreaths, door hangers, and more! Please share with us over at the How To Make Wreaths Facebook Group.
If you are interested in more info on learning how to make wreaths, where to buy supplies, and being in a community of like-minded crafters, check out our Creative Coaching Subscription Group.
Don’t miss these posts too!
Spring Door Decor Hangers
Equipment
Materials
- 2 Base or form (in this case, we used a carrot and bunny base)
- Wired ribbon
- Greenery sprays
- Wreath sign
- Pipe cleaners
Instructions
- Use your EZ Bow Maker to make a 12″ tail. Don't worry, you can always trim that back later if you want.
- Create 1 bow loop (for each side) that are 5½ inches.
- Start building your next layer. Make your tails the same length, but make 2 loops (for each side) that are a little smaller (around 4½ inches).
- Make one more layer. The tails will be the same length, but make 1 loop (for each side) that are a little smaller (around 3½ inches).
- Create your center loop (about 3 inches) with the same length tail.
- Pull your ribbon off of the EZ Bow Maker and secure it with a pipe cleaner.
- Take your greenery and cut the stems apart so you can layer the pieces on each other.
- Take the greenery bush you just layered and secure the pieces together with a zip tie.
- Put the greenery on top of your base and add your bow on top. Use the pipe cleaner of your bow to attach both pieces to your base.
- Bend any long wired stems so they are hidden under bundle. Spread out your arrangement and fluff your bow and dovetail the tails.
Video
Just pin this quick and easy spring door hanger tutorial below to find the instructions later!


