
Want to craft your own bows for Christmas? Whether it’s for presents or the Christmas tree these 6 different bow styles are GORGEOUS!
Jordan from Designs by Jordan are stunning and he walks us through how to make every single one in the video tutorial. He also shows a few examples on how you can use them beyond presents.

What are the different ways I can use bows for Christmas?
Outside of the obvious, on Christmas presents. You can also use Christmas bows for:
- Wreaths
- Door hangers
- Decorative lanterns
- Christmas trees
- Centerpieces
- Garlands
The difference between full bows and half bows
All the full bows have balanced bows, so there are equal number of loops on each side of its center. Half bows, on the other hand, have single loops on top and tails at the bottom.
Half bows work great scattered on a Christmas tree, while a larger bow like the 10-ribbon bow works best as a tree topper bow.

Tips for Making a Ribbon Bow
Always keep the prettier side facing forward. Twist your ribbon during the bow making process to ensure that the finished side is on top.
Use wired ribbon so you can curl or shape tails and loops.
When using a bow maker to help you, build your bow from the bottom layer to the top. Hand bows, you’ll start from the top to the bottom layer.
To perk up your bows, use a zip tie to secure the layers together instead of a pipe cleaner.

How to Make Beautiful Bows for Christmas
Equipment
- 1 Pair of scissors
- Zip ties
- Pipe cleaners
Materials
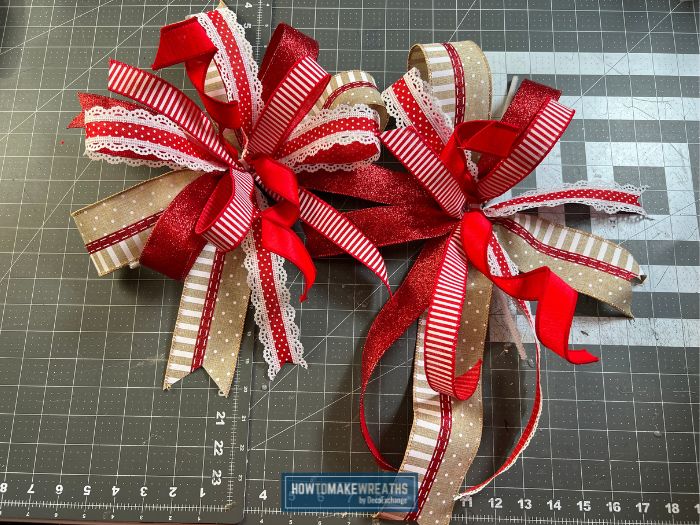
Bow #1 and Bow #2: Gingerbread Inspired Bows
- 1 2.5" Wired Ribbon
- 1 7/8" Wired Ribbon
- 2 1.5" Wired Ribbon different styles
- 1 1" Wired Ribbon
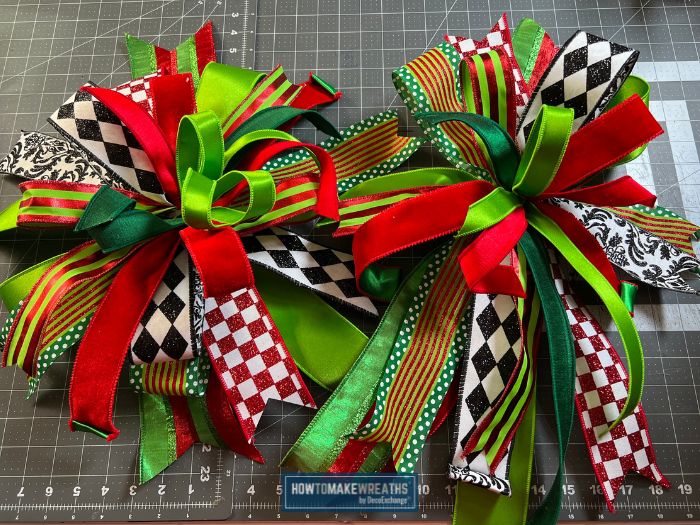
Bow #3 & Bow #4: Mixed Pattern Christmas Bow
- 2 2.5" Wired Ribbons different styles
- 2 1.5" Wired Ribbons different styles
- 1 1" Wired Ribbon
Bow #5 and Bow #6: 10-Ribbon Bow
- 1 4" Wired Ribbons
- 4 2.5" Wired Ribbons
- 2 1.5" Wired Ribbons
- 3 1" Wired Ribbon
Instructions
Bow #1: Gingerbread Inspired Bow
- Start by taking the 1" wired ribbon and cutting a 19" piece.
- Pinch the middle of the ribbon and make the sides curl.
- Take 7/8" wired measure out 9" tail.
- Create (1) 11" loop on each side.
- End with a 9" tail.
- Next, add your first 1.5" wired ribbon behind the 7/8' curl you created.
- Make (1) 12" loop and 9" tail on each side.
- Using the next 1.5" wired ribbon behind the previous ribbon, create (1) 12" loop and 9" tail on each side.
- Last up is the 2.5", again placing behind the last set. We're working from top to bottom versus bottom to top if you were using a bow maker.
- Create (1) 13" loop and 9" tail on each side.
- Add a pipe cleaner to the back and zip tie all the layers together.
- Dovetail the ends.
- Fluff out your bow.
Christmas Bow #2: Gingerbread Inspired Half Bow (All the tails on the bottom and loops on the top)
- Start by taking the 1" wired ribbon and cutting a 19" piece.
- Pinch the middle of the ribbon and make the sides curl.
- Take 7/8" wired measure out 9" tail pointed downward.
- Create (1) 11" loop pointed upward
- Next, add your first 1.5" wired ribbon behind the 7/8' curl you created.
- Make (1) 12" loop and (2) 9" tail on the opposite side.
- Using the next 1.5" wired ribbon behind the previous ribbon, create (1) 13" loop and (2) 9" tail on the opposite side.
- Last up is the 2.5", again placing behind the last set.
- Create (1) 13" loop and 9" tail on the opposite side.
- Add a pipe cleaner to the back and zip tie all the layers together.
- Dovetail the ends.
- Fluff out your bow.
Christmas Bow #3: Mixed Patterns
- Starting with the 1" wired ribbon create a 9" tail, pinch and make a 10" loop.
- Repeat on the opposite side.
- Next add the first 1.5" wired ribbon under the first layer.
- Create a 9" tail, pinch and make a 11" loop.
- Repeat on the opposite side.
- Next add the second 1.5" wired ribbon under the last layer.
- Create a 9" tail, pinch and make a 11" loop.
- Repeat on the opposite side.
- Next add the first 2.5" wired ribbon under the previous layer.
- Create a 9" tail, pinch and make a 12" loop.
- Repeat on the opposite side.
- Lastly add the second 2.5" wired ribbon under the previous layer.
- Create a 9" tail, pinch and make a 12" loop.
- Repeat on the opposite side.
- Add a pipe cleaner to the back.
- Position all your tails in place.
- Secure your bows and pipe cleaner with a zip tie.
- Dovetail the ends.
- Fluff out your bow.
Christmas Bow #4: Mixed Patterns Half Bow
- Start by taking the 1" wired ribbon and cutting a 19" piece.
- Pinch the middle of the ribbon and make the sides curl.
- Next add the first 1.5" wired ribbon under the first layer.
- Create a 9" tail, pinch and make a 10" loop, and finish with another 9" tail. Keep all tails pointing downward and loops pointing up.
- Then add the second 1.5" wired ribbon under the last layer.
- Create a 9" tail, pinch and make a 11" loop, and finish with another 9" tail. Keep all tails pointing downward and loops pointing up.
- Next add the first 2.5" wired ribbon under the last layer.
- Create a 9" tail, pinch and make a 12" loop, and finish with another 9" tail. Keep all tails pointing downward and loops pointing up.
- Finally, add the second 2.5" wired ribbon under the last layer.
- Create a 9" tail, pinch and make a 13" loop, and finish with another 9" tail. Keep all tails pointing downward and loops pointing up.
- Secure your bows and pipe cleaner with a zip tie.
- Dovetail the ends.
- Position 2 tails to left, 2 tails to the right, and 4 pointing down.
- Fluff out your bow.
Christmas Bow #5 – 10 Ribbon Bow
- Start with the first 1" wired ribbon creating (2) 5" loops and (2) 10" tails.
- Keep the tails and loops on opposing sides, creating an X shape.
- Next add the second 1" wired ribbon creating (2) 10" tails.
- Repeat with the third 1" wired ribbon.
- Curl the ribbon tails.
- Now, layer in your first 1.5" wired ribbon, creating (2) 11" loops and (2) 10" tails.
- Next, repeat with second 1.5" wired ribbon.
- Now, add your first 2.5" wired ribbon, creating (2) 12" loops and (2) 10" tails.
- Next, add (2) 10" ribbon tails using the second 2.5" wired ribbon.
- Next, add your 3rd 2.5" wired ribbon, creating (2) 13" loops and (2) 10" tails.
- Then add your 4th 2.5" wired ribbon, creating (2) 14" loops and (2) 10" tails.
- Lastly, using the 4" wired ribbon create a tail.
- Layer your bows and tails.
- Add a pipe cleaner to the back.
- Secure your bows and tails and pipe cleaner with a zip tie.
- Dovetail the ends.
- Fluff out your bow.
Christmas Bow #6 – 10 Ribbon Half Bow
- Start with the first 1" wired ribbon creating (1) 10" loop and (2) 10" tails.
- Next add the second 1" wired ribbon creating (2) 10" tails.
- Repeat with the third 1" wired ribbon.
- Curl the ribbon tails.
- Now, layer in your first 1.5" wired ribbon, creating (1) 11" loops and (2) 10" tails.
- Next, add the second 1.5" wired ribbon, creating (1) 12" loops and (2) 10" tails.
- Now, add your first 2.5" wired ribbon, creating (1) 13" loops and (2) 10" tails.
- Next, add (2) 10" ribbon tails using the second 2.5" wired ribbon.
- Next, add your 3rd 2.5" wired ribbon, creating (2) 14" loops and (2) 10" tails.
- Then add your 4th 2.5" wired ribbon, creating (2) 14" loops and (2) 10" tails.
- Lastly, using the 4" wired ribbon create a tail.
- Layer your bows and tails.
- Add a pipe cleaner to the back.
- Secure your bows and tails and pipe cleaner with a zip tie.
- Dovetail the ends.
- Fluff out your bow.
Video


Just love this tutorial by Jordan he makes such beautiful bows and his teaching methods are very easy to follow 😊