
Christmas may only come once a year, but you can make Christmas wreaths all year long! Today, I’m showing you how to turn a non-Christmas dog sign into a beautiful dog Christmas wreath!
Hey, y’all! I just love dogs (and so do a lot of our customers) so I work them into my wreath designs from time to time.
Take my Live Love Rescue wreath, for example.
This time, I had some fun Christmas dog paws that I just knew I needed to use on a wreath.
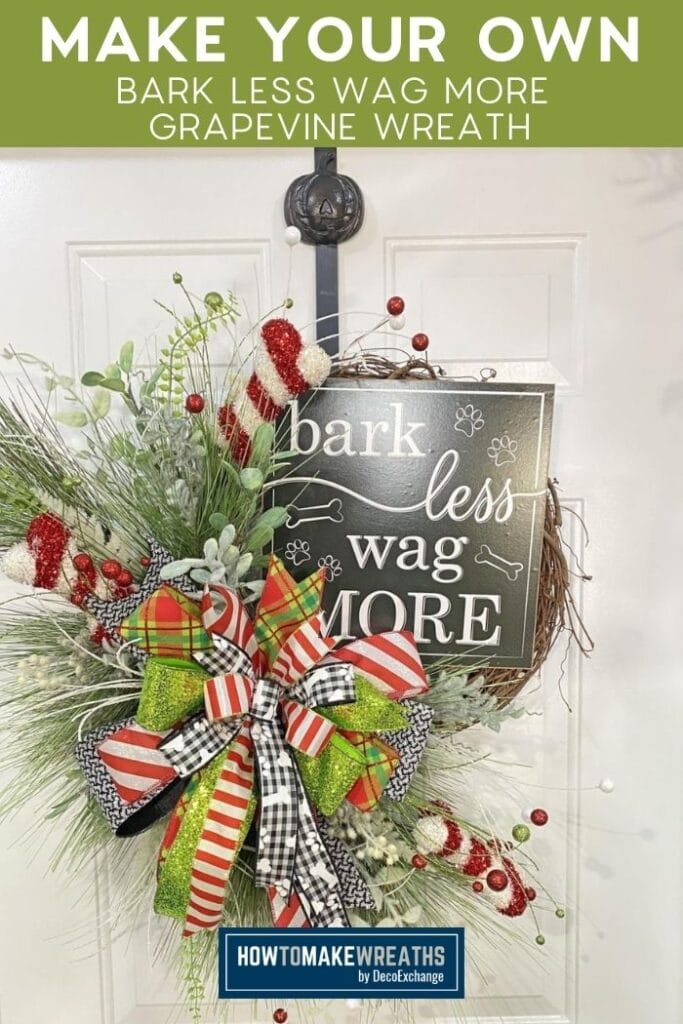
You’ll notice that the sign I use says “Bark Less, Wag More” and it’s not even remotely Christmas-y. But, hey, that’s ok! Because today, I’m showing you how to take a non-Christmas item like this fun sign and create a dog Christmas wreath with it. Prepare to be amazed!
Bark Less Wag More Dog Christmas Wreath Tutorial
In the video below, I show you step-by-step how to make a fabulous dog paw wreath that’s perfect for Christmas. Using beautiful ribbons, deco mesh, and a really cute sign, I make a Christmas creation that is perfect for any front door (and will fly off your shelves)!
Supplies Needed:
- 1 16” grapevine
- 1 Bark Less Wag More (12”x12”) sign
- Pipe cleaners
- 1- 4” ribbon
- 3- 2.5” ribbon
- 2- 1.5” ribbon
- 3 pine greenery sprays
- 3 greenery sprays
- Christmas dog bone spray
- Candy cane spray
- Stem cutter
- Scissors
- Bolt cutters
How to Make Your Dog Christmas Wreath
Follow these step-by-step instructions to make your own beautiful Christmas dog wreath.
Step 1
Take your sign and staple 2 pipe cleaners to opposite corners of the back of your sign. Add a dab of hot glue to secure them.
Step 2
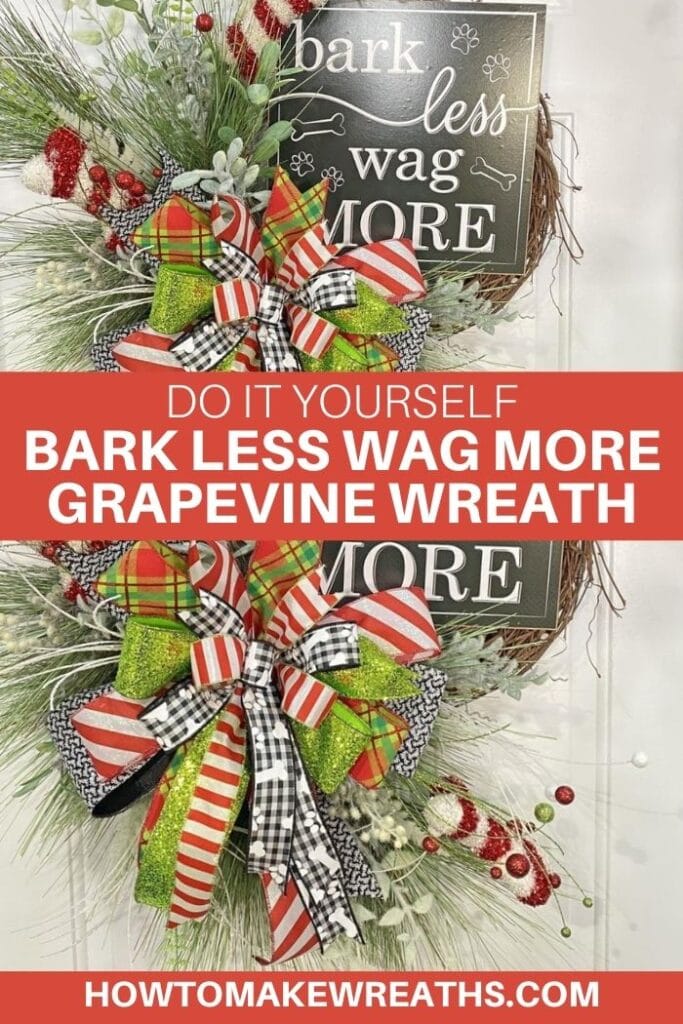
Take your 3” ribbon and make a 7-inch loop. Twist your ribbon and cut the tail.
Step 3
Take one of the 2.5” ribbons and make a 7” loop. Twist your ribbon and cut the tail.
Step 4
Repeat the process with your second 2.5” ribbon.
Step 5
Repeat the process again with your third 2.5” ribbon.
Step 6
Take your first 1.5” ribbon and add another 7” loop.
Step 7
Repeat with your second 1.5” ribbon.
Step 8
Take your first 1.5” ribbon and make a center loop.
Step 9
Twist 2 pipe cleaners together (because this bow is really big), wrap it through the middle of your bow and twist it tightly and tie it off in the back of your bow.
Step 10
Using the pipe cleaners on the back, attach the sign to your grapevine wreath.
Step 11
Take your pine sprays and trim off some of the stem. Take your first pine and work the stem into the bottom area of the grapevine. Repeat with the second pine spray.
Step 12
Add your third pine spray from the middle/top of the grapevine. Add a drop of hot glue to secure the sprays.
Step 13
Take your bow and attach it in the center where your pine sprays come together with the pipe cleaners.
Step 14
Trim the tails on your bow and dovetail them.
Step 15
Take your other greenery spray and break it apart. Trim the stems, if needed, add a drop of hot glue to the end of the stem and insert it to your design from the top of the grapevine.
Step 16
Repeat the process from the bottom and the side of the grapevine.
Step 17
Fluff out your ribbon and greenery.
Step 18
Take your Christmas dog bone spray and cut it to separate the bones. Using the same process as with the greenery, insert the stems of the bones in the grapevine from the top, bottom, and side.
Step 19
Take your candy cane spray and repeat the process.
Step 20
Trim off the excess length from the pipe cleaners in the back and tuck in the ends. Now your wreath is done!
I love Christmas crafting, y’all! With all the variety available, it just never gets old, and I love how festive it all is. I hope you love this dog Christmas wreath design!
More Christmas Wreaths You’ll Love
- Deco Mesh Elf Wreath
- Burlap Snowman Wreath
- DIY Christmas Wreath
- Vintage Santa Wreath
- Christmas pancake wreath
- Santa Stop Here Wreath
- Christmas Tree Shaped Door Hanger
- Christmas Grapevine Wreath
- DIY Poinsettia Wreath
If you need any help with centerpiece-making, bow-making, wreath-making, or crafting in general, be sure to check out more of our tutorials on How to Make Wreaths.
We would love to see your beautiful summer wreaths! Please share with us over at the How To Make Wreaths Facebook Group.


Bark Less Wag More Christmas Wreath
Equipment
- Stem Cutter
- Bolt Cutters
Materials
- 1 grapevine wreath
- 1 Bark Less Wag More (12”x12”) sign
- pipe cleaners
- 1 4" wired ribbon
- 3 2.5" wired ribbon
- 2 1.5 wired ribbon
- 6 greenery sprays
- Christmas Picks
Instructions
- Staple 2 pipe cleaners to two of the opposite corners of the back of your sign. Secure with a dab of hot glue.
- Grab your 3” ribbon and make a 7-inch loop. Twist off your ribbon and cut the tail.
- Pick your first 2.5” ribbon and make a 7” loop. Twist off and cut the tail.
- Pick your second 2.5" ribbon and repeat the process.
- Repeat the process one more time with your third 2.5” ribbon.
- Grab your first 1.5” ribbon and create a 7” loop on top of your bow.
- Repeat the process with your next 1.5” ribbon.
- Grab your first 1.5” ribbon again and use it to make a center loop.
- Since this bow is very big, twist TWO pipe cleaners together, wrap them through the middle of your bow and tie them off in the back of your bow by twisting tightly.
- Attach the sign to your grapevine wreath with the pipe cleaners you stapled to the sign.
- Take your pine sprays and trim the stem. Work the stem of your first pine spray into the bottom area of the grapevine. Repeat with the second pine spray.
- Do the same thing with your third pine spray but add it to the middle/top of the grapevine. Add a drop of hot glue to secure all the sprays.
- Attach your bow in the center where your pine spray stems meet using the pipe cleaners.
- Trim the tails on your bow and dovetail them.
- Take your other greenery sprays and cut the first one apart. Trim the stems, if needed, add a drop of hot glue to the end of the stem and insert one piece at a time to your design from the top of the grapevine.
- Repeat the process from the bottom and the side of the grapevine.
- Fluff out your greenery and ribbon.
- Take your Christmas dog bone spray and cut it to separate the bones. Using the same process as with the greenery, insert the stems of the bones in the grapevine from the top, bottom, and side.
- Take your candy cane spray and repeat the process.
- Trim off the excess length from the pipe cleaners in the back and tuck in the ends. Now your wreath is done!

