
Learn how to make a Proud Wife Military Wreath. This bright, patriotic wreath will look beautiful on any military household front door any time of the year.
Hey, Y’all! Today I’m showing you how to make a deco mesh military wreath that honors military wives who make huge sacrifices.
Military wives fill a HUGE (and often under-looked) role in running a military home. When their partners are away on tour, they manage the household, raise kids, and often work their own jobs entirely by themselves. And they do that all while praying that their spouse stays safe.
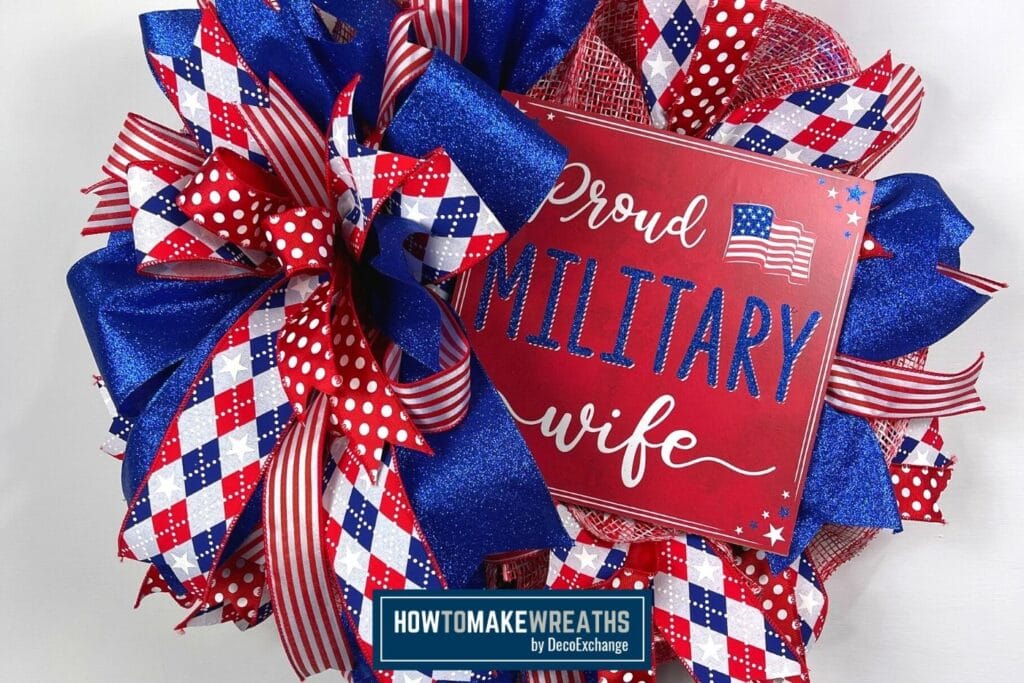
I wanted to pay tribute to those hard-working military wives, so I created this deco mesh military wreath design that I know you’re gonna love. It’s full of patriotic spirit with lots of red, white, and blue ruffles, curls, and ribbon tails.
Also be sure to check out our Red Top Hat Poof and Ruffle Wreath and God Bless America Patriotic Wreath!

Proud Wife Mesh Military Wreath DIY Supplies Needed
Here’s everything you need to make this beautiful patriotic wreath to show your support for hard-working military wives.
- Wire wreath base
- 18 strips of mesh 10-inches long
- 6 strips of mesh cut to 20-inches long
- Proud Military Wife sign
- Mounting squares
- Superglue
- Hot glue gun and hot glue
- Mesh cutter
- (2) 1.5” ribbons
- (1) 2” ribbon
- (1) 4” ribbons
- Pipe cleaners
- Ribbon tailboard
- EZ Bow Maker

CHECK OUT MORE DECO MESH WREATHS
How to Make a Military Wreath with Deco Mesh
Use these step-by-step instructions to put your wreath together.
Step 1
Take (2) 10-inch strips of mesh and roll them up into 2 separate curls. Take your 2 rolls and place one on top of the other in an “X” shape. Attach your “X” to the wreath base with one of the pipe cleaners on the outside of your base.
You’ll have 6 pairs of curls around the outside of your wreath.
Step 2
Take another 10-inch mesh strip and scrunch the middle to create a very simple ruffle. The strips are not long enough to curl first, so it’s just a ruffle.
Add one of these ruffles to each of your “X”s. Make sure to add it in the opposite direction so that it makes each “X” look really full.
Step 3
Take your first 20-inch mesh strip and repeat the same ruffle process. Attach it to the base with one of the inner pipe cleaners perpendicular to the outer ruffles.
If you attached your 10-inch ruffles vertically, like I did, attach these 20-inch ruffles horizontally so they’re perpendicular to the outer ruffles.
Step 4
Pair up your ribbons. I paired one 1.5” ribbon with my 4” ribbon and one 1.5” ribbon with my 2.5” ribbon.
Take your first 1.5” ribbon and use your ribbon tail board to cut (6) 14-inch strips. Repeat the same process with the other 3 ribbons. Go ahead and dovetail all the ends.
Step 5
Time to make our bow. We need 72” of each of our ribbons for the bow. Measure out 72” of each ribbon.
Step 6 – Start The Military Wreath Bow
Grab your EZ Bow Maker and 4” ribbon then measure 12” tails and 7” loops in an “X” shape.
Step 7
Take your first 1.5” ribbon and measure out 12” tails and 6.5” loops in an “X” shape. Repeat the process with the 2.5” ribbon but make the loops slightly smaller at 6”.
And finally, repeat the same process with your last 1.5” ribbon, making the loops 5.5”.
Step 8
You’ll have scraps leftover for each ribbon. One at a time, take 3 of your scraps and scrunch them off-center from the middle of the scrap. Add them to the top of your bow, folding the tail down toward the bottom of the bow. Alternate sides.
Step 9
Your final scrap will be your center bow. Grab a pipe cleaner and carefully pull your bow off the EZ Bow Maker. Wrap the pipe cleaner around the center of your bow and tighten with a twist.
Step 10 – Prepare the Proud Wife Military Wreath Sign
Grab your sign and prepare it to add to the wreath. Add a dab of superglue to all 4 corners of the back of the sign. Quickly put a mounting square on top of each dab of glue. Then take your hot glue gun and glue around the edges of each mounting square.
Once the glue is dry, add a pipe cleaner to each mounting square.
Step 11
Form pairs of ribbon tails. One at a time, take your ribbon tail pair, pinch it, and attach it all around the outside of your wreath frame using the same pipe cleaners you used for your ruffles. Alternate pairs all around the outside of the frame.
Step 12
Begin adding ribbon tail pairs around the inside of the frame. After you add each pair on the inside and twist the pipe cleaner, arrange the tails into an “X” shape.
Step 13
Your base is now done! Add your bow to the wreath to the top left portion of the frame. Trim the tails into a dovetail shape.
Step 14
It’s time to add our sign! Use the pipe cleaners you added to the back to attach the sign to your wreath base on the right side, tucked in around the bow.
Add a dab of hot glue to the edge of the sign and tap the nearest ribbon loop into the hot glue to make sure that the bow doesn’t block the writing on the sign.

Learn how to start, operate, and scale your creative business!
Get more info about business and creative coaching at The Makers University.
Make This Military Wreath For Your Door
Now your Deco Mesh Proud Wife Military Wreath is complete! Isn’t it full of patriotic colors?
If you love this patriotic wreath, you won’t want to miss our Patriotic Ice Cream Door Hanger, DIY Patriotic Deco Mesh Wreath, or Patriotic Red Bike Wheel!
If you need any help with centerpiece-making, bow-making, wreath-making, or crafting in general, be sure to check out more of our tutorials on How to Make Wreaths.
We would love to see your beautiful wreaths! Please share with us over at the How To Make Wreaths Facebook Group.
If you’re interested in more info on learning how to make wreaths or being in a community of like-minded crafters, check out our Creative Coaching Subscription Group.

Mesh Proud Wife Military Wreath
Materials
- 14.5 inch wire wreath frame
- 10" deco mesh cut into (18) 10" strips and (6) 20" strips
- wreath sign Proud Military Wife sign
- 1″ mounting squares
- super glue
- hot glue gun
- mesh cutter
- 2 1.5" wired ribbon
- 1 2.5" wired ribbon
- 1 4" wired ribbon
- pipe cleaners
- ribbon tailboard
- EZ Bow Maker
Instructions
- Take (2) 10-inch strips of mesh and roll them up into curls. Place one curl on top of the other in an “X” shape. Attach them to the outside of your wreath base with one of the pipe cleaners on the base. You’ll end up with 6 pairs of curls around the outside of your wreath.
- Create a very simple ruffle by scrunching another mesh strip in the middle without curling the ends. Add one of these ruffles in a vertical direction on top of each of your “X” curls so that it makes your curls look really full.
- Repeat the same ruffle process with your 20" strips of mesh, attaching each one to the base with one of the inner pipe cleaners in a perpendicular direction to the outer ruffles.
- Take your first 1.5” ribbon and use your ribbon tail board to cut (6) 14-inch strips. Do the same thing with the other 3 ribbons. Trim all the ends in a dovetail shape.
- Measure out and cut 72” of each ribbon.
- Grab your EZ Bow Maker and 4” ribbon. Measure out 12” tails and 7” loops and form them into an “X” shape.
- Measure out 12" tails and 6.5" loops with your first 1.5” ribbon in the same “X” shape. Repeat the process with the 2.5” ribbon but make the loops 6”.Repeat the same process one more time with your last 1.5” ribbon, making the loops slightly smaller at 5.5”.
- You’ll have scraps leftover from each ribbon. With your first 3 ribbon scraps, scrunch them off-center from the middle and add them to your bow, folding the tail down toward the bottom of the bow. Alternate sides for the ribbon tails.
- Use your final ribbon scrap as your center bow. Then grab a pipe cleaner. Carefully pull your bow off the EZ Bow Maker and twist on your pipe cleaner to secure your bow.
- Prepare your sign. Add a dab of superglue to all 4 corners of the back and quickly put a mounting square on top of each dab of glue. Add hot glue around all edges of each square to secure them in place.After the glue dries, attach a pipe cleaner to each mounting square.
- Take your ribbon tails and create pairs. One at a time, pinch a ribbon tail pair in the middle and attach it all around the outside of your wreath frame using the same pipe cleaners you used for your ruffles. Alternate ribbon tail pairs as you make your way around the frame.
- Next, add ribbon tail pairs to the inside of the frame. Arrange each of these tails into an “X” shape.
- Now it's time to add your bow to the wreath in the top left portion of the frame. Dovetail the tails.
- Attach your sign using the pipe cleaners you added to the back. Add your sign on the right side of the wreath, tucked into the bow.Prevent the bow from covering up the sign by adding a dab of hot glue to the edge of the sign and using it to glue any ribbon loop that might get in the way.
Video
Notes
Just pin this proud wife military wreath tutorial to save the instructions for next time!


Bought this kit, received April 3, 2021 and got the wrong QR code. I called office and got no help from the young girl that answered the phone. I found this video today which does not show the video I watch when i bought the kit.
The video can be found at the very end of the blog post together with the written tutorial. If you still need to get ahold of customer service, you can contact [email protected].