Learn how to make this lovely mesh magnolia door wreath. This is an easy project that comes together quickly and looks stunning on any door in your home.
Hey, y’all! You can’t go wrong with making any type of magnolia wreath. They look incredible anywhere you hang them (the front door, entryway, or even an empty wall) and are perfect to display any time of the year.
I don’t work with fresh flowers in my wreath designs. So, if I want to make a flower wreath, that means I’m using faux flowers. In the case of this design, I’m not using flowers at all! Instead, I’m using deco mesh to create a flower design.
And, it sells like hotcakes every time. 😉
Believe it or not, I sell everyday wreath designs all year long – even through the holidays. That’s why I need reliable everyday designs that I can make quickly and easily and always have on hand.
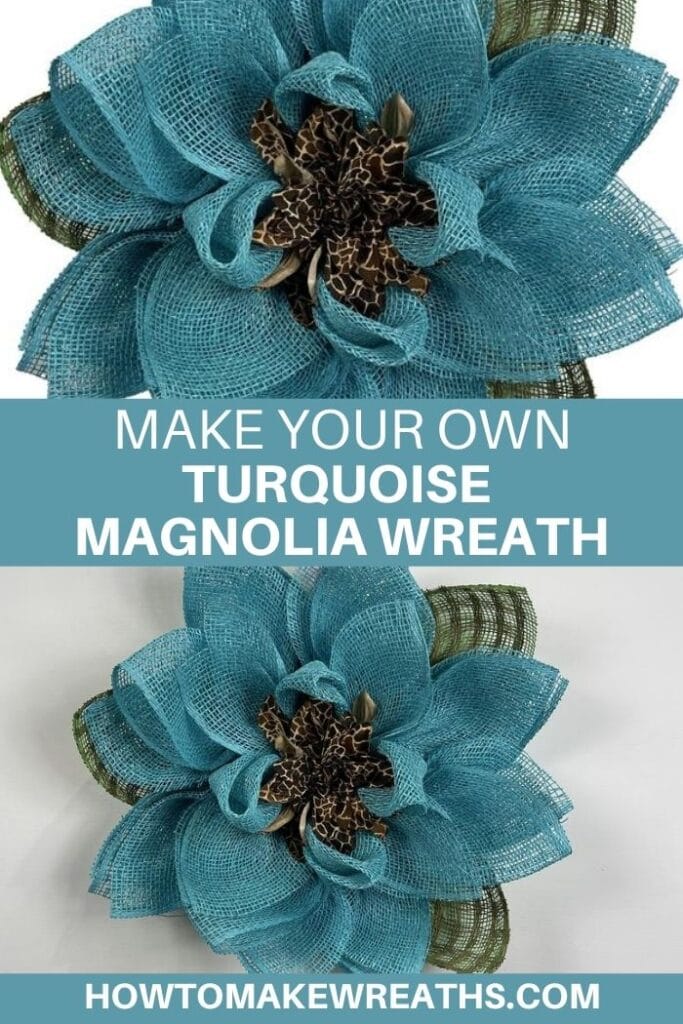
Say hello to my third magnolia wreath design: the turquoise magnolia mesh wreath!
First, I made a white magnolia wreath design. It was so popular that I made a red magnolia wreath. Both of these look incredible throughout the year.
Note: If you want a flower design specifically for the holiday season, check out my mesh poinsettia wreath design!
Ok, let’s get started making your next best-selling magnolia door wreath!

Make A Magnolia Wreath At Home
For this turquoise magnolia wreath, we will be making the same type of petals we made in our white Magnolia wreath. This design comes together fast, so it’s perfect for making multiples and keeping your inventory stocked.
Supplies Needed
- (8) 20” strips of turquoise mesh
- (8) 10” strips of turquoise mesh
- 8-inch zip ties
- (3) 8” strips of light green poly deco mesh
- (3) 8” strips of dark green poly deco mesh
- Animal print mum flower head
- UITC flower board
- Wood burning tool
How To DIY A Turquoise Magnolia Door Wreath
Follow along as I guide you through step-by-step on the process of making this beautiful magnolia wreath!
Note: I use the wood-burning tool to cut the mesh and seal it so that it doesn’t fray.
Step 1
Start by cutting (3) 8” strips of each of the green deco meshes. Then, use your wood-burning tool to cut each of those strips diagonally from corner to corner to create triangles.
Step 2
Next, we’re going to stack 2 triangles (one of each color) on top of each other.
Scrunch the wide end of the stacked triangles together, bringing the corners into the middle. Add them to our UITC flower board in a triangle shape on row 2 with a zip tie. Repeat for the remaining 2 stacks.
Step 3
Now we need to make our turquoise petals. Fold your first 20-inch strip in half.
Fold it in half again, diagonally, so it’s in a triangle shape. Follow the same scrunching process that you did for the green mesh and accordion the two sides together into the middle. Take the end and slide it in a zip tie starting with the outside ring first.
Secure your zip tie nice and tight. Repeat this process for every zip tie around the row of the board. Remember to cut off your excess zip ties as you go through the process of making your magnolia door wreath.
Step 4
It’s time to add your 10×10 mesh strips to the center.
You’ll make the same petal as above but this time you can cut out the initial step of folding the strip in half. Fold it diagonally into a triangle and scrunch the corners together into the middle.
Add your petal to one of the zip ties in the middle. Then, skip the cable tie beside that one and go add your next petal to the next zip tie.
Step 5
Now we need to make a smaller flower petal. Take a square and fold it in half corner to corner, just like before. Next, fold it again to be a small triangle. Bring the tips together on the long side to form an open shoe shape.
I like to close this open gap with a little hot glue and pinch it closed. Add your petal to one of the open zip ties you skipped. Keep repeating this step until all the open zip ties are filled.
Step 6
Add hot glue to the bottom of the animal print mum and secure it to the center of your petals. Hold it nice and tight with pressure while it is bonding.
Step 7
Give your flower a more textured and layered look by lifting your petals on the second row and pulling them forward. Pull the two layers of each petal apart a little. This really adds more dimension to your wreath.
Step 8
Find the top of your board (it has the most holes). Go ahead and add a pipe cleaner to make your hanger for your magnolia door wreath.
Make This DIY Design Today!
Isn’t that turquoise magnolia door wreath fun to make? I love what you can create even when you just use minimal supplies.
If you love this design, be sure to check out our other flower designs:
- Pink And White Flower Wreath
- Cow Flower Wreath
- Use The UITC Flower Board To Make A Mesh Flower Wreath
- DIY Sunflower Wreath
If you need any help with centerpiece-making, bow-making, wreath-making, or crafting in general, be sure to check out more of our tutorials on How to Make Wreaths.
We would love to see your beautiful wreaths! Please share with us over at the How To Make Wreaths Facebook Group.
If you’re interested in more info on learning how to make wreaths or being in a community of like-minded crafters, check out our Creative Coaching Subscription Group.


How To Make A Turquoise Magnolia Door Wreath
Materials
- 8 20" strips turquoise mesh
- 8 10" strips turquoise mesh
- zip ties
- 3 8" strips light green mesh
- 3 8" strips dark green mesh
- Animal print mum flower head
- UITC Flower Board
- wood burning tool
Instructions
- Cut (3) 8” strips of both green deco meshes. Use the wood-burning tool to cut each of those strips diagonally to create triangles.
- Next, we’re going to stack 2 triangles on top of each other. Bring the corners into the middle as you scrunch the wide end of the stacked triangles together. Insert the scrunched end into one of the zip ties in row 2. Repeat for the remaining 2 stacks.
- Make the turquoise petals. Start by folding your first 20-inch strip in half. Fold it in half again, diagonally, and follow the same scrunching process that you did for the green mesh. Take the scrunched end and slide it in a zip tie starting with the outside ring first. Pull your zip tie tight. Repeat this process for every zip tie around that row of the board. Remember to cut off the excess zip tie ends as you go.
- It’s time to add your 10×10 mesh strips to the center. You’ll make the same petal as above but this time cut out the initial step of folding the strip in half. Fold it diagonally into a triangle and scrunch the corners together.Add your petal to one of the zip ties in the middle. For the next petal, skip the cable tie beside that one and go add your next petal to the next zip tie.
- Now we need to make a smaller flower petal. Take a square and fold it in half corner to corner, just like before. Next, fold it again to be a small triangle. Bring the tips together on the long side to form an open shoe shape. Use some hot glue and pinch the gap closed. Add your petal to one of the open zip ties you skipped. Repeat this step until all the open zip ties are filled.
- Add hot glue to the bottom of the animal print mum and secure it to the center of your petals. Hold it nice and tight with pressure Until it cools.
- Give your flower a more textured and layered look by lifting your petals on the second row and pulling them forward. Pull the two layers of each petal apart a little. This really adds more dimension to your wreath.
- Find the top of your board (it has the most holes). Go ahead and add a pipe cleaner as a hanger.
Video