
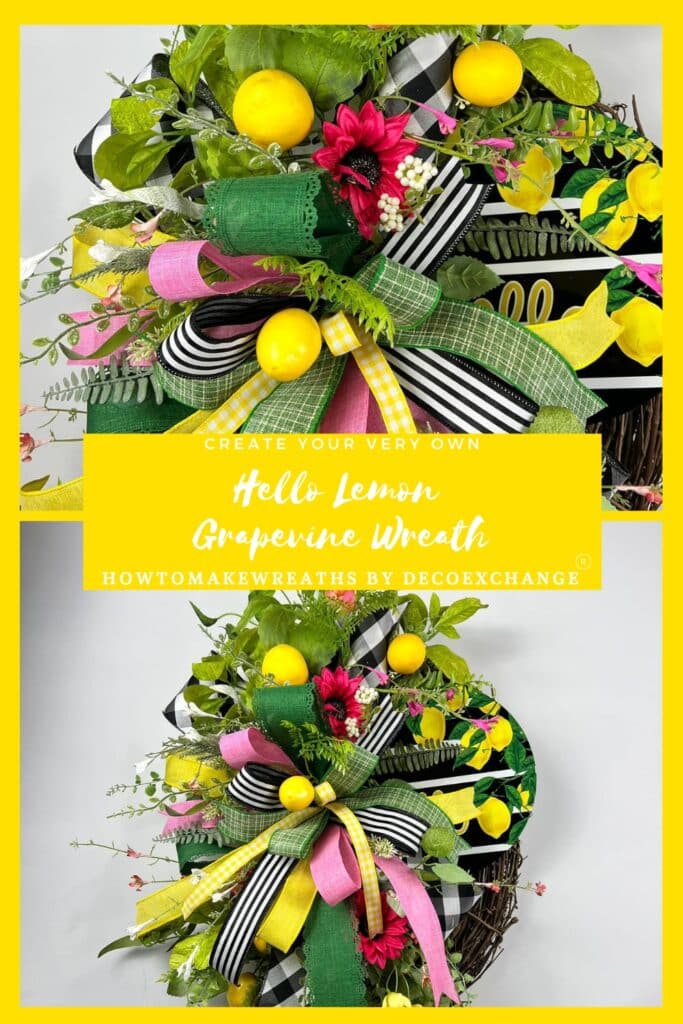
Spring will be here before you know it! Get ahead of your customer by getting started with your spring wreath designs. This spring-themed grapevine wreath with lemons is the perfect way to start filling your inventory and catching those early bird buyers.
Hey, y’all! Today I’m showing you how to make a beautiful spring grapevine wreath with lemons and a “Hello” lemon sign. I’m pulling out all the bright and cheery springtime colors for a wreath that will be purchased as soon as you add it to your shop!
If it seems a little early to be thinking about spring wreaths and designs, I want to open your eyes because it’s not! We’ve done a ton of experimenting over the years and developed a tried and true production calendar.
And I have to admit, after weeks or months of holiday creations, I enjoy the seasonal change as much as our customers do!
Note: If you want more bright and cheery lemon wreath design ideas, check out our popular Bless Your Heart Lemon Wreath and Lemon-Themed Home Wreath projects!

How To Make A Cheery Spring Wreath With Lemons
This fun springtime grapevine wreath with lemons is easy to bring together. Although the design differs from our Lemon Grapevine Wreath With Blue And White Florals, it offers a similar cheery vibe. Let’s get started on making some spring wreaths.
Supplies Needed
Here’s what you’ll need to make this bright and chipper wreath.
- 14” oval grapevine
- Greenery stem
- (2) Floral stems
- (2) Lemon stems
- (1) 5/8” ribbon
- (4) 1.5” ribbons
- (1) 2.5” ribbon
- (1) 4” ribbon
- “Hello” lemon sign
- Pipe cleaners
- Hot glue gun and glue sticks
- EZ Bow Maker
- Bolt cutters
Instructions
Follow this step-by-step tutorial to create a wonderful grapevine wreath your customers will snatch up!
Step 1
We’re going to start by preparing the sign so we can attach it to the right side of the wreath base using pipe cleaners.
Turn your sign around and put a dab of super glue on the back at the top of the sign and another one at the bottom of the sign.
Put a mounting square on top of each dab of super glue. Then hot glue around the edges of the mounting squares.
Add a pipe cleaner to each mounting square and set the sign aside so the glue can dry while we work on the rest of the design.
Step 2
Let’s make a bow!
Take your EZ Bow Maker and your 4” ribbon. Make (2) 14” tails and (2) 8” loops. Position this layer in an “x” shape.
Next, take your 2.5” ribbon and make (2) 14” tails with (2) 7.5” loops. Offset this layer from the layer below.
Now grab your first 1.5” ribbon and make (2) 14” tails with (2) 7” loops. Don’t forget to offset this layer slightly from the previous layer.
Repeat the process with the second 1.5” ribbon, making the loops just slightly larger at 6.5”. Again, offset this layer so you can see the layer below.
Take your third 1.5” ribbon and repeat the process again, making these loops 6”. Offset this “x” so you can see the layer below.
Let’s add a 4th layer with a 1.5” ribbon, making (2) 14” tails and (2) 5.5” loops.
To finish off this bow, take the ⅝” ribbon and make (2) 14” tails and (1) 5” loop.
Wrap a long pipe cleaner around the center of the bow and twist it tightly to secure your bow.
Use the pipe cleaner to attach the bow to the left side of the grapevine wreath. Dovetail the ribbon tails.
Step 3
Use the pipe cleaners that you added to the back of your sign to attach the sign to the right side of the grapevine base.
Step 4
Take your greenery stems and use bolt cutters to cut them off the large center stem. Add a dab of hot glue to the ends, then insert them one by one into the grapevine base around the bow.
Note: One stem will go above the bow, one will be below the bow, and one will go to the outside of the bow.
Step 5
Now it’s time to add some floral stems into the wreath design to add more texture and color variation. Use bolt cutters to cut the individual stems off of the main stem.
Add a dab of hot glue to each stem as you insert it around the bow.
Step 6
Next, let’s add some lemon stems to make our spring wreath with lemons design complete. Use bolt cutters to cut the individual stems off of the main stem.
Add a dab of hot glue to each stem as you insert it around the bow.
Step 7
I want to add a little pop of white to this spring wreath with lemons. Take your white floral stems and use bolt cutters to cut the individual stems off of the main stem.
Then add a dab of hot glue to each stem as you insert it into the design.
Step 8
Finally, take a look at your wreath. Add any additional floral or greenery stems as needed, fluff out your bow, and you’re done!
Isn’t this spring wreath with lemons so much fun? I love the pops of pink, which were a nod to pink lemonade.
Make This Grapevine Spring Wreath With Lemons For Your Store
As always, feel free to take this design template and change it to make a custom design of your own. Play around with using a different sign, other greenery or floral stems, and even different ribbon patterns and colors.
If you want more springtime inspiration, make sure to check out some of these popular designs:
- Moss Covered Bunny Wreath
- How To Make A Deco Mesh Spring Wreath
- How To Make A Spring Chick Wreath
- Make Your Own Spring Floral Grapevine Wreath
- Spring Carrot Wreath
- Spring Grapevine Wreath Idea
If you need any help with centerpiece-making, bow-making, wreath-making, or crafting in general, be sure to check out more of our tutorials on How to Make Wreaths.
We would love to see your beautiful wreaths! Please share with us over at the How To Make Wreaths Facebook Group.
If you’re interested in more info on learning how to make wreaths or being in a community of like-minded crafters, check out our Creative Coaching Subscription Group.


Grapevine Wreath With Lemons And Hello Sign
Materials
- 14” oval grapevine
- Greenery stem
- 2 Floral stems
- 2 Lemon stems
- 1 5/8” ribbon
- 4 1.5” ribbons
- 1 2.5” ribbon
- 1 4” ribbon
- wreath sign “Hello” lemon sign
- Pipe cleaners
- hot glue gun
- glue sticks
- EZ Bow Maker
- bolt cutters
Instructions
- Prepare the sign so we can attach it to the right side of the wreath base using pipe cleaners.Put a dab of super glue on the back of the sign at the top and another one at the bottom.Put a mounting square on top of each dab of super glue. Then hot glue around the edges of the mounting squares.Add a pipe cleaner to each mounting square and set the sign aside.
- Let’s make a bow!Take your EZ Bow Maker and your 4” ribbon. Make (2) 14” tails and (2) 8” loops. Position this layer in an “x” shape.Grab the 2.5” ribbon and make (2) 14” tails with (2) 7.5” loops. With the 1.5” ribbon, make (2) 14” tails with (2) 7” loops. Repeat the process with the second 1.5” ribbon, making the loops just slightly larger at 6.5”. With the third 1.5” ribbon and repeat the process again, making these loops 6”. Take the 1.5” ribbon and make (2) 14” tails and (2) 5.5” loops.Add a center loop with the ⅝” ribbon, making (2) 14” tails and (1) 5” loop.Wrap a long pipe cleaner around the center of the bow and twist it tightly to secure your bow.Use the pipe cleaner to attach the bow to the left side of the grapevine wreath. Dovetail the ribbon tails.
- Use the pipe cleaners on the back of your sign to attach the sign to the grapevine base.
- Take your greenery stems and use bolt cutters to cut them off the large center stem. Add a dab of hot glue to the ends, then insert them one by one into the grapevine base around the bow.
- Use bolt cutters to cut the individual stems off of the main stem. Add a dab of hot glue to each stem as you insert it around the bow.
- Use the bolt cutters to cut the individual stems off of the main stem. Add a dab of hot glue to each stem as you insert it around the bow.
- Take the white floral stems and use bolt cutters to cut the individual stems off of the main stem. Then add a dab of hot glue to each stem as you insert it into the design.
- Fluff out your bow, and you’re done!
Video
If you love to craft, check out our Eat. Sleep. Craft. Repeat. t-shirts and click on the picture below!


