
Coach Tammy is here to show us how to make layered patriotic bows for all your wreaths and other designs. If you’re familiar with making Terri Bows, you won’t have any problems making this one either! And, if you’re new to Terri Bows, this tutorial will simplify the process so that you can become an expert in no time.
Hey, y’all! One of the areas where we consistently receive questions from readers and crafters is about making bows. I get it – I remember how daunting it felt to make bows when I first started my wreath-making journey.
Although we often share wreath-making or centerpiece-making tutorials where bows are a part of them, we’ve decided to try breaking it down a little. So, we’ve been busy publishing bow-making tutorials because making bows is NOT scary or intimidating!
With just a little practice, anyone can do it. I promise.
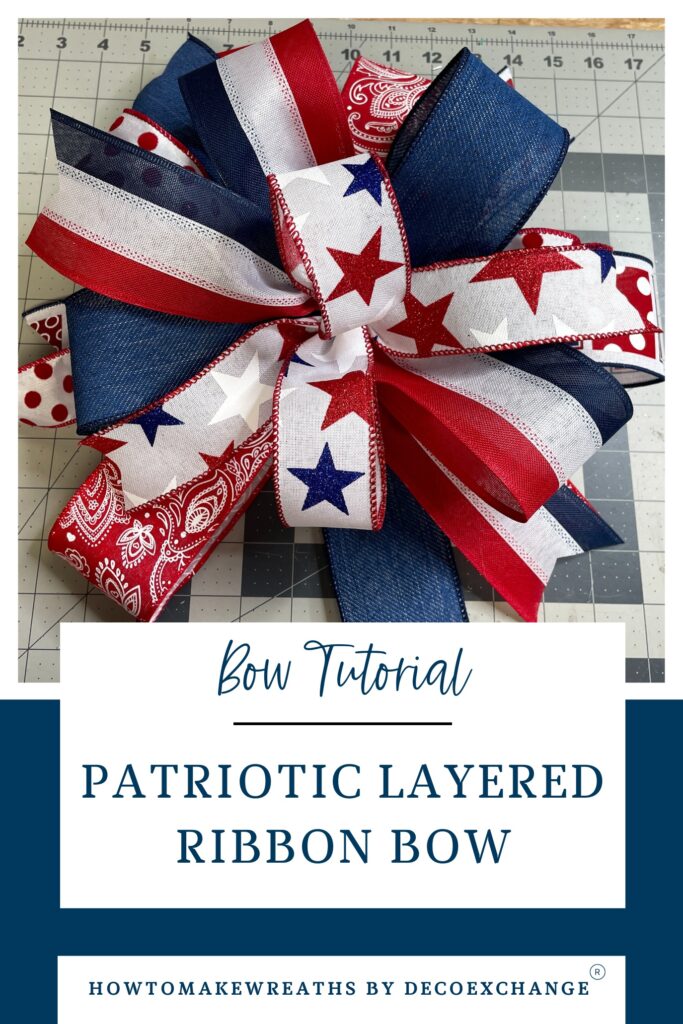
Today, Coach Tammy is sharing how to make multi-layered patriotic bows. If you’re familiar with Terri Bows, I think you’ll recognize it right away. I love this patriotic twist, and I know you will too.
Note: If you need some inspiration for wreaths that could use a gorgeous patriotic bow like this design, check out our Patriotic Wreath With God Bless America Sign, Patriotic Dog Wreath, and Patriotic Flag Deco Mesh Wreath ideas.
And if you want to add some patriotic flair throughout the entire house, try making this DIY Patriotic Centerpiece With A Top Hat too!
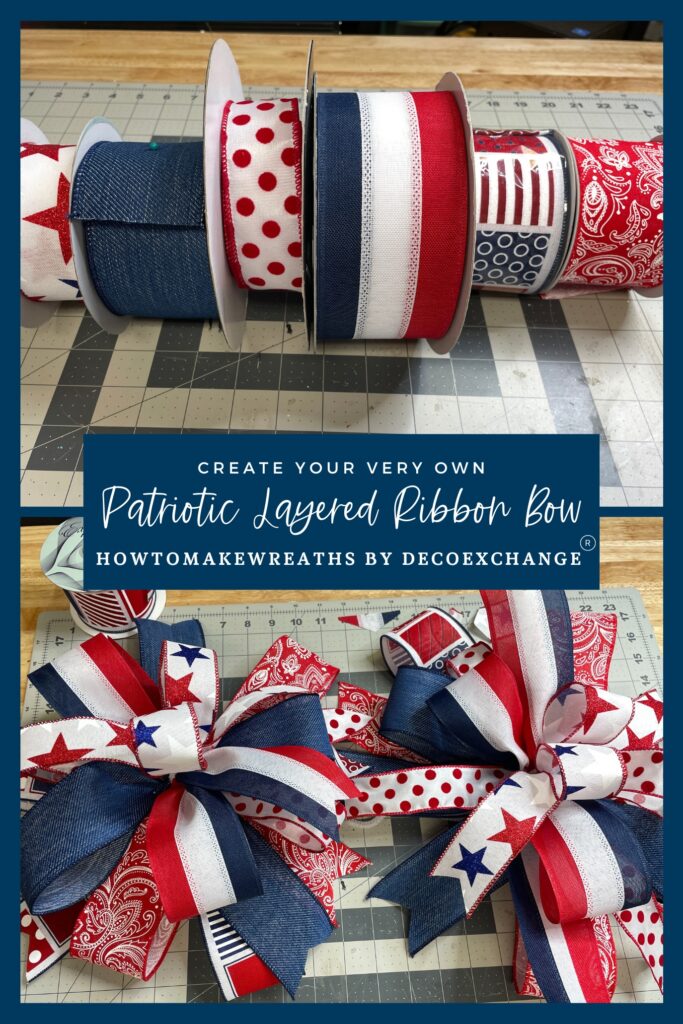
Supplies Needed
Here’s everything you’ll need to make this layered wreath bow. You don’t need much, but I’ve included a few helpful links just in case you’re missing something.
How To Make Patriotic Bows
Traditionally, the Terri Bow is made with the Pro Bow, the hand bow maker. However, Coach Tammy has developed a way to make them by hand, and they look amazing! Follow these step-by-step instructions to do them yourself.
Note: For this type of bow, it DOES NOT matter which order you use your ribbons! So, for these instructions, I’m just going to write “1st ribbon,” “2nd ribbon,” etc. That allows you the freedom to use any ribbon you want in any order.
Step 1
Take your 1st ribbon and make (2) 7-inch tails with (2) 8-inch loops.
Position this layer so that the tails and loops form an “X” shape as the base of your patriotic bow.
Place this layer down onto an extra-long pipe cleaner (or two pipe cleaners tied end to end to make one extra-long pipe cleaner). Twist the pipe cleaner tightly over this layer three times.
Step 2
Grab your 2nd ribbon and make (2) 7-inch tails with (2) 7-inch loops.
Place this layer on top of the previous layer in the pipe cleaner. Make sure to offset this layer so that the loops of this layer go on top of the tails of the bottom layer.
Hold this ribbon down while you twist the pipe cleaner tightly over it three times.
Step 3
Take the 3rd ribbon and make (2) 7-inch tails with (2) 6-inch loops. Again, place this layer on top of the previous layer, stacking the loops of this ribbon on top of the tails of the ribbon below.
Hold the ribbon down while you twist the pipe cleaner tightly over it three times.
Step 4
Now, take your 4th ribbon and create (2) 7-inch tails with (2) 5-inch loops. Place this layer on top of the previous layer in the pipe cleaner, alternating where you put the tails.
Hold the ribbon down while you twist the pipe cleaner tightly over it three times.
Step 5
Now, take your 5th ribbon and create (2) 7-inch tails with (2) 5-inch loops. Place this layer on top of the previous layer in the pipe cleaner, following the pattern of offsetting the loops and tails.
Hold the ribbon down while you twist the pipe cleaner tightly over it three times.
Step 6
Now, take your 6th ribbon and create (2) 7-inch tails with (2) 4-inch loops. Place this layer on top of the previous layer in the pipe cleaner, following the pattern of offsetting the loops and tails.
Hold the ribbon down while you twist the pipe cleaner tightly over it three times.
Step 7
Take the pipe cleaner ends and bring them to the back of the patriotic bow. Cinch the pipe cleaner tightly, then twist them together 3 times.
Step 8
Now that you’ve created all your layers, it’s time to make your bow look amazing. Starting with the bottom layer, fluff out each of the ribbon loops.
Spread out any loops and tails as needed so that your bow doesn’t have any open spaces or gaps.
Step 9
Fluff everything out and make sure all the ends are dovetailed. Trim any long ribbon tails if needed. I like to trim the ribbon tails on top shorter while keeping the ribbon tails toward the back of the bow longer.
That’s it! I hope this tutorial made the process of creating a Terri Bow by hand easy for you!
Tips And Final Thoughts About Making Layered Patriotic Bows
If you want this style of wreath bow to look incredible every single time, here are a couple of tips that may help:
- First, have fun with the ribbons. You can use 6 different ribbons or repeat one ribbon twice in your bow.
- Second, if you’re using a glittery ribbon in your patriotic bows, I like to use them in the back so that the bottom layer doesn’t get “lost.” I also like to use them for the front ribbon to add a special sparkle to the bow.
If you’re used to using a bow maker while you create Terri bows, trying them by hand may sound challenging. But whether you’re new or experienced in a different style of bow-making, I encourage you to just have fun with these and practice making these patriotic bows (or change the colors for any color scheme). They’ll get much easier very quickly!
Check out some of our other bow-making tutorials techniques:
- Terri Bow Tutorial: Make a Bow Using the EZ Bow Maker
- Learn How to Make Decorative Bows
- Bow Making Fun with the Creative Coaches
- How To Make A Simple Bow: A Tutorial By Parker
- Bow Maker Tools- The Great Bow Debate
If you need any help with centerpiece-making, bow-making, wreath-making, or crafting in general, be sure to check out more of our tutorials on How to Make Wreaths.
Finally, if you’re interested in more info on learning how to make wreaths, where to buy supplies, and being in a community of like-minded crafters, check out our Creative Coaching Membership Group.
Multi-Layered Patriotic Bows
Materials
Instructions
- Use your 1st ribbon to make (2) 7" tails with (2) 8" loops.Create an “X” shape with the loops and ribbon tails then place this ribbon down onto an extra-long pipe cleaner. Twist the pipe cleaner tightly over this ribbon 3 times.
- Grab your 2nd ribbon and make (2) 7"tails with (2) 7"loops.Place this layer on top of the previous layer in the pipe cleaner. Offset this layer so that the loops of this layer go on top of the tails of the bottom layer.Wrap the pipe cleaner over this ribbon and twist it tightly 3 times.
- Take the 3rd ribbon and make (2) 7" tails with (2) 6" loops. Add this ribbon on top of the previous ribbon and offset the loops and tails.Hold the ribbon down while you twist the pipe cleaner tightly over it 3 times.
- Now, take your 4th ribbon and create (2) 7" tails with (2) 5" loops. Add this layer on top of the previous one and hold it down while you twist the pipe cleaner tightly over it 3 times.
- Next, take your 5th ribbon and create (2) 7" tails with (2) 5" loops. Place this layer on top of the previous layer in the pipe cleaner, following the pattern of offsetting the loops and tails. Twist the pipe cleaner 3 times to secure this ribbon in place.
- Take the 6th ribbon and create (2) 7" tails with (2) 4" loops. Add this layer to the top of the pipe cleaner and twist the pipe cleaner tightly over it three times.
- Wrap the pipe cleaner ends around the bow and twist them together 3 times at the back of the bow.
- Starting with the bottom layer, fluff out each of the ribbon loops. Spread out the loops and tails to eliminate any gaps or holes.
- Fluff everything out and dovetail the ends. Trim any long ribbon tails shorter, if needed.

