
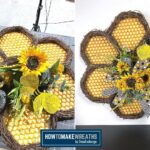
Sunflowers and honeycombs just scream summertime. Use this tutorial to create a cute honeycomb and sunflower door hanger to add that perfect summer vibe to your front door.
Hey, y’all! I’m a sucker for some of these new supplies that we’ve been getting lately. I saw the giant honeycomb door hanger base and sunflowers and just had to play with them. In fact, when I saw these supplies, I knew they had to be our next wreath kit.
I can’t get enough of summertime, including the cheery yellows and anything bee-related. Those yellows, browns, and greens with black accents are perfect for a sunny summertime design.
For all the craftpreneurs, snag this up, because this sunflower door hanger is the perfect design to make quickly and sell even faster!
Note: The door hanger base I’m using for this project is a little more expensive than most others because it’s huge and essentially 7 separate grapevines put together. Plus, the honeycomb backing is a different type of fabric added on top of the normal door hanger canvas backing.
If you love bee-themed wreaths too, be sure to check out our Fun Bee Wreath with Sunflowers, Cutest Bumblebee Wreath, or DIY Bumble Bee Wreath.

Honeycomb Door Hanger Supplies Needed
This project was originally part of one of our wreath kits. If you can’t find the kit in stock, you can purchase the supplies separately on your own.
Here’s everything you need to make this sunny, summer-y honeycomb and sunflower door hanger.
- Honeycomb grapevine wreath base (24”)
- Sunflower floral picks
- Bee pick
- Zip ties
- (1) 2.5” ribbon
- (1) 1.5” ribbon
- Hot glue gun and hot glue
- Pipe cleaners
- EZ Bow Maker
How To Make This Honeycomb And Sunflower Door Hanger
Use these step-by-step instructions to put this project together. This project is so quick and easy because we don’t want to hide the amazing honeycomb base. Instead, we want to simply give it an accent piece to really make it pop!
Step 1
Take your sunflower floral picks and pull all the flowers in front of the greenery pieces. With the base turned so that the door hanger is at the top, insert the pick into the center of the grapevine base. You want the stem to be hidden directly behind one of the grapevine pieces.
Spread the florals apart, shape them to give depth and dimension to the design, and fill that center section. Secure the stem with a zip tie.
Step 2
It’s time to make a simple 2-layer bow.
Take your EZ Bow Maker and your 2.5” ribbon. Make (2) 5.5” loops with 12” tails. Repeat this same process with your 1.5” ribbon, making the loops slightly smaller at 5”.
Step 3
Carefully pull your bow off the EZ Bow Maker and wrap a pipe cleaner around the middle of the bow to hold it together. Give a tight twist to secure it.
Step 4
Use the same pipe cleaner to attach the bow to your frame right in the middle of your floral stem. Fluff out the loops and tails and arrange them amongst the florals so that they all blend to look like one cohesive piece.
Make sure to bring all the tails down so they are towards the bottom of the arrangement and dovetail the ends.
Step 5
Take the bee pick and separate the wings to give a more realistic appearance. Then, give the stem a curve to slip into the wreath base and come out in front for a cool 3D effect.
Work the stem through the grapevine behind the florals to add some stability and arrange it so that it looks like the bee is flying around the honeycomb. Secure it in place with a zip tie.
And, that’s it! The process is super simple because we really want to highlight the honeycomb base rather than hide it!
Make This Sunflower Door Hanger For Your Door Or To Sell
This project is perfect for beginners to make whether you want to sell it or hang it up on your own door. It comes together quickly and looks amazing because that super cool honeycomb grapevine base does the hard work.
Now that your sunflower door hanger is complete, you won’t want to miss some of our other fun summertime designs. Try making our:
- Lemon grapevine wreath
- DIY Summer Road Trip Inspired Wreath
- Patriotic Ice Cream Door Hanger
- DIY Patriotic Deco Mesh Wreath
- How to Make a Patriotic Red Bike Wheel
If you need any help with centerpiece-making, bow-making, wreath-making, or crafting in general, be sure to check out more of our tutorials on How to Make Wreaths.
We would love to see your beautiful wreaths! Please share with us over at the How To Make Wreaths Facebook Group.
If you’re interested in more info on learning how to make wreaths or being in a community of like-minded crafters, check out our Creative Coaching Subscription Group.

Honeycomb & Sunflower Door Hanger
Materials
- grapevine wreath
- floral picks sunflower florals
- bee pick
- zip ties
- 2.5" wired ribbon
- 1.5" wired ribbon
- pipe cleaners
- EZ Bow Maker
Instructions
- Pull all the sunflowers in your floral pick toward the front and push the greenery back. Turn the base so that the door hanger piece is at the top and insert the pick into the center of the grapevine base. The stem should be hidden directly behind one of the grapevine branches. Secure the stem with a zip tie.
- Take your EZ Bow Maker and make a simple bow. Grab your 2.5” ribbon and make (2) 5.5” loops with 12” tails. Repeat this same process with your 1.5” ribbon, making the loops slightly smaller at 5”.
- Carefully pull your bow off the EZ Bow Maker and wrap a pipe cleaner around the middle of the bow to hold it together. Give a tight twist to secure it.
- Use the pipe cleaner to attach the bow to your frame along with the florals. Fluff out the loops and tails and arrange both the bow and the florals so that they all blend to look like one cohesive piece. The tails should all be at the bottom of the floral arrangement. Dovetail the ends.
- Separate the wings on the bee pick to make it look more realistic. Curve the stem so that the bee will hover above the design for a cool 3D effect. Push the stem through the frame behind the florals to give it stability and secure it in place with a zip tie.
Video
Just pin this honeycomb door hanger tutorial to save the instructions for later!


