
This quick and easy patriotic wreath is a beautiful, tasteful way to show your pride. Use the included quick video tutorial to learn how to make two nearly identical patriotic wreaths (one with a sign and one without).
Hey, y’all! It’s time to display your red, white, and blue patriotic spirit!
Festive red, white, and blue patriotic wreaths are a must-have for any front door all summer long. I love seeing front doors decked out in patriotic colors!
Today’s project is super quick. In just 40 minutes you’ll make not one but two patriotic wreaths showcasing your spirit (quick, right?)! Whether you keep these, gift them, or sell them to customers, these are an excellent addition to any wreath portfolio.
If you love everything red, white, and blue, be sure to also check out our Patriotic Flower Wreath, Patriotic Dog Wreath, and Patriotic Flag Deco Mesh Wreath designs!
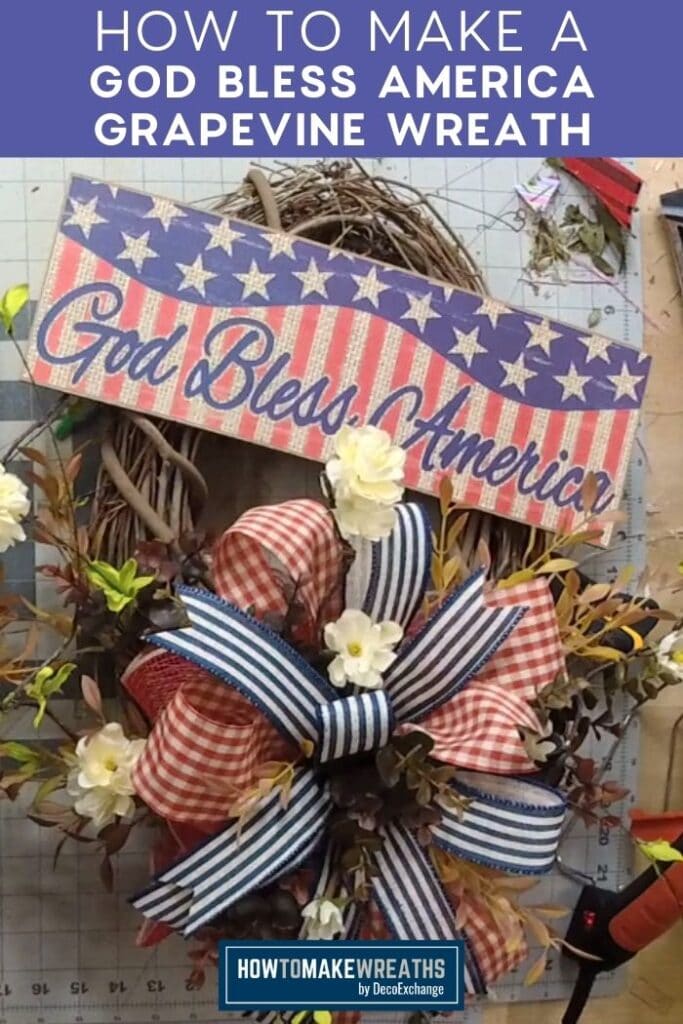
How To Make A God Bless America Patriotic Wreath
We’ll start with an oval grapevine wreath and add a base ruffle with two 10-inch strips of mesh. Then, we’ll layer on a ribbon with 6-inch loops and add a pretty navy and cream bow right on top. Lastly, we’ll round out this ribbon with some gorgeous greenery and a very appropriate patriotic wreath sign.
But first, here’s the video tutorial.
Video tutorial
I have to tell you guys – I’m kind of obsessed with the ribbon combo in this patriotic wreath. This was part of a kit that we sent out. They always sell out quickly, but when I last looked there was some similar ribbon still available on DecoExchange.
And, since I know that we have a lot of visual learners in our audience, I try to make videos of most of the designs we create. Here’s our video showing how to make this two-for-one red, white, and blue God Bless America wreath.
Supplies needed
- (2) Grapevine wreath base
- (1) Wreath sign
- Picks/sprays
- Floral picks
- 10″ deco mesh
- (1) 1.5 wired ribbon
- (1) 2.5″ wired ribbon
- Pipe cleaners
- Stem cutter
- Glue gun
- Craft foam
- Staple gun
- EZ Bow Maker
Patriotic wreath project instructions
Just in case you missed a step or two in the video, here’s the process for making these red, white, and blue wreaths.
Step 1
Prepare your wreath sign by flipping it over, gluing a piece of craft foam on each side of the sign, and using a staple gun to attach the pipe cleaners on top of the craft foam.
Add a thin line of glue around the edges of the foam with the glue gun to secure the pipe cleaner and craft foam in place.
Step 2
Use the pipe cleaners to attach the sign to the top of the grapevine wreath base.
Step 3
Take your deco mesh and cut (2) 20″ strips. Curl the ends and scrunch the rest of the way down toward the center. Stack the 2 pieces on top of one another and attach them to the bottom of the grapevine with a pipe cleaner.
Step 4
Get your EZ Bow Maker and ribbons and make a couple of bows!
Take the 2.5″ ribbon and measure a 12″ tail and (2) 6.5″ loops on each side.
Next, take your 1.5″ ribbon and measure a 12″ tail with a 6″ loop on each side.
Grab your 1.5″ ribbon and cut a ribbon tail.
Then cut a ribbon tail out of your 2.5″ ribbon and place it in the opposite direction of the previous ribbon tail, making an “X.”
Take your 1.5″ ribbon and make a single loop for the center.
Then, get your pipe cleaner and wrap it around the center of your bow. Twist tightly to secure your bow.
Step 5
Add your bow to the wreath and dovetail the ends. Then, fluff and arrange the bow on top of the deco mesh.
Step 6
With pliers or stem cutters, trim off pieces of your greenery picks.
Step 7
With the hot glue gun, add greenery around the loops and mesh. This will help make the wreath look bigger and fuller.
Step 8
Do the same process with the floral picks, so that your wreath looks fuller.
Step 9
Fluff everything out and make it look exactly the way you want it to look.
Alternative Method: A Patriotic Wreath With No Sign
If you want to make this design without the sign, simply begin the process at step 3 and proceed from there!
What do you all think of this style of wreath? It’s a bit different from some of our other ones but I am loving it, y’all!
FAQs
Here are a few answers to questions I frequently see readers ask to help you out even more!
Can I use different patterns in this design?
Yes! I recommend sticking with the same color scheme since it’s meant to be a red, white, and blue wreath. However, feel free to play with the color patterns and make this design uniquely your own!
Can I use a different type of glue?
You could use super glue to attach the foam craft pieces to the sign. But otherwise, for this design, I would stick with using hot glue because it dries very quickly and holds strong.
Make Patriotic Wreaths For Your Shop!
I hope you love this design. It’s perfect for farmhouse-style customers, but others will also love it. I know from experience that if you added it to your shop, it would sell quickly!
If you love this design, be sure to check out these other tutorials too:
- Red, White, And Blue Wreath
- Patriotic Truck Wreath In Red, White, and Blue
- Patriotic Ice Cream Door Hanger
- How To Make A Patriotic Christmas Tree
- DIY Patriotic Deco Mesh Wreath
- How to Make a Patriotic Red Bike Wheel
If you need any help with centerpiece-making, bow-making, wreath-making, or crafting in general, be sure to check out more of our tutorials on How to Make Wreaths.
We would love to see your beautiful wreaths! Please share with us over at the How To Make Wreaths Facebook Group.
If you’re interested in more info on learning how to make wreaths or being in a community of like-minded crafters, check out our Creative Coaching Subscription Group.


DIY God Bless America Patriotic Grapevine Wreath
Materials
Instructions
- Get your grapevine wreath base, wreath sign, pipe cleaners, craft foam, glue gun, and staple gun.
- Starting with the wreath sign, flip it over, add the craft foam on each side of the sign, and use a staple gun to attach the pipe cleaners on top of the craft foam. Use the glue gun to secure the pipe cleaner and craft foam.
- Attach sign to the top of the grapevine wreath base.
- Take your deco mesh, measure 20" and cut 2 strips. Curl the 2 ends and scrunch the rest of the way down the center. Add the 2 pieces together and add to bottom of grapevine with a pipe cleaner.
- Add your quick bow. Trim ends in to dovetails. Then fluff and arrange bow on top of the deco mesh.
- With pliers or stem cutters, trim the ends of your greenery picks. You can cut them in to smaller pieces.
- With the hot glue gun, add greenery around the loops and mesh. This will help make the wreath look bigger.
- Do the same process with the floral picks, so that your wreath looks fuller.
- Repeat steps 4-8, doing the same process to make an identical wreath minus the wreath sign.

Quick Bow using the EZ Bow Maker
Instructions
- Get your EZ Bow Maker and ribbons.
- With the 2.5" ribbon, measure 12" tail and (2) 6.5" loops on each side.
- Next, take your 1.5" ribbon, measure 12" tail and (1) 6" loop on each side.
- With your 1.5" ribbon, cut a ribbon tail.
- Then with your 2.5" ribbon, cut another ribbon tail and place in the opposite direction of the previous ribbon tail making an "X."
- Take your 1.5" ribbon and make a single loop for the center.
- Then get your pipe cleaner and wrap around the center of your bow. Twist nice and tight. Fluff out your bow.
We Think You’ll Enjoy These Related Posts:
If you’re a dog lover or know someone who is, check out our Support Dog Rescue t-shirts and click on the picture below!


