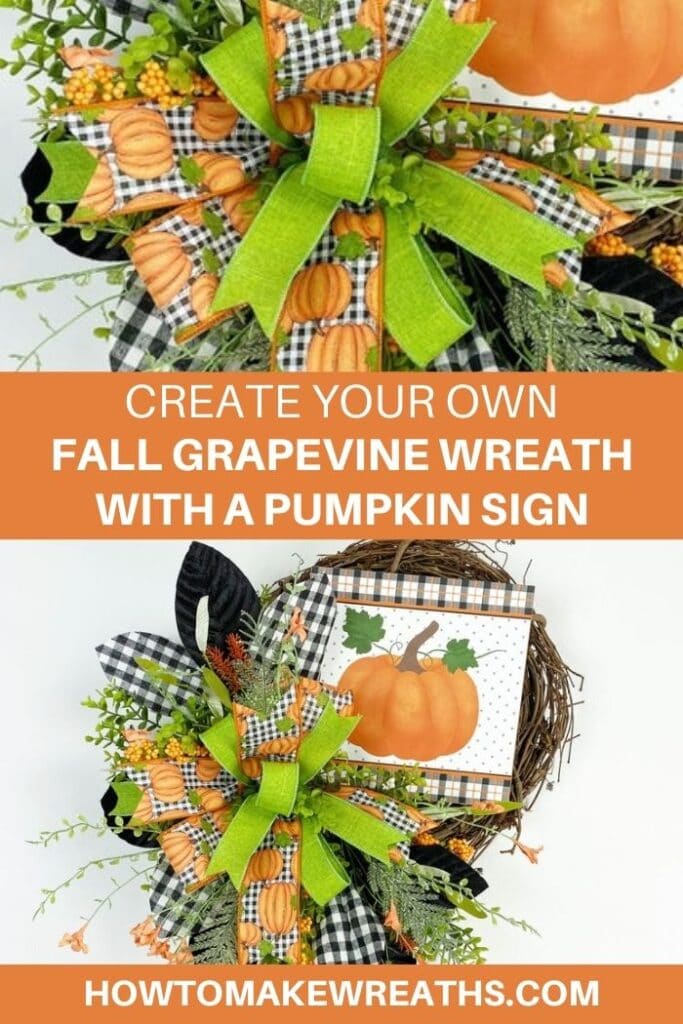
Today, Coach Mel is joining us to make a fall grapevine wreath with a pumpkin sign. This pumpkin grapevine wreath is a terrific fall design that will look great on your door or help complete your fall inventory!
It’s fall, y’all! Or at least it’s almost fall…but, when it comes to selling wreaths, the season has arrived. If you haven’t begun stocking up your inventory for fall yet, you’re a little behind your customers. But I have a solution for you!
Well, actually, Coach Mel and I have a solution for you.
She’s joining me as we create this super cute wreath together. We got so many requests about offering a wreath kit that we pulled together a kit for this design which you can find at decoexchange.etsy.com.

Say Hi To Coach Mel!
Hey guys! Coach Mel here. I know how busy summer can be. It can be tough to get in the mode to start working on your fall inventory in time to have it ready for those customers who like to shop ahead.
If you’re looking for a quick, colorful fall design, this is it!
If you like fall wreaths, don’t forget to also check out our How To Make A Simple Fall Grapevine Wreath, Fall Harvest Wreath, and “Hello Fall” Wreath designs.
Supplies For This Fall Grapevine Wreath With A Pumpkin Sign
Here’s what you’ll need to make this gorgeous seasonal wreath.
- 14” round Grapevine wreath base
- Pumpkin sign
- 1 boxwood greenery bush
- 3 stems of black leaves greenery
- 1 orange and green floral sprig
- Pipe cleaners
- (1) 2.5” ribbon
- (1) 1.5” ribbon
- Mounting squares
- Hot glue gun and hot glue
- Bolt cutters
- EZ Bow Maker
How To Make A Fall Grapevine Wreath With A Pumpkin Sign
Follow this step-by-step guide to put your holiday wreath together so you can get it ready to display for the season. Note: I’m using a slightly different technique for this bow that you won’t want to miss!
Step 1
Prepare your grapevine base by inspecting it to see if there are any leaves or stems that stick out too far. If there are, just cut them off.
Step 2
Prepare your sign by peeling off the stickers from the back of the sign. Then, take the sticker covers off the mounting squares and place one square in each of the corners on the back of the sign. Insert pipe cleaners into the mounting squares.
Add a dab of hot glue around the mounting squares to provide a little extra support.
Step 3
While you’re waiting for your hot glue to dry, go ahead and cut the stems off your greenery and floral picks to prep it for adding to the grapevine base.
Step 4
Use the pipe cleaners on your sign to attach it to the grapevine wreath.
TIP: if you have trouble pushing the pipe cleaner through your grapevine, take your needle nose pliers and use them to push the pipe cleaner through the wreath. Then, use them to grab the pipe cleaner on the other side and pull it through so that the pipe cleaner comes out the back.
Step 5
Take your EZ Bow Maker and your 2.5” ribbon and start making your bow. Start by making 8” tails with 6” loops.
Now grab your 1.5” ribbon and make 8” tails with 5.5” loops.
With the little bit left of your 2.5” ribbon, just center it to the design and add it to the top of your bow as essentially one long straight ribbon tail.
Take the remainder of your 1.5” ribbon and make tails with one center loop.
Tie it off with a pipe cleaner and twist tightly to secure it, then use the same pipe cleaner to tie the bow onto the grapevine wreath form.
Step 6
Take your boxwood stems and begin adding them around your bow to round out your design as you “frame” your bow with the greenery. Add a bit of hot glue to each stem where you insert it into the grapevine wreath.
Step 7
Add the black and white magnolia leaves in a triangle pattern around your bow. Secure with a dab of hot glue on each stem and spread the leaves apart as you put a few behind your boxwood greenery to make them look fully integrated into the final design.
Step 8
Spread apart your orange and green florals then begin adding them into the design as well in a triangle pattern to add some texture. Use a dab of hot glue on each stem to secure it in place.
Step 9
Dovetail the ribbon tail ends. Add any extra little greenery pieces directly into the bow with a dab of hot glue.
CHECK OUT MORE FALL GRAPEVINE WREATHS
Add A Pumpkin Sign To Your Grapevine Wreath
Y’all, can you believe that you just made a designer wreath (which can sell for $100-$125) in under 30 minutes for less than $40? The design turned out so well, and the great thing is that you can make this design or take the ideas and make similar but unique designs very easily!
If you love a great fall grapevine wreath, make sure to check out some of our other popular designs:
- DIY Fall Grapevine Blue Truck Wreath
- Cotton Wreath for Fall
- Make a Designer DIY Fall Wreath in Under 6 Minutes
- Fall Harvest Wreath
If you need any help with centerpiece-making, bow-making, wreath-making, or crafting in general, be sure to check out more of our tutorials on How to Make Wreaths.
We would love to see your beautiful wreaths! Please share with us over at the How To Make Wreaths Facebook Group.
If you’re interested in more info on learning how to make wreaths or being in a community of like-minded crafters, check out our Creative Coaching Subscription Group.


Designer Fall Grapevine Wreath with a Pumpkin Sign
Materials
- grapevine wreath base 14" round
- Pumpkin sign
- 5 greenery stems 1- boxwood greenery bush, 3-stems of black leaves greenery, 1- orange and green floral sprig
- Pipe cleaners
- 1 2.5" wired ribbon
- 1 1.5 wired ribbon
- 1″ mounting squares
- hot glue gun
- hot glue
- bolt cutters
- EZ Bow Maker
Instructions
- Prepare your grapevine base by inspecting it to see if there are any leaves or stems that stick out too far. If there are, just cut them off.
- Prepare your sign by peeling off the stickers from the back of the sign. Then, take the sticker covers off the mounting squares and place one square in each of the corners on the back of the sign. Insert pipe cleaners into the mounting squares.
- Add a dab of hot glue around the mounting squares to provide a little extra support. While you’re waiting for your hot glue to dry, go ahead and cut the stems off your greenery and floral picks to prep it for adding to the grapevine base.
- Use the pipe cleaners on your sign to attach it to the grapevine wreath. TIP: if you have trouble pushing the pipe cleaner through your grapevine, take your needle nose pliers and use them to push the pipe cleaner through the wreath. Then, use them to grab the pipe cleaner on the other side and pull it through so that the pipe cleaner comes out the back.
- Take your EZ Bow Maker and your 2.5” ribbon and start making your bow. Start by making 8” tails with 6” loops. Now grab your 1.5” ribbon and make 8” tails with 5.5” loops. With the little bit left of your 2.5” ribbon, just center it to the design and add it to the top of your bow as essentially one long straight ribbon tail. Take the remainder of your 1.5” ribbon and make tails with one center loop. Tie it off with a pipe cleaner and twist tightly to secure it, then use the same pipe cleaner to tie the bow onto the grapevine wreath form.
- Take your boxwood stems and begin adding them around your bow to round out your design as you “frame” your bow with the greenery. Add a bit of hot glue to each stem where you insert it into the grapevine wreath.
- Add the black and white magnolia leaves in a triangle pattern around your bow. Secure with a dab of hot glue on each stem and spread the leaves apart as you put a few behind your boxwood greenery to make them look fully integrated into the final design.
- Spread apart your orange and green florals then begin adding them into the design as well in a triangle pattern to add some texture. Use a dab of hot glue on each stem to secure it in place.
- Dovetail the ribbon tail ends. Add any extra little greenery pieces directly into the bow with a dab of hot glue.
Video
Just pin this designer fall grapevine wreath with a pumpkin sign tutorial to save these step-by-step instructions for later!