
Hello, fall! Learn how to make this quick and easy truck wreath design that showcases all the amazing colors of the season.
Hey, y’all! The fall season is here, and it’s time to decorate your doors and porches with colorful fall foliage, pumpkins, and trendy blue trucks!
We’ve got the fall wreath design ideas flowing at full speed now because we only have a couple of weeks to crank out as many fall wreaths as we can before we switch things over to all the holidays that will come right after that.
Ah, the life of a Craftpreneur!
Do you love the look of a designer fall wreath, but have no idea what to do to make one? This quick and easy Fall Grapevine Blue Truck Wreath is the wreath recipe for you!
If you want some more fall wreath inspiration, be sure to check out our Hello Fall Mesh Wreath, Fall Harvest Wreath, and “Hello Fall” Wreath designs.
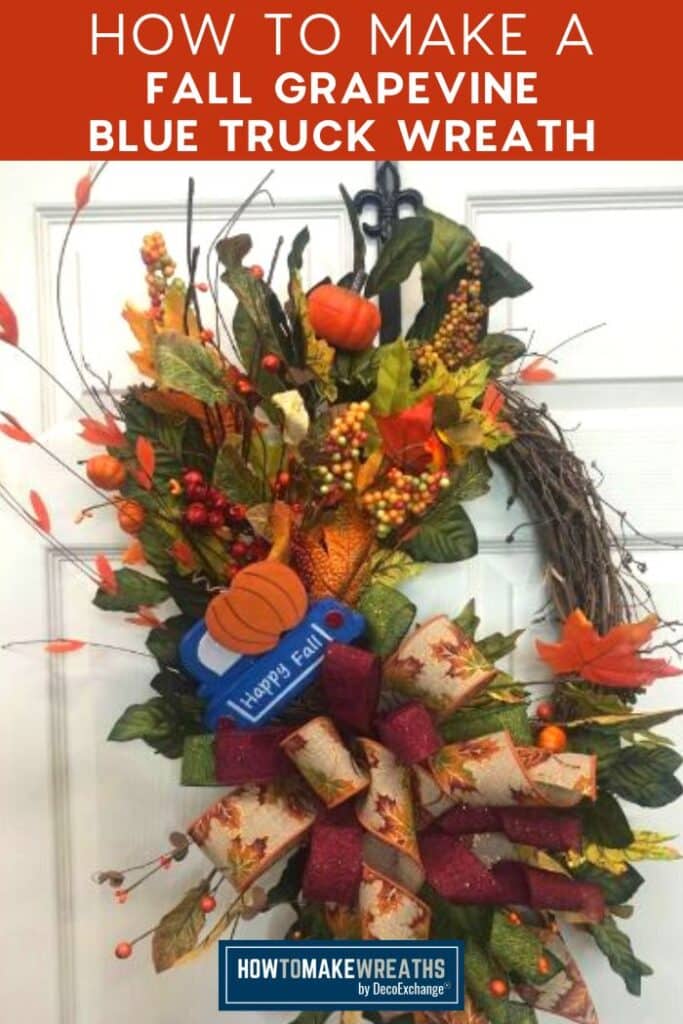
How To Make A DIY Fall Grapevine Blue Truck Wreath
Well, no worries, we created a step-by-step video tutorial for a designer fall wreath, using a few simple pieces!
Supplies Needed
- 18-inch oval grapevine wreath
- 3 fall foliage picks with berries
- 1 green foliage pick
- 1 decorated stem with a blue truck and berries
- Stem cutter
 (not required but makes it easier to cut large stems)
 - Wire cutters
- zip ties
- (2) 1.5-inch wired ribbon
- (1) 2.5-inch ribbon
- Hot glue gun (optional)
- Hot glue sticks (optional)
- EZ Bowmaker

 (not required but makes it easier to cut large stems)


 (optional)
Fall Grapevine Blue Truck Wreath Video Tutorial
You don’t need to be a floral expert to pull this off because I’ll show you how to create a wreath that will impress your family, friends, and neighbors in this short, easy-to-follow tutorial.
Instructions
In case you want a little support as you follow along with the video, here are the step-by-step instructions for making this fall blue truck wreath design.
Step 1
First, inspect your grapevine base to see which side you want to use for the front and remove any glaring imperfections (sticks that stick out, large leaves, etc.).
Step 2
Start adding your foliage to the base. Cut smaller stems off the large main foliage stem and insert them into the base from the top and bottom so that the stems meet each other in the middle.
Secure them in place with some hot glue.
Step 3
Next, take the berry picks into the wreath base as you did with the foliage, following the same process. Secure with hot glue.
Step 4
Insert the pick with the blue truck and secure it in place with hot glue.
Step 5
Cut off pieces of the green foliage and add some as a filler (and additional color) for the design. Secure with hot glue.
Step 6
Grab your EZ Bow Maker, and let’s make a quick bow.
With the 1.5″ ribbon, make (2) 15″ tails and (4) 6-inch loops.
Take the 2.5″ ribbon and repeat the same process.
Make one more layer with the second 1.5″ ribbon.
Carefully pull the bow off the EZ Bow Maker and wrap a pipe cleaner around the middle. Twist tightly and use the pipe cleaner to attach the bow to the wreath just below the blue truck.
Step 7
Curl the ribbon tails and dovetail the ends of the ribbons.
Add This Fall Blue Truck Wreath To Your Inventory!
That’s it, y’all! I told you that it was easy! Now, you know the secret to creating a designer Fall wreath that didn’t take hours to make or break the bank. All it takes is a few simple pieces and less than 20 minutes of your time!
It’s a perfect “filler” for your online inventory because its colorful fall design will have it flying off the shelves, making very happy customers.
As always, you can personalize this wreath design by changing the colors and patterns. Modify it for other holidays or seasons to create a signature item that your customers buy again and again.
While you’re here, be sure to check out these other fall designs too:
- Designer Fall Grapevine Wreath With A Pumpkin Sign
- How to Make a Cotton Wreath for Fall
- How To Make A Simple Fall Grapevine Wreath
- Make a Designer DIY Fall Wreath in Under 6 Minutes
If you need any help with centerpiece-making, bow-making, wreath-making, or crafting in general, be sure to check out more of our tutorials on How to Make Wreaths.
We would love to see your beautiful wreaths! Please share with us over at the How To Make Wreaths Facebook Group.
If you’re interested in more info on learning how to make wreaths or being in a community of like-minded crafters, check out our Creative Coaching Subscription Group.
If you’re interested in more info on learning how to make wreaths, where to buy supplies, and being in a community of like-minded crafters, check out our Creative Coaching Subscription Group.

We think you’ll love these other fall wreath tutorials.
CHECK OUT MORE FALL GRAPEVINE WREATHS

DIY Fall Grapevine Blue Truck Wreath
Materials
- 1 18-inch oval grapevine wreath
- 3 Fall foliage picks
- 1 Greenery stem
- 1 Decorated stem with a blue truck and berries
- Stem cutter
- Wire cutters
- Pipe cleaners
- 2 1.5-inch wired ribbon
- 1 2.5-inch ribbon
- Hot glue gun
- Hot Glue Sticks
- EZ Bow Maker
Instructions
- Look over your grapevine base to pick the side you want to use for the front. Remove any glaring imperfections.
- Begin cutting smaller foliage stems off the main stem and insert them into the base from the top and bottom so that the stems come together in the middle. Secure them in place with hot glue.
- Now insert the berry picks into the wreath base as you did with the foliage. Secure with hot glue.
- Insert the pick with the blue truck and secure it in place with hot glue.
- Cut off pieces of the green foliage and add some as filler for the design. Add hot glue.
- Grab your EZ Bow Maker to make a quick bow.Take the 1.5″ ribbon and make (2) 15″ tails with (4) 6-inch loops.Repeat the process with the 2.5″ ribbon.Then do it one more time with the second 1.5″ ribbon.Carefully pull the bow off the EZ Bow Maker and wrap a pipe cleaner around the middle. Twist tightly and use the pipe cleaner to attach the bow to the wreath just below the blue truck.
- Curl the ribbon tails and dovetail the ends of the ribbons.
Video
Just pin this DIY Fall Grapevine Blue Truck Wreath tutorial to save these instructions for later.


Beautiful, elegant, and easy. As always fabulous skills Damon.