
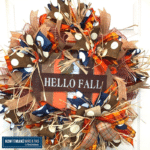
Fall naturally gives us some of the most beautiful colors imaginable. In this tutorial, I’m showing you how to make a “Hello Fall” wreath that has some of my favorite colors.
Hey, y’all! Fall is one of my favorite seasons to craft for y’all! I love the colors, the textures, and all the possibilities for creativity. It’s so much fun replicating those colors in my fall-themed wreaths every year!
Fall starts one of the busiest seasons in the crafting world. And hot on the heels of the fall fun is the Christmas season, and we all know how busy that is! So, our best plan of attack for staying out of the production weeds is to go into fall strong.

This beautiful deco mesh wreath is a great project to help you hit the ground running! Staying on top of your production schedule can be challenging, so if you need a helping hand, check out how to use a craft calendar to schedule your craft production. You never have to find yourself behind again!
If you want more Fall wreath inspiration, please check out our Designer Fall Grapevine Wreath With A Pumpkin Sign, Fall Deco Mesh Wreath, and Fall Harvest Wreath designs.
How To Make A “Hello Fall” Wreath
Here’s everything you need to know about making a fall wreath that you (and your customers) will love.
Supplies Needed
Gather these supplies to make this wreath design.
- 1 wreath form
- 18 pieces 10″ deco mesh 30″ long
- mesh cutter
- (5) 2.5″ wired ribbon
- (1) 1.5 wired ribbon
- Pro Bow the Hand
- Floral Wire 26″ gauge
- (6) 2.5″ wired ribbon
- wire cutters
- 1 sign/attachment
- staple gun
- pipe cleaners
- zip tie
- scissors
- ribbon tailboard
“Hello Fall” Wreath Video Tutorial
I know many wreath-makers prefer to see a visual walk-through, so we made a little video to take you through the entire process!
I show you how to use one of the handiest tools to use when using mesh in your wreaths. Say “hello” to the mesh roller! You don’t have to use one of these, but it will make your life so much easier. I also give you some tips on the easiest ways to work with your mesh.
Instructions
Follow these simple instructions, and in just a few minutes, you’ll have a beautiful ladybug deco mesh wreath to display all spring and summer!
This design uses ruffles, but so many people can make them much harder than they really are. Don’t overthink your ruffles! They don’t need to be perfect.
We strive for perfection in too many areas of our lives already. You don’t need to worry about your wreath ruffles! Check out these tips on how to make a deco mesh wreath base.
Step 1
Fluff out the wreath form to prepare it. Then, take your 10″ mesh and cut (18) 30″ pieces.
Step 2
Take each of the 18 pieces of mesh, curl the edges and scrunch towards the center. Tie one ruffle into every wreath tie, starting at the bottom of the wreath frame and working your way to the top to avoid getting tangled up.
Step 3
Get out your ribbon tail board, 2.5″ ribbon, and 1.5″ ribbon. Cut (18) 14″ strips out of your 2.5″ ribbon.
Then cut (36) 14″ strips out of your 1.5″ ribbon.
Dovetail the ends.
Step 4
Layer (2) 1.5″ ribbon strips on top of (1) 2.5″ ribbon strip. Then fold the stack in half, scrunch in middle, and add one stack to each wreath tie. Start at the bottom of the wreath design and fluff out each ribbon tail set after you tie it into a pipe cleaner.
Step 5
Get your wreath sign, pipe cleaners, and staple gun. Staple a pipe cleaner to each corner on the back of the sign.
Add the sign to the wreath frame in the center. Thread pipe cleaner around the back and tie nice and tight.
Step 6
Time to make a bow.
Cut 4 pieces of floral wire at 24-inches each.
With your first ribbon, measure out a 7-inch tail. Take a wire and fold it in half, give it a pinch around the ribbon, and tie it off. Wrap the ribbon around your center peg. Pinch on the bottom peg, twist, and tie it off on the top.
That’s your center loop, so it’s now time to add your second wire. Fold the wire in half and work it through.
Add some strands of hay for the autumn look (optional).
Take your 2.5″ ribbon, and follow the same process.
Repeat the process until all the pegs are used, working your way outwards from the center peg. Once you’re done, tie off, and unwrap the first wire from the top and bottom. Remove your bow from the Pro Bow.
Finish your bow by placing it in the center of the fluff box and wrapping the wires on the side hooks to keep it in place. Fluff out your bow, starting with the outside and working your way to the center.
Attach your bow to your wreath at the bottom right of the sign.
Step 7
Take (5) of the 2.5″ ribbons and cut 10″ strips to make ribbon tails. Scrunch one end and wrap a zip tie around. Trim the ends of the ribbon tails into dovetails. Fluff out the tails.
Add the ribbon tails underneath the bow. Use the pipe cleaner to attach to the wreath form.
Step 8
Take (3) of the 2.5″ ribbons and cut 24″ strips. Fold the first strip in half (tails facing the bottom). Take the next strip and fold it in half (tails facing the top). Then take the last strip and fold it in half (tails facing the bottom).
Layer each one on top of the other and then fold all in half and scrunch at the center. Dovetail all the ends.
Using The Pro Bow To Make “Hello Fall” Wreath Bows
I hope you love this design! If you haven’t used the Pro Bow before, there’s definitely a learning curve. But it does make bow-making easier. I love tools that make my wreath-making easier, and this one is no exception. Not only does it make bow-making easier, but it makes your final product look more professional.
I know that bow-making doesn’t come naturally to everyone. But, it’s so important to have beautiful, professional-looking bows on your wreaths. So keep practicing, try different methods, and use any tool that helps you make bows you can be proud of!
Make This “Hello Fall” Wreath This Year
Alright, y’all! You have the list of supplies you need and my video showing you step-by-step how to make this “Hello Fall” wreath. Time to grab yourself a cup of something warm and cozy and dig into your fall crafting.
Before you go, check out these other Fall wreath designs:
- DIY Fall Grapevine Blue Truck Wreath
- Scarecrow Deco Mesh Wreath
- Hello Pumpkin Autumn Grapevine Wreath
- How To Make A Simple Fall Grapevine Wreath
If you need any help with centerpiece-making, bow-making, wreath-making, or crafting in general, be sure to check out more of our tutorials on How to Make Wreaths.
How to Make a Bow using the Pro Bow
Materials
Instructions
- Sort out what ribbons you will be using. Measure out 4 pieces of floral wire about 24-inches each. Cut the floral wire with your wire cutters.
- Let's start with our first ribbon. Measure out about 7-inches for the tail. Take a wire and fold it in half, give it a pinch around the ribbon, and we're going to tie it off. Wrap the ribbon around your center peg. Pinch on the bottom peg, twist, and tie it off on the top.
- Now that you have your center loop, you'll need to add your second wire. Fold the wire in half and work it through.
- Add some strands of hay for the autumn look.
- Take your 2.5" ribbon, trim into a dovetail, Measure out about 7-inches for the tail. Take a wire and fold it in half, give it a pinch around the ribbon, and we're going to tie if off. Wrap the ribbon around the next peg. Pinch on the bottom peg, twist, and loop on the other side. Cut the dovetail. Tie off with the wire. Add some strands of hay.
- Repeat the step above until all the pegs are used working your way outwards from the center peg. Once you're done, tie off, unwrap the first wire from the top and bottom from when you first started. Take off your bow from the Pro Bow.
- Take your fluff box, place the bow in the center and wrap the wires on the side hooks to keep it in place. Fluff out your bow, start with the outside and work your way to the center.
DIY “Hello Fall” Wreath
Materials
Instructions
- Fluff out wreath form. Take your 10" mesh and cut (18) 30" pieces.
- Take each of the 18 pieces of mesh, scrunch down the center, and add to every wreath tie. This is the ruffle method. Do start at the bottom of the wreath frame and work your way to the top to avoid getting tangled up.
- Get out your ribbon tail board, 2.5" ribbon, and 1.5" ribbon.Wrap 2.5" ribbon around the ribbon tail board and cut into (18) 14" strips.Wrap 1.5" ribbon around the ribbon tail board and cut into (36) 14" strips. Cut ends into dovetails.
- Layer (2) 1.5" ribbon strips on top of (1) 2.5" ribbon strip, fold in half, scrunch in middle, and add to the wreath ties. Start with the bottom row.Fan out the ribbon tails. and Make sure it all points out to make the wreath look bigger.Repeat until you add ribbon tails to each wreath tie on the bottom and then the top ties.
- Get your wreath sign, pipe cleaners, and staple gun. Staple a pipe cleaner to each corner on the back of the sign. Add sign to wreath frame in the center. Thread pipe cleaner around the back and tie nice and tight.
- Then add your bow to your wreath to the bottom right of the sign.
- Take (5) of the 2.5" ribbons and cut 10" strips to make ribbon tails. Scrunch one end and wrap a zip tie around, threading a pipe cleaner for good measure. Trim the excess of the zip tie. Trim the ends of the ribbon tails into dovetails. Fluff out the tails.Add the ribbon tails underneath the bow. Use the pipe cleaner to attach to the wreath form.
- Take (3) of the 2.5″ ribbons and cut 24″ strips. Take the first strip and fold it in half (tails facing the bottom). Take the next strip and fold it in half (tails facing the top). Then take the last strip and fold it in half (tails facing the bottom).Layer each one on top of the other and then fold all in half and scrunch at the center. Dovetail all the ends.
We Think You’ll Enjoy These Related Posts:
Just pin this “hello fall” wreath tutorial to save these instructions for next time!


