
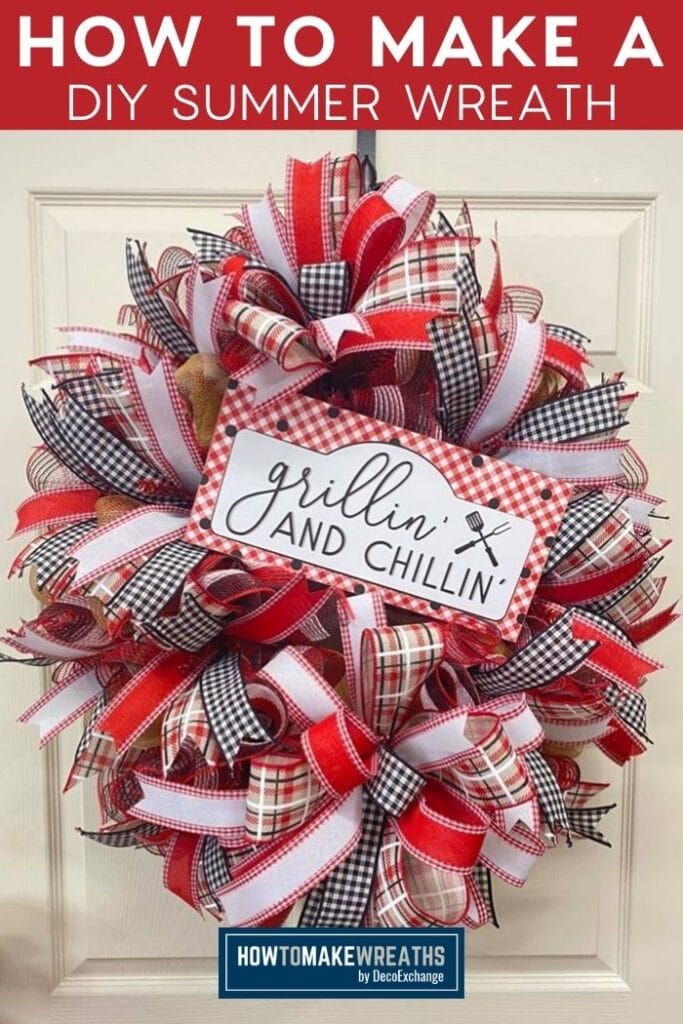
This DIY summer wreath is just the thing to add festive cheer to any BBQ or summer gathering. Whether you are enjoying burgers solo or grilling chicken for the family, this wreath will set the perfect chillaxin’ mood!
There are few things I love more than grilling out in the summer, y’all. Yes, it’s hotter than Hades, but a nice cold drink takes care of that pretty well! I often joke with my friends that my favorite summer pastime is grillin’ and chillin’. So of course, when I saw this sign, I had to make a DIY summer wreath to share my catchphrase with the world. 😉
DIY Summer Wreath Video Tutorial
This wreath starts on a basic wire frame. I wanted to give this DIY summer wreath a bit of a more elongated look than a typical circle, so I squished in the frame a bit.
Did you know you could do that? If not, you do now!
Follow along with this simple video tutorial, and I’ll show you exactly how to do this fun project in a little over an hour.
Materials Needed For Grillin’ And Chillin’ Wreath
Here’s what you’ll need to gather up for this wreath. Some of these links may be affiliate links which means that if you make a purchase a small portion will go towards this site.
- Wreath form
- 1 21″ deco mesh
- 1 10″ deco mesh
- 3 1.5 wired ribbon
- 1 2.5″ wired ribbon
- Mesh cutter
- Scissors
- Pipe cleaners
- EZ Bow Maker
- Sign/attachment
- Zip tie mounts
- Hot glue gun
- Ribbon tailboard
How To Make This DIY Summer Wreath
Here’s how to make this festive summer wreath that features two bows and scores of ribbon tails!
Step 1
Take your wreath frame and squish the frame just a little bit to make it more oval-shaped. Fluff out your wreath frame.
Step 2
Use the 21″ deco mesh and take the cut edge and fold it under, then scrunch it up. Start on the top and do 10″ poofs all the way around the wreath base. Repeat around the bottom.
Step 3
Prepare your sign: remove the stickers, add mounting squares to each corner, and add the pipe cleaners to each mount. Use your hot glue gun to reinforce the mounts. Set aside to dry.
Step 4
Cut 20″ strips of your 10″ deco mesh with the mesh cutter.
Step 5
To add the strips, use the “cruffle” method: curl the ends, scrunch to the center. Add them to the top wreath ties and then the bottom wreath ties.
Step 6
Add the sign to the top center of the wreath at a slight angle. Starting at the bottom right of the sign, attach the pipe cleaner to the metal frame and wrap nice and tight.
Step 7
Next, tie the pipe cleaner on the top left to the metal frame. This will prevent the sign from moving around. Tie the remaining corners.
Step 8
Let’s make the first bow. Use your EZ Bow Maker and first 1.5″ ribbon to make a 12″ tail, and (3) 6.5″ loops on each side.
Step 9
Next, with your 2.5″ ribbon and make a 12″ tail and (2) 6″ loops on each side.
Step 10
Next, with your first 1.5″ ribbon, make a 12″ tail and (1) 5.5″ loop on each side.
Step 11
With your second 1.5″ ribbon, make a tail with it facing the top right.
Step 12
With the third 1.5″ ribbon, make a center loop.
Step 13
Take 2 pipe cleaners and twist them together to make a longer piece. Wrap around the center of the bow and twist off tightly. Then, add it to the wreath using the pipe cleaner to secure it. Fluff the bow and dovetail the ends.
Step 14
Next, make a smaller bow. Start with the 1.5″ ribbon and make (2) 8″ tails and (2) 6.5″ loops in an X shape.
Step 15
Start with a 2.5″ ribbon and make (2) 8″ tails and (2) 6″ loops to the top right in an X shape.
Step 16
With the second 1.5″ ribbon and make (2) 8″ tails and (2) 6.5″ loops in an X shape.
Step 17
Use the 3rd 1.5″ ribbon to make (2) 8″ tails and (2) 6″ loops in an X shape.
Step 18
Make a center loop with a 1.5″ ribbon.
Step 19
Wrap a pipe cleaner around the center of the bow and twist it off then use it to attach the bow to the wreath above the sign. Fluff the bow and dovetail the ends.
Step 20
Next, use your tailboard to cut (14) 14″ strips of your 2.5″ and 1.5″ ribbons. Cut all ends into dovetails.
Step 21
With the other (2) 1.5″ ribbons, cut in 14″ strips. You’ll need 8 strips of each ribbon. Cut all ends into dovetails.
Step 22
Get (1) 2.5 ribbon tail and (2) 1.5″ ribbon tails (3 total). Fold the middle, scrunch, and add each tail set to the outer edges of the wreath. Alternate the 1.5″ ribbon tails as you add to the outer wreath ties.
Step 23
For your next set of ribbon tails, repeat previous step. Add to the left of your big bow.
Step 24
Add the next set of ribbon tails to the left of the wreath sign. For the right side, fill in the ties on the right side of the wreath. Add the rest of the tails to the top of the sign.
Note: Please grab the free printable instructional card at the bottom of this post if you want to print and follow the instructions for this patriotic wreath project.
Make Your Own DIY Summer Wreath For Your Door!
Now your DIY summer wreath is all complete! Doesn’t it look terrific?
If you love this wreath, you won’t want to miss these other summertime designs:
- Make A Bumble Bee Mesh Wreath For Summer
- How to Make a Patriotic Red Bike Wheel
- DIY Summer Road Trip Inspired Wreath
- Fun Summer Decorating Ideas That’ll Brighten Your Doorway
If you need any help with centerpiece-making, bow-making, wreath-making, or crafting in general, be sure to check out more of our tutorials on How to Make Wreaths.
We would love to see your beautiful wreaths! Please share with us over at the How To Make Wreaths Facebook Group.
If you’re interested in more info on learning how to make wreaths or being in a community of like-minded crafters, check out our Creative Coaching Program.
Are you ready for summer yet? I’m ready for grillin’ and definitely ready for chillin’ and this DIY summer wreath just helps me feel even more ready.
DIY Summer BBQ themed Wreath
Materials
Instructions
- Take your wreath frame and smash the frame just a little bit. We want it to be more oval than round. Fluff out your wreath frame.
- With the 21" deco mesh, take the cut edge and fold it under, then scrunch it up. When doing 21" poofs, always start on the top. Do 10" poofs all the way around. Now go around the bottom with 10" poofs as well.
- Get your sign. Remove all the stickers. Add the mounting squares to each corner of the sign. Add the pipe cleaners to each mount. To reinforce the mounts, you can use your hot glue gun. Set aside to dry.
- Take your 10" deco mesh and cut 20" strips using the mesh cutter.
- To add the strips, use the "cruffle" method. Curl the ends and scrunch to the center and add to the top wreath ties and then the bottom wreath ties.
- Add sign to the top center of the wreath slightly angled. Start with the bottom right of the sign, and attach the pipe cleaner to the metal frame and wrap nice and tight.
- Next, tie the pipe cleaner on the top left to the metal frame nice and tight. This is so the sign doesn't move around. Tie the remaining corners.
- Make the first bow. Get your EZ Bow Maker and ribbons. Start with 1.5" ribbon and make a 12" tail and (3) 6.5" loops on each side.
- Next, with your 2.5" ribbon and make a 12" tail and (2) 6" loops on each side.
- Next, with your 1.5" ribbon, make a 12" tail and (1) 5.5" loop on each side.
- With your second 1.5" ribbon, make a tail with it facing the top right.
- With the third 1.5" ribbon, make a center loop.
- With a pipe cleaner, take 2 and twist together to make a longer piece. Wrap around the center of the bow and twist off and tie nice and tight. Then add it to the wreath using the pipe cleaner to secure it. Fluff the bow and dovetail the ends.
- Make a smaller bow. Start with 1.5" ribbon and make a 8" tail to the top right, a 6.5" loop to the top left, loop to the bottom right, and tail to the bottom left.
- Start with 2.5" ribbon and make a 8" tail to the top left, a 6" loop to the top right, loop to the bottom left, and tail to the bottom right.
- Start with 1.5" ribbon and make a 8" tail to the top right, a 6.5" loop to the top left, loop to the bottom right, and tail to the bottom left.
- Start with 1.5" ribbon and make a 8" tail to the top left, a 6" loop to the top right, loop to the bottom left, and tail to the bottom right.
- Make a center loop with a 1.5" ribbon.
- Wrap a pipe cleaner around the center of the bow and twist it off nice and tight. Add the bow to the wreath on the top of the wreath sign. Use the pipe cleaner to tie the bow to the wreath frame. Fluff the bow and dovetail the ends.
- Next, use your tailboard to cut (14) 14" strips of your 2.5" and 1.5" ribbons. Cut all ends into dovetails.
- With the other (2) 1.5" ribbons, cut in 14" strips. You'll need 8 strips of each ribbon. Cut all ends into dovetails.
- Get (1) 2.5 ribbon tail and (2) 1.5" ribbon tails (3 total), fold down the middle, scrunch, and add to outer edges of the wreath. Alternate the 1.5" ribbon tails as you add to the outer wreath ties.
- For your next set of ribbon tails, repeat previous step. Add to the left of your big bow.
- Add the next set of ribbon tails to the left of the wreath sign. For the right side, fill in the ties on the right side of the wreath. Add the rest of the tails to the top of the sign.


Thanks!!!! Great directions to follow. Sometimes it is hard for an older person (I am 82) to follow quickly on the videos. Appreciate.
want to buy grillin and chillin wreath kit
The grillin and chillin wreath kit is no longer available, but do check out decoexchange.com for any current wreath kits that are available.