
Crafting for the holidays is so great, but sometimes it’s fun to get back to those everyday designs. Today, Coach Mel is showing us how to make an everyday grapevine wreath with a burlap bow that you’re going to love!
Hey, y’all! In some cases, the phrase “everyday” feels boring, repetitive, or run-of-the-mill. That can definitely prove true if you’re talking about your commute or your shoes, but it’s a totally different story when it comes to wreaths!
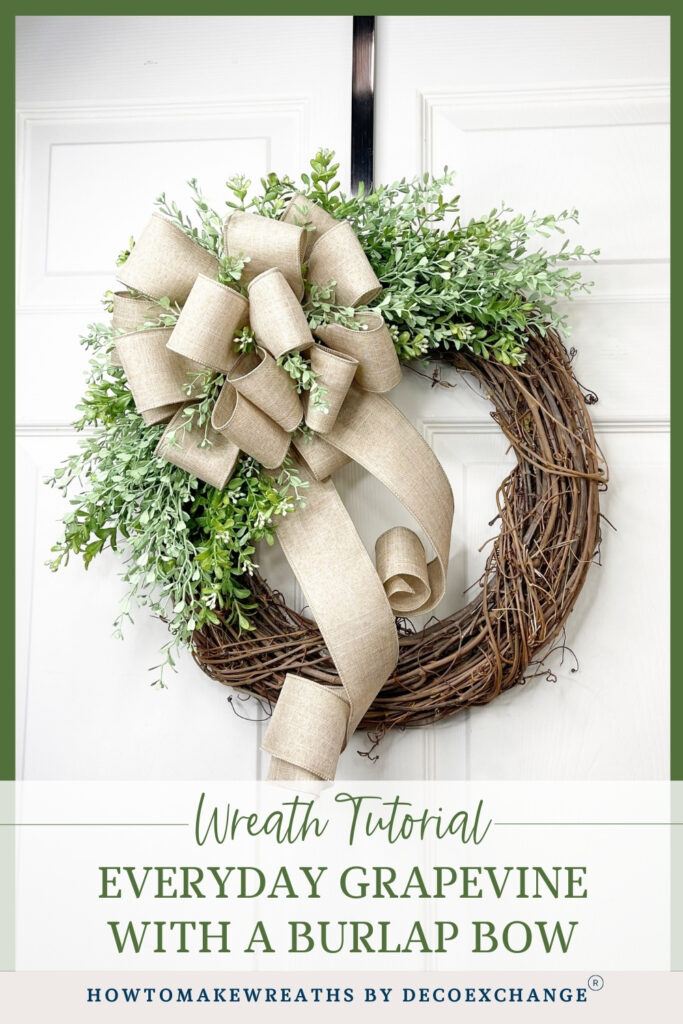
When it comes to door decor, “everyday” refers to something beautiful to dress up your door between seasons. In this tutorial, Coach Mel is showing us how to make an everyday grapevine wreath with a burlap bow that will prove my point perfectly!
Note: If you (and your customers) love “everyday” wreaths, check out our Simple Basic Grapevine Wreath, Spring Grapevine Wreath (the title says “spring,” but it looks like an everyday wreath), and Simple Grapevine Lavender Wreath designs!
How To Make A Burlap Bow On An Everyday Grapevine Wreath
This adorable wreath features some of the most popular elements of door decor. Grapevine, burlap, and some pretty greens all come together to make a beautiful wreath with a rustic feel.
Supplies Needed
Coach Mel uses burlap and small greenery for this wreath, and the results are fabulous! That doesn’t mean you have to stick to those supplies though y’all! If burlap isn’t your thing, just swap it out for a different style of ribbon.
- 16″ Grapevine wreath
- 2.5″ Wired ribbon – we used burlap
- 2 Greenery sprays
- Scissors
- Wire cutters
- Hot glue gun

Instructions
This design is sure to be a hit with farmhouse fans, garden lovers, and anyone who craves a touch of nature. It is also a very simple project- you can complete it in about 15 minutes.
That makes it perfect for making multiples and for beefing up your lower price point products. Check out how to efficiently make multiples of your designs if you need a little direction!
Step 1
Start by making a simple hand bow.
Leave a long tail, then make a small loop (just under 4″) for the center of your bow.
Pinch, twist the ribbon (so the pretty side always faces forward), and make another loop slightly larger than your last.
Pinch, twist, and make a loop that matches the last one.
Continue this process, making each set of loops slightly larger than the previous layer until your bow is as large as you want.
Secure the center of the bow with a pipe cleaner and twist the bow to tighten the pipe cleaner.
Step 2
Next, use the pipe cleaners on your bow to attach it to the top right side of the grapevine. Then fluff out your bow and dovetail the ends.
Step 3
Use the wire cutters to separate the stems of your greenery sprays into smaller pieces and fluff up the pieces, so they look more natural.
Begin inserting greenery into the frame, starting at the bow. Use hot glue to secure the pieces as you work your way out from the bow.
Step 4
Continue to add the greens evenly throughout the design to fill out the wreath. Spring in a few tiny pieces of greenery into the bow to give the overall design a cohesive appearance.
How’s that for quick and easy, y’all? Coach Mel is so great at explaining techniques and keeping things simple. I hope y’all learned a lot about working with greenery! If you’re afraid it won’t look good, just get in there and spread the greenery out – it’ll do all the hard work of looking good.
You’ll be a pro like Mel in no time! Happy crafting, friends!
Burlap Bow And Grapevine Wreath FAQs
Crafting naturally lends itself to questions! Here are a few that I see readers often ask about making this project.
How can I personalize this burlap bow wreath?
This tutorial is just meant to be a guideline. You can certainly make it, as Coach Mel demonstrates. Or, once you get the hang of the design, you’ll be able to take it and make your own unique creations!
Some examples could include using flowers instead of greenery, using different types of greenery, and playing with different ribbons (colors or textures). You could even make a multiple-layer bow using a combination of ribbons.
How do I arrange greenery in a grapevine wreath?
We know that greenery can seem a little intimidating when you’re first starting out. But I’m here to tell you there’s no reason to be scared! You don’t have to glue anything down on your first go, y’all!
Before you jump in and glue all the greenery in place, you can lay out your greens where you think you want them and evaluate how everything looks. If you don’t like the look, try again!
There aren’t any real rules. I just aim to spread out and intermix various types of greenery and florals. I also make sure that I don’t leave any open gaps.
If you haven’t glued anything down, you can arrange greenery pieces as many times as you want until you love the way they look.
And just know that you won’t always feel the need for a practice round. After you have a few wreaths under your belt, you’ll feel confident in working with greenery!
Want to learn more? Grab our tips on how to add greenery to your wreaths.
How do I get the greenery to stay in place?
You can hold greenery in place using glue in one of two ways. First, position the greenery the way you love it (with the stems inserted into the frame), then use a hot glue gun to add dabs of glue into the wreath frame to hold the stems in place.
Or alternatively, you could position the greenery stems on top of the wreath frame. Then take each stem, add a dab of hot glue (or dip it in a hot glue bowl), and insert it into the frame one at a time.
Make This Grapevine Wreath And Burlap Bow For Your Customers!
Just as much as your customers need seasonal and holiday-specific wreath designs, they also need simple everyday designs that they can use in between seasons! All it takes to create a great everyday design is a simple burlap bow with some greenery.
Here’s some inspiration for other designs you can make year-round:
- How To Make An Everyday DIY Wreath Bow
- Everyday Bow Tutorial
- How To Make A Magnolia Centerpiece
- Centerpiece For Your Table

Learn how to start, operate, and scale your creative business!
Get more info about business and creative coaching at The Makers University.
Need some help with any part of the wreath-making process? We’d love to lend a hand. This includes answering any questions about bow-making, wreath-making, or crafting in general! Look for what you need at How to Make Wreaths.
Don’t forget to check out more of our tutorials on the site, too, then come share with us over at the How To Make Wreaths Facebook Group.
Just pin this everyday grapevine wreath with burlap ribbon tutorial below to find the instructions later!

CHECK OUT MORE GRAPEVINE WREATHS

Everyday Grapevine and Burlap Wreath
Materials
Instructions
- Start by making a simple hand bow. Leave a long tail and dovetail the end. Next, make a small loop (just under 4") for the center of your bow. Pinch then twist the ribbon and make another loop slightly larger than your last. Pinch, twist, and make a loop that matches the last one. Continue this process, making each set of loops a bit larger than the last, until your bow is as large as you want it. Then secure the center of the bow with a pipe cleaner.
- Next. use the pipe cleaners on your bow to attach it to the top right side of the grapevine. Then fluff out your bow.
- Use the wire cutters to separate the stems of your greenery sprays into smaller pieces. Then fluff up the pieces so they aren't laying flat. Start at the bow and use hot glue to attach the greenery to the wreath. Then work your way out from the bow.
- Continue to add the greens evenly to fill out the wreath. Be sure to use a few tiny pieces of greenery in the bow itself.
Video
If you’re a dog lover or know someone who is, check out our Support Dog Rescue t-shirts and click on the picture below!


