
Make a DIY deco mesh frog wreath to dress up your front door. Whether you are making this as a gift, to keep, or to sell, this little guy is sure to put a smile on your face.
Hey, y’all! On this site, I often share wreath designs (ex: farmhouse-style or holiday wreaths) that appeal to a large number of people so that you can create them for your own home or make them to add to your shop and sell if you’re a Craftpreneur.
But part of the fun of wreath-making is allowing the imagination to expand and creating cute designs that may be more specific. In other words, they may not be as broadly appealing, but they will be highly appreciated by the people who love the subject of the design.
Today’s project is one of those fun ones. I’m going to show you how to make a cute frog wreath!
This wreath is colorful and cheery, and it’s perfect to display all spring and summer.
If you want more inspiration on fun wreath designs, check out our DIY Stuffed Ladybug Deco Mesh Wreath, DIY Lemon-Themed Home Wreath, or DIY Pineapple Door Hanger tutorials!
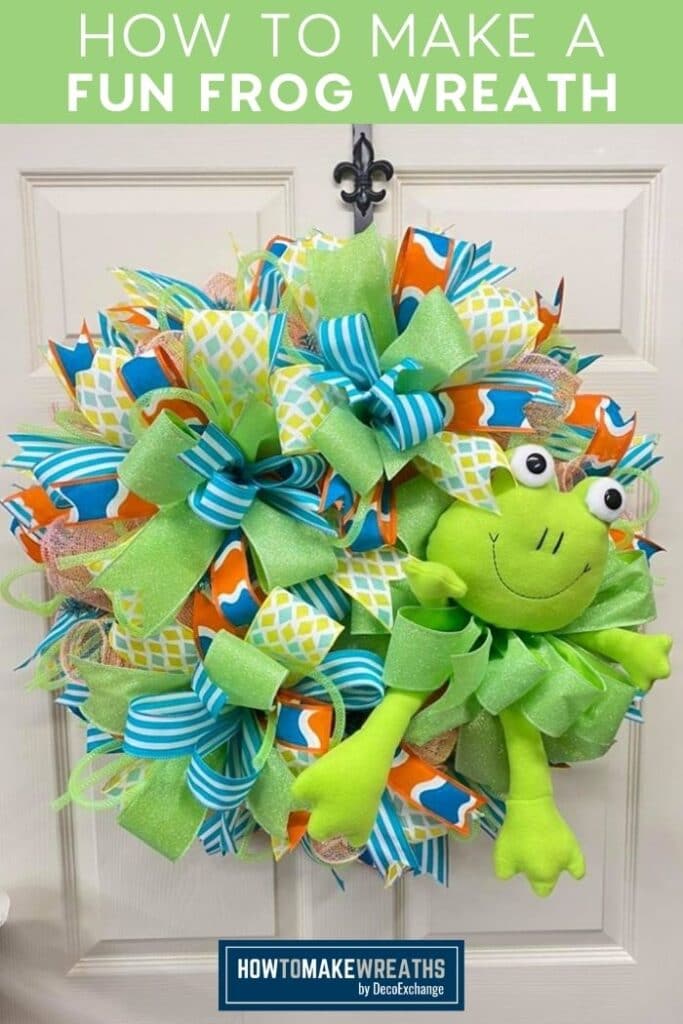
How To Make A Fun Frog Wreath
In today’s tutorial, I’m going to show y’all how to do one of my favorite tricks! It’ll look like you fill your wreath base with the pouf method using 10-inch curls, but in reality, we are just going to use a single roll of affordable mesh.
Supplies Needed
Here’s what you’ll need to complete this project.
- 1 Wreath form
- 1 roll 21″ deco mesh
- (2) 2.5″ wired ribbon
- (3) 1.5″ wired ribbon
- Deco tubing
- 1 Sign/attachment
- Pipe cleaners
- Scissors
- EZ Bow Maker
- Mesh cutter
- Ribbon tail board
- Hot glue gun
Video Tutorial
We know that many of our readers appreciate being able to see the process of making a wreath. Since I can’t come to your home and show you personally, I did the next best thing: make a video! Watch this frog wreath come to life below:
Instructions
Follow these simple instructions and in just a few minutes you’ll have a beautiful frog wreath to display all spring and summer!
Step 1
Fluff out wreath form.
Step 2
Layout your mesh, measure out 12″, and cut your strips. You’ll need about 13 strips. The amount will vary depending on the number of ties to your wreath frame.
Step 3
Let the mesh roll up nice and loose, measure 5″, tie to the wreath form, make a poof and continue around the bottom of the frame. Make sure your curls are big. Fluff out the center to make the poof. This is the curl and poof method.
Step 4
Continue the same process with 2 layers all the way around the top of the frame.
Step 5
Using your EZ Bow Maker, make a Terri bow for the body of the frog. Tie it nice and tight to the wreath frame.
Step 6
Take the frog attachment, lengthen the wire, and attach it to the top of the bow. Tie to the wreath frame.
Step 7
Add the other frog attachment through the left and right sides of the bow. Then add the bottom two attachments below the bow.
Use a hot glue gun to reinforce the attachments.
Step 8
Now we grab our ribbons and EZ Bow Maker to make our other bows!
Using the 1.5″ ribbon create (2) 8″ tails and (2) 7″ loops in an “x” shape.
Using the 2.5″ ribbon create (2) 7″ tails and (2) 6″ loops in an “x” shape and offset it from the layer down below.
With the 1.5″ ribbon, create (2) 8″ tails and (2) 5.5″ loops in an “x” shape and offset it from the layer down below.
Take the deco tubing, make a figure 8 and add it to the bow maker.
Using the 2.5″ ribbon, create (2) 7″ tails and (2) 4.5″ loops in an “x” shape.
With the 1.5″ ribbon, create (2) 7″ tails and (2) 4″ single loops in an “x” shape and offset it from the layer below.
Take your pipe cleaner around the center of the bow, tie it nice and tight, and arrange the bow.
Step 9
Repeat the process as you make 2 more bows.
Step 10
Attach the 1st bow to the bottom of the wreath, wrapping the pipe cleaner around the metal frame. Fluff out the bow.
Step 11
Attach the 2nd bow to the top of the wreath using the pipe cleaner. Fluff out the bow.
Step 12
Attach the 3rd bow to the left side of the wreath using the pipe cleaner. Fluff out the bow.
Step 13
Use your scissors to trim all the tails into dovetails.
Step 14
Let’s make 10 ribbon tails! Take your ribbon tail board and (2) 1.5″ ribbons, and (1) 2.5″ ribbon.
Measure 14″ ribbon tails and cut ends into dovetails. Layer the 3 ribbons and attach each set to the pipe cleaners around the bottom of the wreath. Fluff out tails away from your wreath.
Step 15
Take your deco tubing and measure about 30.” Twist it and fold in 3s. Add throughout the wreath on top of the ribbon tails.
There you go! Now you can make a beautiful frog wreath of your own. We could all use a smile these days, so why not?
FAQs
Here are a few answers to questions I frequently see readers ask about this frog wreath!
Can I use different colors and patterns in this design?
Yes! Feel free to copy this design exactly as we made it or get creative and use different colors and textures to create your own unique design. You could change the frog elements into different frog elements or exchange the frog for a different animal of your choice.
Do I need to use tubing in this design?
No, not at all! I love the extra touch of texture it adds to this design, but it’s totally optional. If you choose not to use it, just skip that step in the tutorial as you complete your wreath.
If You Love This Frog Wreath, Here’s More Wreath-Making Inspiration!
Check out these other popular design tutorials if you love making animal-themed wreaths.
- Orange Dog Lover Wreath
- Cheeky Sloth Sign Wreath
- Make a Butterfly Door Hanger
- Welcome To Our Honeycomb Floral Grapevine Wreath
If you need any help with centerpiece-making, bow-making, wreath-making, or crafting in general, be sure to check out more of our tutorials on How to Make Wreaths.
We would love to see your beautiful summer wreaths! Please share with us over at the How To Make Wreaths Facebook Group.


How to Make A Terri Bow
Instructions
- We're going to take our two and a half inch ribbon. We're going to measure it out eight inches. Pinch it in the center. We're going to give it a twist, slide it in. We want our pretty side up, ugly side down.
- We’re going to measure it out to seven inches. Bringing it back through, twist it. Y’all, whenever you’re twisting your ribbons, make sure you twist them this way one time and then come back the other way when you come back across. All right?
- So the first one, we want a tail and a loop facing the same direction. So we have our tail and our loop both pointing towards us.
- When we come back across, we’re going to measure our seven inches. Go straight down. Y’all, it’s the tail so we want both pretty sides up. On the outside, we’re going to dovetail it. So we’re just making an X every time.
- For the next layer, we're going to have our tail pointing out the first time. Give it a twist. Tail pointing up. So if our tail's pointing up, we want our first loop going up. Y'all, and guess what? We're not going to measure anymore. We're just going to make each one a little bit smaller going in.
- Since our last layer, the loop was down, so now our first tail is going to be down. Y'all, any time you kill a roll, well, then you get to buy three more. It's a rule.
- All right. So our last one, the first thing that we had down was a tail. So we will bring our tail up to the top this time. Bring a loop down. And you just keep following this same pattern all the way up until we get to the center.
- So the previous ribbon, we have a loop down, so now we’re going to start with our tail. Repeat same steps: Tail to the top. Loop on the top. Give it a little twist in the middle.
- Then I like to finish mine with the center loop. So to get your center loop, you have your tails coming out on one side, a smaller loop right down the middle, and tail is coming back out.
- Get a pipe cleaner and fold in half. Get it ready, then just hold your pipe cleaner tight in your hand and give your bow a twist.
- Now, add it to your wreath.
- You can add it to the base. That way it makes it easier to fluff. If you add it to your base, get it attached, then it’ll sit there while you pull your ribbons and your tails all in different directions.
- Trim these tails up nice and pretty. Y’all, you can dovetail them or you can just cut them at an angle. Whatever you like to do. Y’all, I also like to leave all the tails longer while I’m making the bow. That way when I come back in and trim them, I can cut them all at different lengths. That way you get a really cool, fun textured look.
How to Make a Fun Frog Wreath
Materials
Instructions
- Fluff out wreath form
- Lay out your mesh, measure out 12" and cut your strips. You'll need about 13 strips. The amount will vary depending on the number of ties to your wreath frame.
- Let the mesh roll up nice and loose, measure 5", tie to wreath form, make a poof and continue around the bottom of the frame. Make sure your curls are big. Fluff out the center to make the poof This is the curl and poof method.
- Continue the same process with 2 layers all the way around the top of the frame.
- Add the Terri bow you made for the body of the frog. Tie nice and tight to wreath frame.
- Take attachment, lengthen the wire and attach it to the top of the bow. Tie to wreath frame.
- Add the other attachment through the left and right side of the bow. Then the bottom two attachments below the bow. Use hot glue gun to reinforce the attachments.
- Now we can add our other bows. Get your ribbons and EZ Bow Maker.
- Using the 1.5" ribbon create an 8" tail on the bottom right. Make a 7" loop on bottom left, loop on top right, and end with 8" tail on top left.
- Using the 2.5" ribbon create an 7" tail on top right. Make a 6" loop on top left, loop on bottom right, and end with 7" tail on bottom left.
- Using the 1.5" ribbon create an 8" tail on the bottom right. Make a 5.5" loop on bottom left, loop on top right, and end with 8" tail on top left.
- With deco tubing make a figure 8 and add to the bow maker.
- Using the 2.5" ribbon create an 7" tail on the bottom right. Make a 4.5" loop on bottom left, loop on top right, and end with 7" tail on top left.
- Using the 1.5" ribbon create an 7" tail on the bottom right. Make a 4" single loop on each side and cut the tail.
- Take your pipe cleaner around the center of the bow, tie nice and tight, and arrange bow.
- Repeat process and make 2 more bows.
- Attach 1st bow on the bottom of the wreath wrapping the pipe cleaner around the metal frame, and fluff out bow.
- Attach 2nd bow on the top of the wreath wrapping the pipe cleaner around the metal frame, and fluff out bow.
- Attach 3rd bow on the left side of the wreath wrapping the pipe cleaner around the metal frame, and fluff out bow.
- Take scissors and trim all the tails in to dovetails.
- Take your (2) 1.5" ribbon, (1) 2.5" ribbon, and ribbon tail board. Measure 14" ribbon tails. Cut ends in to dovetails. You'll need 10 of each ribbon to fill bottom ties on the wreath.
- Take (1) 2.5" ribbon and (2) 1.5" ribbon and layer. Take the 3 ribbons together, fold in half, scrunch in middle, and start placing them in the wreath with ends sticking outwards using a pipe cleaner and attaching to wreath form. Repeat and fill open spots. Fluff out tails outward away from your wreath.
- Take your deco tubing and measure about 30" and twist and fold in 3s. Add throughout the wreath on top of ribbon tails.
Just pin this fun frog wreath tutorial to save these instructions for later!

We Think You’ll Enjoy These Related Posts:
CHECK OUT MORE FALL GRAPEVINE WREATHS
If you’re a dog lover or know someone who is, check out our Support Dog Rescue t-shirts and click on the picture below!


