
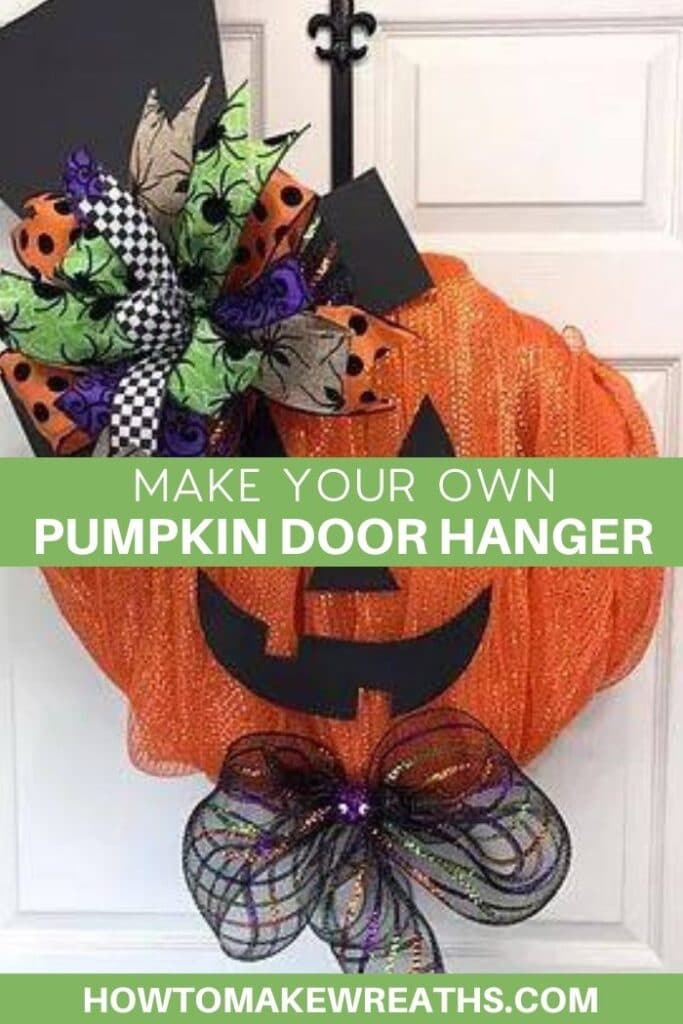
This pumpkin door hanger is the perfect way to dress up your door during the fall season. Here’s a fun and festive cute little pumpkin design that also happens to be fairly easy to make. Once you get this technique down, you’ll be making these for everyone you know!
Hey, y’all! Grab yourself a pumpkin spice latte or a big ol’ slice of pumpkin bread because are going to get crafting for fall. Who doesn’t love decorating with pumpkins during the fall holidays?
Most people may be happy with just sticking a few plastic pumpkins out and call it a day. But I’m not most people, and since you’re here, I don’t think you are either! I’m going to show you how to elevate your front door and make it extra festive with today’s design.
You can make this DIY pumpkin door hanger to sell, as a gift for friends or neighbors, or for yourself. I don’t know about you, but I love stopping by my friend’s homes and being welcomed by pumpkins and other fall decorations. All fall decorations are festive and just plain fun.
Are you ready to dive in and find out how to make your own pumpkin door hanger? And…away we go!

Video: How To Make A Pumpkin Door Hanger
This do-it-yourself pumpkin wreath door hanger is actually really easy to make. But, don’t have to tell anyone else that because it can be our little secret!
I have the directions laid out step-by-step down below so you can quickly and easily replicate this project. If you are anything like me though, you need a good visual! That’s why I made this helpful video walking you through how I put together the pumpkin door hanger.
Supplies Needed To Make A Pumpkin Door Hanger For Fall
Here’s everything you’ll need to make this gorgeous seasonal wreath.
DIY Pumpkin Door Hanger Instructions
Ready to start crafting? Here are all the directions to put together a pumpkin door hanger of your own. You can have fun dressing up your little pumpkin with accessories or swapping out colors if you want to go a non-traditional route too.
Step 1
Start by using a straw wreath.
Place a metal floral pin through the ribbon into the straw wreath to hold the ribbon down at the starting.
Step 2
Then, begin wrapping the ribbon all the way around the straw wreath. End with another metal floral pin and a little bit of hot glue.
Step 3
Grab your spool of wreath fabric mesh and place a pin on the backside of the wreath to hold the mesh onto the wreath.
Step 4
Wrap the outside of the wreath with the mesh fabric, pinning it in place in the back at each section. You just go back and forth, keeping the mesh in bunches (almost like loose cords). Keep going back and forth until you have covered the entire front of the wreath, then trim off the mesh.
Go back with a few extra pieces as needed to fill in the blank spaces and add some pretty texture. Keep playing with it until it is a look you enjoy.
Step 5
You will need a foam core board to make his hat. Using a straight edge or rule, draw and measure out how big you want the top hat to be.
Then, cut it out using an X-Acto knife.
Step 6
Attach the hat with the metal floral pins. You want to make sure it’s very secured to the straw wreath.
Step 7
Cut out eyes, nose, and mouth using the foam core board.
Brush the backsides with Gorilla glue and place them onto mesh where you want his face to appear. Hold the pieces for at least 10 seconds for the glue to start to cure.
Step 8
Make a band with 2 of your ribbons and a funky, playful 4-ribbon Terri bow using the Pro Bow The Hand. Feel free to use as many ribbons and designs as you like.
Step 9
Decorate the hat however you like. For the bow on the hat, I added an extra poofy bow to the backside. This keeps it looking big and full.
Tack it on with the floral pins, so it stays in place.
Step 10
When making the bottom bowtie, I split the tail of the mesh ribbon. It just looks more delightful for this application. As you did with the bow, you will need to use floral pins to attach it as well.
That’s it! You can make this incredible DIY pumpkin wreath in very little time. If you make a lot of wreaths, you can probably put this together in 45 minutes or less. And if you are just starting out, it might take a little bit longer. Making bows is the most challenging part for a beginner. Once you have that down, you will be set!
Frequently Asked Questions About Door Hangers
Here are a few questions we have gotten from fellow crafters…
What’s the difference between a door hanger vs. a wreath?
Although both door hangers and wreaths hang on your front door as decoration, there is one major difference between them. The very basic difference between the two is that a wreath usually is a circle or oval shape with a hollow center. In contrast, a door hanger may be shaped more abstractly and is often a solid piece with no hollow center.
However, there can be exceptions like this design where a door hanger takes a wreath frame and then uses other materials to create the illusion that the center is solid.
How do you hang a door hanger?
I like to use a wreath hanger which is basically a long metal piece that hooks over the top of the door and comes down to a hook at the bottom that holds the wreath. They’re inexpensive, super simple to use, and don’t damage your door. 😉
Make A Pumpkin Fall Door Hanger Yourself!
Isn’t this design so cute? It happens to sell like hotcakes too if you’re into that sort of thing! Y’all, believe it or not, you just made a designer door hanger (which can sell for around $100) in less than an hour? Feel free to add your own fun flair to the design to really make it your own unique product.
If you love a great fall wreath, make sure to check out some of our other popular designs:
- DIY Fall Grapevine Blue Truck Wreath
- Cotton Wreath for Fall
- Designer Fall Grapevine Wreath With A Pumpkin Sign
- Fall Harvest Wreath
- Make a Designer DIY Fall Wreath in Under 6 Minutes
- How to Make a Trick or Treat Wreath for Halloween
If you need any help with centerpiece-making, bow-making, wreath-making, or crafting in general, be sure to check out more of our tutorials on How to Make Wreaths.
We would love to see your beautiful wreaths! Please share with us over at the How To Make Wreaths Facebook Group.
If you’re interested in more info on learning how to make wreaths or being in a community of like-minded crafters, check out our Creative Coaching Subscription Group.


How To Make A Pumpkin Door Hanger
Materials
Instructions
- Take your straw wreath and insert a metal floral pin through your ribbon and into the straw wreath to hold the ribbon down so you can wrap it around the wreath form.
- Then begin wrapping the ribbon all the way around the straw wreath. End by pushing another metal floral pin into the wreath form and secure with a little bit of hot glue.
- Grab your fabric mesh and place a pin on the backside of the wreath to hold the mesh onto the wreath.
- Wrap the outside of the wreath with the mesh fabric, pinning it in place after completing each section. Go back and forth, keeping the mesh bunched in a cord-like manner. Continue until you have covered the entire front of the wreath, then trim off the mesh.
- Take a foam core board and use an X-Acto knife to make his hat.
- Use metal floral pins to attach the hat.
- Cut eyes, nose, and mouth out of the foam core board.Add some Gorilla glue to the back of each piece and place them onto the mesh to create his face. Hold the pieces for at least 10 seconds to allow the glue to set.
- Take 2 of your ribbons and cut out bands for the hat. Then make a 5-ribbon Terri bow using the Pro Bow The Hand.
- Decorate the hat however you like using floral pins to keep everything in place.
- When making the bowtie, split the tail of the mesh ribbon. Attach it to the wreath with a floral pin.
Just pin this pumpkin door hanger below to find the instructions later!
If you love to craft, check out our Eat. Sleep. Craft. Repeat. t-shirts and click on the picture below!


Awesome and very creative…. thanks for sharing!!!
Thank You Damon watching from Australia, I do like your pumpkin,I am always learning something new , can now make more wreaths now that you have put me in touch of a supply in Australia. Damon you are terrific for taking the time to help me a big thank you again.
I’m going to try this, thank you for another great blog
Love it?♀️??
thanks!
I enjoyed watching you do something that was outside of your comfort zone. But you nailed it!
a great addition to add to your fall decor if you’re a diy person. Looking forward to the next blog post
Love this idea and instructions. Thank you for sharing!!
glad you liked it – feel free to share.
Love this idea. Different and unique. Thanks for sharing with us.
Loved it! Halloween is one of my very favorite holiday ! Thanks for sharing ???
glad you liked it thanks for watching!
Love it. Thanks Damon.
It’s 2cute love it ❤
Love these posts
thanks for reading!
Thanks for sharing, I was wondering how to do one