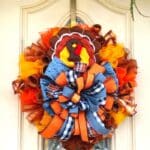
This DIY turkey wreath is the perfect way to get your front door Thanksgiving-ready. We’ll show you how to make your own wreath and get the fall season started!
Hey, y’all! Have you ever seen those wreaths with plush attachments and wondered how they were made? Well, today is the day you’ll find out! We have a great step-by-step tutorial for you today showing you how to make an adorable turkey wreath for your front door using a plush turkey attachment.
With fall soon approaching, it’s time to pull out the seasonal home decor and get festive! In short, it’s time to start putting away those summer blues and bring out those orange and yellow hues.
We shared a fall wreath that Silvia made with our DIY Turkey Kit in a Facebook post a while back. Since we had such a great response, it got us thinking…what better way to celebrate the fall festivities than with a turkey wreath?
By the way, if you want even more fun fall or Thanksgiving inspiration, check out our Deco Mesh Turkey Wreath and Fall Harvest Wreath designs!

How To Make A Turkey Wreath
We invited Silvia Boudreaux from Wreaths by Silvia to create a fun tutorial on how to make a turkey wreath using our DIY Turkey Kit with mesh and TONS of ribbon.
Watch our Live Facebook Tutorial (Part 1 and Part 2), so you can follow along as we create a fun turkey wreath to hang on your front door this fall!
Supplies Needed
- Wreath form 15″
- 21″ deco mesh copper/brown/gold stripe
- 10″ poly burlap deco mesh beige/red
- (3) 10″ deco mesh gold, yellow, orange
- (4) 4″ wired ribbon – blue
- (3) 1.5 wired ribbon – blue, black & white plaid, orange & black
- (2) 2.5″ wired ribbon – orange, orange & black
- rotary cutter
- cutting mat
- EZ Bow Maker
- zip ties
- pipe cleaners
- turkey from Deco Exchange Turkey Kit (SOLD OUT, but you can use another plush from another store)
DIY Turkey Wreath Video Tutorial
For part 2, go here.
Instructions
Here are the steps in written-out form for you!
Step 1
The wire wreath frame holds 18 zip ties in total. We’re going to add three curls to each twist tie.
Cut twelve 10” strips of each color of mesh (Poly Burlap Mesh, Orange Mesh, and Yellow Mesh).
Next, cut an extra three curls of Yellow Mesh.
Step 2
Cut fifteen 10” strips of the 21” Poly Deco Mesh.
Take a strip of 21” Poly Deco Mesh and fold it in half. Starting at the finished edges, roll the mesh inwardly until it’s rolled up into a curl. Repeat this step two more times until you have three curls.
Take the three curls and add them to one of the twist ties on the top ring of the wreath, making sure they are tied in the middle of the curls.
Step 3
Next, take three of the yellow 10” strips and curl each of them. Add the three curls to a twist tie next to the curls just placed in Step 3.
Step 4
Repeat Steps 2 and 4, creating sets of 3 curls of the same color. Add the sets of curls to each twist tie until they are all full. If you have some bare spots, cut some extra strips and add them to those spots.
Step 5
Using the EZ Bow Maker, lay a zip tie vertically and take 2 pipe cleaners that have been tied together, and lay them horizontally.
Step 6
Take the 4” Blue Ribbon and make 8” loops with a 10” tail.
Next, take the 2” Orange, Black, and White Plaid Ribbon and make two 7” loops with a 10” tail, leaving them stacked on top of the blue loops.
Use the 2 ½” Orange and Black Ribbon and make three 6 ½” loops. Use the 1 ½” Orange and Black, Black and White, and Blue Ribbon to make three 6” loops.
Step 7
Start closing the zip tie in increments as you work to fluff out the ribbon, starting from the bottom and working your way to the top.
Once the zip tie is snug against the ribbon, cut off the excess of the zip tie. Cut a small piece of color ribbon and fold it thin to tie around the middle to keep the zip tie out of sight.
Step 8
If you have the turkey from the DecoExchange Turkey Kit, place the head of the turkey where you would like it to go at the top and tie the wires on the back to the wreath behind the curls. Repeat this step at the bottom with the turkey legs.
Step 9
Next, place the bow in the middle and attach the two pipe cleaners to the frame.
Hang it up!
Try This Deco Mesh Wreath For Your Door!
Decorating for fall can be so much fun. Find seasonal colors that work for you and make the best holiday decor you can! Think wreaths, leaves, acorns…anything that is fall-themed or reminds you of Thanksgiving!
Whether you want to make this for your own home, give it as a gift to your host for Thanksgiving, or make a pile of these to sell, this turkey wreath is sure to be a crowd-pleaser!
If you love this turkey wreath design, be sure to check out these designs too:
- How To Make A Simple Fall Grapevine Wreath
- DIY Fall Grapevine Blue Truck Wreath
- Designer Fall Grapevine Wreath With A Pumpkin Sign
- Make a Designer DIY Fall Wreath in Under 6 Minutes
If you need any help with centerpiece-making, bow-making, wreath-making, or crafting in general, be sure to check out more of our tutorials on How to Make Wreaths.
We would love to see your beautiful wreaths! Please share with us over at the How To Make Wreaths Facebook Group.
As you create and design your wreaths, share pics or tips you’ve learned along the way in the comments! If you are interested in more info on learning how to make wreaths, where to buy supplies, and being in a community of like-minded crafters, check out our Creative Coaching Subscription Group.
DIY Turkey Wreath
Materials
- wreath form 15"
- 21" deco mesh copper/brown/gold stripe
- 10" poly burlap deco mesh beige/red
- 3 10" deco mesh gold, yellow, orange
- 4 4" wired ribbon blue
- 3 1.5 wired ribbon blue, black & white plaid, orange & black
- 2 2.5" wired ribbon orange, orange & black
- mesh cutter
- cutting mat
- EZ Bow Maker
- zip ties
- pipe cleaners
- Turkey from Deco Exchange Turkey Kit SOLD OUT (but you can use a plush from another store)
Instructions
- With the wire wreath holding 18 ties in total, use three curls per twist tie. Cut twelve 10” strips of the Poly Burlap Mesh, Orange Mesh and Yellow Mesh. Next, cut three more curls of Yellow Mesh.
- Cut fifteen 10” strips of the 21” Poly Deco Mesh.Take a strip of 21” Poly Deco Mesh and fold each of them in half. Starting at the finished edges, roll the mesh inwardly until it’s rolled up into a curl. Repeat this step two more times until you have three curls.Take the three curls and add them to one of the twist ties on the top ring of the wreath, making sure they are tied in the middle of the curls.
- Next, take three of the yellow 10” strips and curl each of them. Add the three curls to a twist tie next to the curls just placed in Step 3.
- Repeat Steps 2 and 4 creating sets of 3 curls of the same color. Add the sets of curls to each twist tie until they are all full. If you have some bare spots, cut some extra strips and add them to those spots.
- Using the EZ Bow Maker, lay a zip tie vertically and take 2 pipe cleaners that have been tied together and lay it horizontally.
- Take the 4” Blue Ribbon and make 8” loops, leaving a 10” tail. Next, take the 2” Orange, Black, and White Plaid Ribbon and make two 7” loops with a 10” tail, leaving them stacked on top of the blue loops. Use the 2 ½” Orange and Black Ribbon and make three 6 ½” loops. Use the 1 ½” Orange and Black, Black and White, and Blue Ribbon to make three 6” loops.
- Start closing the zip tie in increments as you work to fluff out the ribbon, starting from the bottom and working your way to the top. Once the zip tie is snug against the ribbon, cut off the excess of the zip tie. Cut a small piece of color ribbon and fold it thin to tie around the middle to keep the zip tie out of sight.
- If you have the turkey from the DecoExchange Turkey Kit, place the head of the turkey where you would like it to go at the top and tie the wires on the back to the wreath behind the curls. Repeat this step at the bottom with the turkey legs.
- Next, place the bow in the middle and attach the two pipe cleaners to the frame.
- Hang it up!
Just pin this DIY turkey wreath tutorial to save these fun instructions for a later time!

We think you’ll love these other fall wreath tutorials.
CHECK OUT MORE FALL GRAPEVINE WREATHS
If you love to craft, check out our Eat. Sleep. Craft. Repeat. t-shirts and click on the picture below!


Excellent tutorial! Thank you!
Thank you fro information
Thank you for these excellent articles!
Great info as always. Keep it coming!!
Looooove the turkey…,,, great idea ?
Love the wreath! I have a turkey kit! I made so much fall, I was going to save it till next year! Now you have me inspiration to make mine! Thanks for sharing! Brenda
Thanks for sharing.
Thank you Parker love these tutorials!!❤️?
Great blog and tutorial!! Again hitting it out of the ball park.
Love the wreaths.
Good tutorials always easier if you see someone else do them first ! Thanks !
Great tutorial
Love this ?♀️?? and you guys. Hope you enjoy your holiday weekend ?????♀️??
Love this blog!!!
Parker I love your blogs I learn so much from Damon’s lives I love to see your lives with all the new products I can’t afford to buy much but what I do get I love the quality of the products thank you both for all you do .
Wonderful tutorial, as usual! Love the step by step and visuals. Great for hands on learners!