
Complement your Halloween decor selection with easy-to-make Halloween wreath rails. A wreath rail like this one will add that needed “sparkle” to your home or online shop!
Hey, y’all! As summer begins to fade into fall, we’re busier than ever making fall and holiday items for our shop. Customers start buying early!
If you’re a Craftpreneur, your customers want to decorate their homes and make them come alive in colorful, festive decor. Getting a jumpstart early is your only hope of staying on top of the busy season.
If this seems a little premature to you, we share a tested (and proven) Craft Calendar to Plan Your Craft Production Schedule that helps us maximize our sales.
Most of the time, we focus on making wreaths. However, we also like to through in a few other items to “complete the look” around the entire home. The front door is a great way to welcome guests, but the inside of the home is where you (and your customers) hang out!

In the past, we’ve made some centerpieces and swags. Today we’re adding wreath rails to the collection.
Use wreath rails like this one to complement our Happy Halloween Mesh Wreath, DIY Halloween Wreath Tutorial, and Trick or Treat Wreath for Halloween designs.
How To Make Halloween Wreath Rails
Coach Mel is here to show us how to make this. I love how quickly and easily it comes together! Here’s everything you need to know in order to make this design.
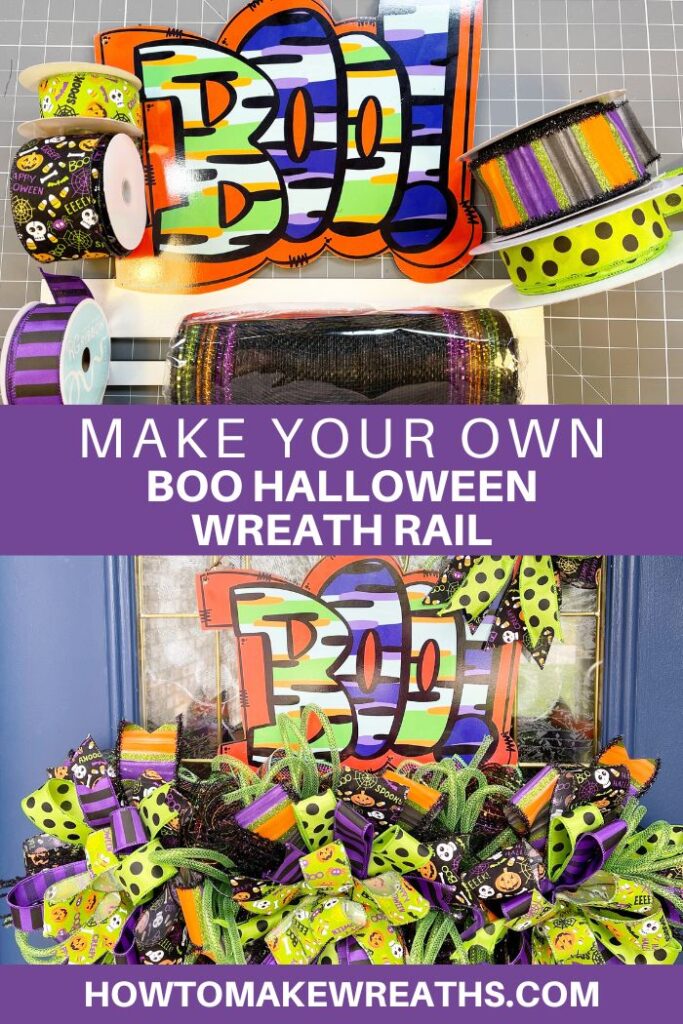
Supplies Needed
- Halloween wreath rail
- (5) 30” strips of 10” mesh (black sequin deco mesh)
- (5) 30” strips of 10” mesh (green sequin deco mesh)
- Black greenery
- Green deco tubing
- (2) 2.5” ribbons
- (3) 1.5” ribbons
- 1” mounting squares (rated for outdoors)
- hot glue gun
- pipe cleaners
- rotary cutter
- scissors
Halloween Wreath Rails Instructions
Follow along as I guide you through the process step-by-step of making this fun Halloween decor.
Step 1
Start by adding 5 pipe cleaners along the length of your wreath rails.
Step 2
Take your green deco mesh strips and make pancake-style ruffles (just scrunch into the middle without curling the ends). Insert one green ruffle into each pipe cleaner on the wreath rail.
Step 3
Make traditional ruffles with your black strips of mesh, placing on black ruffle on top of each green ruffle and twisting the pipe cleaner to hold it in place.
Step 4
Let’s make 3 bows.
Take your first 2.5” ribbon and make two 7.5” tails and three 6” loops (two loops on one side, two tails on the other side with one loop).
Repeat the process with your next 2.5” ribbon, making the tails the same length and the loops slightly smaller at about 6”. Alternate this layer so that the tails go on the opposite side of the bow.
And repeat again with your first 1.5” ribbon, making the loops smaller at 5.5”. Don’t forget to put the tails on the other side of the bow.
Add another layer (following the process) with your second 1.5” ribbon, making the loops 5”. Make sure to alternate the tails to the other side of the bow.
Next, take your third 1.5” ribbon and make four loops this time, each around 5”. This layer should still have 7.5” tails.
Grab a pipe cleaner and wrap it around the center of your bow. Twist it tight by twisting the bow, not the pipe cleaner. Fluff out your bow so that all the layers are visible from the front and dovetail the tails.
Make two more bows just like this one. Using the pipe cleaners on the bows, attach each bow to the wreath rail.
Step 5
Attach wire through the corner holes of the sign part to make a hanger for your Halloween wreath rails.
Step 6
Cut off pieces of the black “greenery,” add a dab of hot glue, and insert them throughout the design to add some fun texture.
Step 7
Take the green deco tubing and make two small loops and a tail on each side. Fold in half and tie a pipe cleaner around the bottom, and twist. Then cut off the excess pipe cleaner, dab the end in hot glue, and insert it into the design.
Repeat 7-8 times, or as many times as you feel necessary to fill in any blank space.
Step 8
Make a simple bow to put on the sign.
Cut a 28” strip of 2.5” ribbon. Create one big front loop, so the tails cross each other. Then pinch in the middle to make your classic bow shape. Wrap a pipe cleaner around the middle to secure it.
Repeat with a strip of green deco tubing. Add this layer on top and twist the pipe cleaner around it.
Make another layer with a 1.5” ribbon. Add it on top of the previous layer and secure it with the pipe cleaner.
Wrap a small piece of deco tubing around the middle of the bow. Attach the bow to the corner of the “Boo” sign.
Your Halloween wreath rail is complete! Isn’t it super cute?
Add Halloween Wreath Rails To Your Inventory!
Y’all, if you’re like me and have wreaths as your main inventory product, I highly recommend branching out into complementary decor pieces. We’ve had great success with our centerpieces and other items, so we’re excited to add this wreath rail to the collection.
While you’re here, be sure to check out these designs too:
- Easy Halloween Grapevine Wreath
- DIY Halloween Ghost Wreath
- Eat Drink And Be Scary Halloween Wreath
- Witch and Broom: Halloween Deco Mesh Wreath
- Simple Spider DIY Halloween Wreath
If you need any help with centerpiece-making, bow-making, wreath-making, or crafting in general, be sure to check out more of our tutorials on How to Make Wreaths.
We would love to see your beautiful wreaths! Please share with us over at the How To Make Wreaths Facebook Group.
If you’re interested in more info on learning how to make wreaths or being in a community of like-minded crafters, check out our Creative Coaching Subscription Group.


Halloween Wreath Rails
Materials
- Halloween wreath rail
- 5 10" deco mesh 30” strips of black sequin mesh
- 5 10" deco mesh 30” strips of green sequin mesh
- greenery stems Black greenery
- deco tubing green
- 2 2.5" wired ribbon
- 3 1.5 wired ribbon
- hot glue gun
- pipe cleaners
- rotary cutter
- scissors
Instructions
- Add 5 pipe cleaners along the length of your wreath rails.
- Take your green deco mesh strips and make pancake-style ruffles (scrunch into the middle without curling the ends). Insert one green ruffle into each pipe cleaner on the wreath rail.
- Next, take the black strips of mesh and curl the ends to make traditional ruffles. Add one black ruffle on top of each green ruffle and twist the pipe cleaner to hold it in place.
- Take your first 2.5” ribbon and make two 7.5” tails and three 6” loops (two loops on one side, two tails on the other side with one loop).Repeat the process with your next 2.5” ribbon, making the tails the same (7.5") and the loops a little smaller at 6”. Alternate the tails on the opposite side of the bow from the previous layer.Make another layer with your first 1.5” ribbon, with the loops at 5.5”. Alternate the side the tails go on again.Take your second 1.5” ribbon and make the loops 5”. Make sure to alternate the tails to the other side of the bow.With your third 1.5” ribbon, make four loops, each around 5” and two 7.5" tails. No need to alternate since it's a balanced layer. Grab a pipe cleaner and wrap it around the center of your bow. Twist it tightly. Dovetail the ends and fluff out your bow so that all the layers are visible. Make two more bows just like this one. Using the pipe cleaners on the bows, attach each bow to the wreath rail.
- Attach wire through the corner holes of the sign part to make a hanger for your Halloween wreath rails.
- Cut off pieces of the black “greenery,” add a dab of hot glue, and insert them throughout the design to add some fun texture.
- Take the green deco tubing and make two small loops and a tail on each side. Fold in half and tie a pipe cleaner around the bottom, and twist. Then cut off the excess pipe cleaner, dab the end in hot glue, and insert it into the design.Repeat 7-8 times, or as many times as you feel necessary to fill in any blank space.
- Make a simple bow to put on the sign. Cut a 28” strip of 2.5” ribbon. Create one big front loop, so the tails cross each other. Then pinch in the middle to make your classic bow shape. Wrap a pipe cleaner around the middle to secure it.Repeat with a strip of green deco tubing. Add this layer on top and twist the pipe cleaner around it.Make another layer with a 1.5” ribbon. Add it on top of the previous layer and secure it with the pipe cleaner.Wrap a small piece of deco tubing around the middle of the bow. Attach the bow to the corner of the “Boo” sign.
Video
Just pin this boo Halloween wreath rail tutorial to save these instructions for later!
If you’re a dog lover or know someone who is, check out our Support Dog Rescue t-shirts and click on the picture below!


