
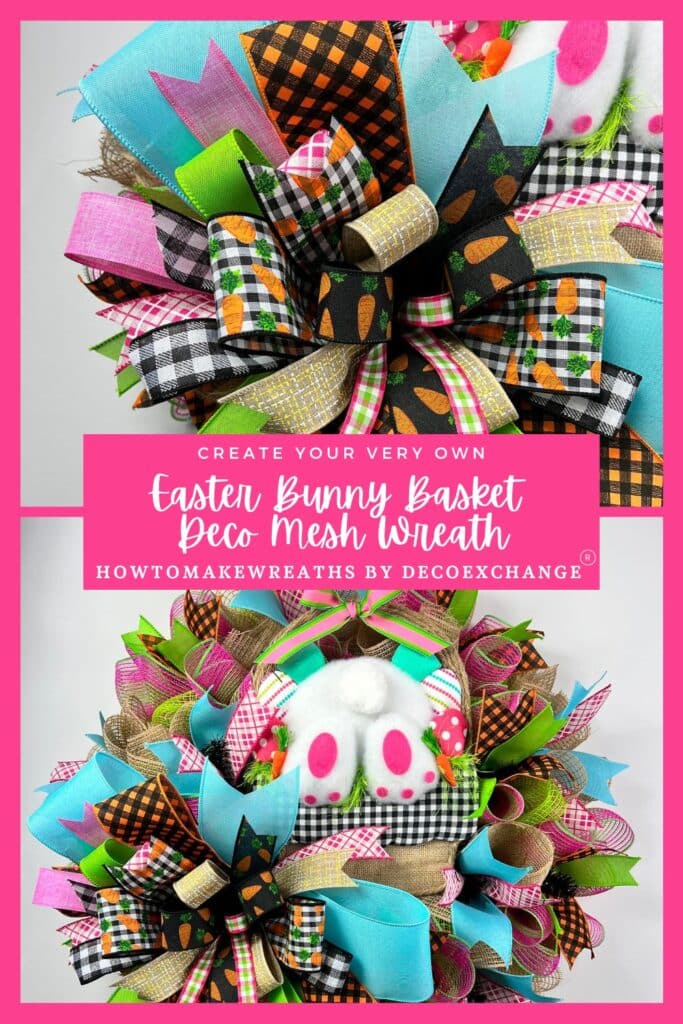
Follow along with this tutorial to learn how to make your own deco mesh Easter bunny wreath. This easy wreath has bright seasonal colors that will stand out among the sea of Easter wreaths.
Hey, y’all! The cold temperatures are starting to thaw, and it’s time to make Easter wreaths!
Easter is one of our biggest holidays as Creators because people want to add some color and cheeriness to their decor after a long winter.
So, when it comes to Easter designs, we make them all: deco mesh, florals, grapevines, and more!
Today, I’m sharing one of my favorite Easter wreath designs: a deco mesh Easter bunny wreath that will catch everyone’s eye.
It’s quickly becoming one of my favorite Easter designs, and customers are gravitating toward it like a moth to a flame. So, I know it’ll be popular with your customers!
If you want some additional Easter wreath inspiration, check out our Easter Bunny Grapevine Wreath, Bunny In An Easter Egg Wreath, and DIY Easter Wreath With A Chick project ideas.

How To Make A Deco Mesh Easter Bunny Wreath
This Easter deco mesh wreath design is visually striking, which may lead you to think it’s harder or more time-consuming than it is!
Supplies Needed
Here’s everything you’ll need for this wreath.
- (1) wreath form
- (3) 10″ deco mesh (green, tan, pink striped)
- (1) 4” wired ribbon
- (1) 2.5″ wired ribbon
- (3) 1.5 wired ribbon
- (2) 1″ mounting square
- (1) sign/attachment
- Pipe cleaners
- Scissors
- Ribbon tailboard
- Super glue
- EZ Bow Maker
Easter Bunny Deco Mesh Wreath Instructions
Follow along as I guide you step-by-step through the process of making this stunning wreath design!
Step 1
Start by taking your green mesh and adding 10” poufs to all of the pipe cleaners on the top and bottom rows of your frame.
Step 2
Now we need to cut some mesh strips. Take your other two colors of mesh and cut 10 strips at 30” long. Then cut 8 strips of these two colors measured at 20” long.
Step 3
Take your 30” strips and make ruffles by curling both ends of a strip over and then scrunching them into the middle.
Add one ruffle into each pipe cleaner as you make your way around the outside of the wreath, alternating colors as you go.
Repeat the same process with the 20″ mesh strips in the inside (closer to the center) row of the frame.
Step 4
Prepare your sign, if needed, by gluing a mounting square or two onto the back of your sign. Then insert a long pipe cleaner into each mounting square.
Once your mounting squares are secured in place, use those pipe cleaners to attach the sign to the center of the wreath, near the top.
Step 5
Let’s make a bow. This is going to be a big one, y’all!
Take the 4″ wired ribbon and your EZ Bow Maker and make 14″ tails with (1) 8-inch loop on each side. Arrange the loops and tails into an “x” shape.
Note: Each layer will “criss-cross” or offset the previous layer.
Take the first 2.5″ wired ribbon and make 14″ tails with (1) 7.5-inch loop on each side.
Next, grab the first 1.5″ wired ribbon and make 14″ tails with (1) 7.0-inch loop on each side.
For this layer, use the second 1.5″ wired ribbon to make 14″ tails with (1) 6.5-inch loop on each side.
Next, grab the third 1.5″ wired ribbon and make 14″ tails with (1) 6.0-inch loop on each side.
Take the fourth 1.5″ wired ribbon and make 14″ tails with (1) 5.5-inch loop on each side.
For this layer, grab the second 2.5″ wired ribbon and make 14″ tails with (1) 5.0-inch loop on each side.
Grab the fifth 1.5″ wired ribbon and make 14″ tails with (1) 4.5-inch loop on each side.
Now, take the sixth 1.5″ wired ribbon and make 14″ tails with (1) 4.0-inch loop on each side.
Finally, make a 4.0” center loop with the ⅞” wired ribbon and two 14” tails.
Take a long pipe cleaner and wrap it around the center of the bow as you carefully pull it off the EZ Bow Maker. Twist the bow tightly and watch it seem to pop and get poufy as you twist!
Step 6
Use the same pipe cleaner on your bow to attach it to the wreath just below the sign. Fluff and arrange the loops and dovetail the ribbon tails.
Step 7
Grab your ribbon tailboard because it’s time to make some ribbon tails.
Take two 2.5” ribbons and two 1.5” ribbons. Cut 9 ribbon tails of each color.
Dovetail the ends.
Step 8
Make ribbon tail pairs by putting one 1.5” ribbon tail on top of one 2.5” ribbon tail.
Take a pair, fold it over, give it a good pinch, then fold it so that the sides come together side-by-side. Attach it to the wreath using one of the pipe cleaners.
Follow the same process all around the wreath, alternating ribbon pairs as you go.
Your Easter bunny deco mesh wreath is now complete and ready to brighten up anyone’s door for Easter this year. If you haven’t begun making spring or Easter inventory items yet, now’s the time to switch over and begin those projects.
Does it feel too soon to be talking about Easter? Check out our tested and proven Craft Calendar To Plan A Craft Production Schedule to help you stay ahead of your customers’ buying desires!

Deco Mesh Easter Bunny Wreath
Materials
- Wreath form
- 3 10″ deco mesh green, burlap, and pink stripes
- 1 4” wired ribbon
- 1 2.5″ wired ribbon
- 3 1.5 wired ribbon
- 2 1″ mounting square
- Sign/attachment
- Pipe cleaners
- Scissors
- ribbon tail board
- Super glue
- EZ Bow Maker
Instructions
- Use the green mesh to make 10” poufs, adding them to all of the pipe cleaners along the top and bottom rows of your frame.
- Let's cut some mesh strips. Take the burlap and pink striped mesh and cut 10 strips at 30” long. Then cut (8) 20" strips of these same two colors.
- Make ruffles from the 30” strips. Take each strip, curl both ends over and scrunch it into the middle. Add one ruffle into each pipe cleaner all the way around the outside of the wreath, alternating colors as you go.Repeat the same process on the inside of the wreath with the 20″ mesh strips.
- Prepare your sign. Glue a mounting square (or two) onto the back of your sign with super glue. Insert an extra long pipe cleaner into each mounting square.After the glue dries, use the pipe cleaners to attach the sign to the center of the wreath, near the top.
- Let’s make a bow.Grab the EZ Bow Maker and the 4″ wired ribbon and make (2) 14″ tails with (2) 8-inch loops. Arrange the loops and tails into an “x” shape.Note: Each layer will “criss-cross” or offset the previous layer.Now use the first 2.5″ ribbon to make 14″ tails with (2) 7.5-inch loops. Next, grab the first 1.5″ ribbon and make the same size tails with (2) 7-inch loops. Take the second 1.5″ ribbon and make 14″ tails with (2) 6.5-inch loops.For this layer, grab the third 1.5″ ribbon and make the same size tails with (2) 6-inch loops. Next, use the fourth 1.5″ ribbon to make 14″ tails with (2) 5.5-inch loops. Now, grab the second 2.5″ ribbon and make 14″ tails with (2) 5-inch loops. For this layer, use the fifth 1.5″ ribbon and make the same length tails with (2) 4.5-inch loops.Now, take the sixth 1.5″ ribbon and make 14″ tails with (2) 4-inch loops. Finally, make a 4” center loop with the ⅞” ribbon and two 14” tails. Take a long pipe cleaner and wrap it around the center of the bow as you carefully pull it off the EZ Bow Maker. Twist the bow tightly to secure it.
- Use the same pipe cleaner to attach the bow to the wreath just below the sign. Fluff the loops and dovetail the ribbon tails.
- Now let's make some ribbon tails.Take (2) 2.5” ribbons and (2) 1.5” ribbons and cut 9 tails from each color.Dovetail the ends.
- Make ribbon tail pairs by putting one 1.5” ribbon tail on top of one 2.5” ribbon tail.Take a pair, fold it over, pinch it, then fold it. Attach one pair to each of the pipe cleaners on the wreath.Follow the same process all around the wreath, alternating color pairs.
Video
Try This Deco Mesh Easter Bunny Wreath Yourself!
Isn’t this colorful deco mesh wreath design so much fun? It’s ready in 30-40 minutes and makes fun use of colors and patterns that are guaranteed to grab your customers’ attention!
If you love this design, check out some of our other popular Easter projects:
- Grapevine Wreath For Easter
- Easter Swag with Bow
- Happy Easter Wreath
- How To Make An Easter Bunny Wreath
If you need any help with centerpiece-making, bow-making, wreath-making, or crafting in general, be sure to check out more of our tutorials on How to Make Wreaths.
We would love to see your beautiful wreaths! Please share with us over at the How To Make Wreaths Facebook Group.
If you’re interested in more info on learning how to make wreaths or being in a community of like-minded crafters, check out our Creative Coaching Subscription Group.

If you love to craft, check out our Eat. Sleep. Craft. Repeat. t-shirts and click on the picture below!


