
Follow along with this tutorial to learn how to make your own sunflower mesh wreath using a UITC flower board. This unique wreath-making technique is easier than it may seem and creates a wreath unlike any other.
Hey, y’all! A year or so ago, I started playing around with a new wreath-making technique that has received a great response from readers and customers. This technique uses a UITC flower board and deco mesh to create a flower design.
When I first started doing this design, I focused solely on making a magnolia flower. Check out the design that started it all: the White Magnolia Wreath.
This eye-catching design is unlike anything else on the market, so it caught the attention of customers and readers very quickly. In fact, it got so much attention that we created several variances, including our Turquoise Magnolia Wreath, Red Magnolia Flower Wreath, and our Pink and White Magnolia Wreath.
Then we began moving away from a magnolia flower to other types of flowers. We’ve done a DIY Sunflower Wreath. And today, we’re going to try a second version of the sunflower mesh wreath.
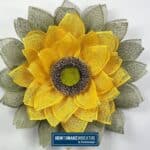
Say hello to your new summer wreath project: the mesh sunflower wreath!

How To Make A Sunflower Mesh Wreath
This summer deco mesh wreath design is quick and easy to make. That’ll come in handy because you’ll have friends and customers begging you to make more!
Supplies Needed
- (16) 10” strips of green 10” poly burlap deco mesh
- (24) 10” strips of yellow 10” poly burlap deco mesh
- Styrofoam flower center
- 6-inch zip ties
- 12” UITC flower board
- Metal U-pins
- Wood burning tool
- Hot glue gun
Instructions
Follow along as I guide you step-by-step through the process of making this beautiful flower wreath with mesh!
Note: I use the wood burning tool to cut the poly burlap mesh and seal the edges so that it doesn’t fray. Make sure to ONLY cut the mesh with the wood burning tool on top of a glass cutting board, so you don’t melt your cutting mat.
Step 1
Grab the circle flower center disk, a pipe cleaner, and the metal u-pins. Lay the pipe cleaner across the disk. Attach it by inserting both u-pins, then cover the section in hot glue.
Without using your fingers, place a scrap piece of ribbon over the hot glue and press it down.
Step 2
Start by cutting (16) 10” strips of the green poly burlap meshes with your wood-burning tool.
Next, need to prepare the UITC board by inserting zip ties into the pairs of holes all the way around the outside row on the board. Close the zip ties but don’t tighten them. We want to leave them loose so we can add our mesh to them easily.
Step 3
Let’s make the outer leaves first. Take a strip of green mesh and fold it corner to corner to create a triangle. Scrunch the wide end of the triangle into the middle to create a lovely leaf shape.
Add this mesh petal to a zip tie on the outside ring of the flower board. Pull the zip tie tight and cut off the excess from the zip tie.
Repeat this leaf-making process all the way around the board.
Step 4
Prepare the middle row of holes in the board by adding zip ties to the hole pairs. Close the zip ties but don’t cinch them.
Follow the same leaf-making process to create petals with the yellow mesh strips. Add these petals to the zip ties on the middle row of the UITC board. Pull the zip ties tight and cut off the excess.
Repeat all the way around the board.
Step 5
Prepare the next row of holes in the board by adding zip ties to the hole pairs. Close the zip ties but don’t cinch them.
Follow the same petal-making process with the yellow mesh strips. Add these petals to the zip ties on the row of zip ties that you just added. Pull the zip ties tight and cut off the excess.
Repeat all the way around the board.
Step 6
Prepare the innermost row of holes on the board by adding zip ties to the hole pairs and the adjacent holes. You’ll have 8 zip ties total in the inner row. Close the zip ties but don’t cinch them.
Make petals with the yellow mesh following the same process. Insert one into every other zip tie. Once you make your way around the circle, insert a petal into the zip ties you skipped the first time around the circle. Pull the zip ties tight and cut off the excess.
Note: You’ll notice that the center gets bulky as you finish adding in petals. Just do the best you can.
Step 7
Now take the flower center that you prepared at the beginning. Push the ends of the pipe cleaner (that you glued on) down through the center holes of the flower board. Twist the pipe cleaner together to secure the flower center in place. Cut off any excess from the pipe cleaner.
Step 8
Take a 3rd pipe cleaner and insert it into the two holes at the top of the board to create a hanger. Twist to secure and cut off any extra.
Your sunflower mesh wreath is now complete and ready to adorn anyone’s door!
Make This Sunflower Mesh Wreath Today!
Isn’t this flower deco mesh wreath technique so much fun? You can make this one pretty quickly and won’t spend an arm and a leg on supplies, and you’ll still be able to sell it in your shop for $75 or more.
If you love this design, check out some of our other popular summer projects:
- Learn How To Create A Sunflower Oval Grapevine
- Simple Sunflower Grapevine Wreath Tutorial
- Honeycomb And Sunflower Door Hanger
- How To Make A Fun Bee Wreath with Sunflowers
- How To Make A Patriotic Flower Wreath

If you need any help with centerpiece-making, bow-making, wreath-making, or crafting in general, be sure to check out more of our tutorials on How to Make Wreaths.
We would love to see your beautiful wreaths! Please share with us over at the How To Make Wreaths Facebook Group.
If you’re interested in more info on learning how to make wreaths or being in a community of like-minded crafters, check out our Creative Coaching Subscription Group.

Sunflower Mesh Wreath
Materials
- 16 10" deco mesh 10” strips of green 10” poly burlap
- 24 10" deco mesh 10” strips of yellow 10” poly burlap
- Styrofoam flower center
- zip ties 6-inch
- UITC Flower Board 12"
- Metal U-pins
- Wood burning tool
- Hot glue gun
- Hot glue
Instructions
- Place the pipe cleaner across the flower center. Insert both u-pins over it to attach the pipe cleaner. Cover the section in hot glue. Next, place a scrap piece of ribbon over the hot glue and press it down using something other than your fingers.
- Cut (16) 10” strips of the green poly burlap meshes with your wood-burning tool. Next, prepare the board by inserting zip ties into the pairs of holes all the way around the outside row on the board. Close the zip ties but don’t tighten them. We want to leave them loose so we can add our mesh to them.
- Take a strip of green mesh and fold it corner to corner to create a triangle. Scrunch the wide end of the triangle into the middle to create a leaf shape.Add this mesh petal to a zip tie on the outside ring of the flower board. Pull the zip tie tight and cut off the excess from the zip tie.Repeat this process all the way around the flower board.
- Next, add zip ties to the hole pairs on the row inside the row you just filled. Close the zip ties but don’t cinch them.Follow the same leaf-making process to create petals with the yellow mesh strips. Add these petals to the zip ties and pull the zip ties tight. Cut off the excess.Repeat all the way around the board.
- Add zip ties to the hole pairs on the next row of holes in the board. Close the zip ties but don’t cinch them.Repeat the same petal-making process with the yellow mesh strips. Add the petals to the zip ties on the row of zip ties that you just added. Pull the zip ties tight and cut off the excess.Continue all the way around the board.
- Prepare the innermost row of holes on the board by adding 8 zip ties to the hole pairs and the adjacent holes. Close the zip ties but don’t cinch them.Make petals with the yellow mesh following the same process. Insert one petal into every other zip tie. After you go around the circle once, insert a petal into the zip ties you skipped the first time around the circle. Pull the zip ties tight and cut off any excess.Note: You’ll notice that the center gets bulky as you finish adding in petals. Just do the best you can.
- Now take the flower center and push the ends of the pipe cleaner through the center holes of the flower board. Twist the pipe cleaner together to secure it and cut off any excess.
- Take a 3rd pipe cleaner and insert it into the two holes at the top of the board to create a hanger. Twist to secure and cut off any extra.
Video
If you’re a dog lover or know someone who is, check out our Support Dog Rescue t-shirts and click on the picture below!


