
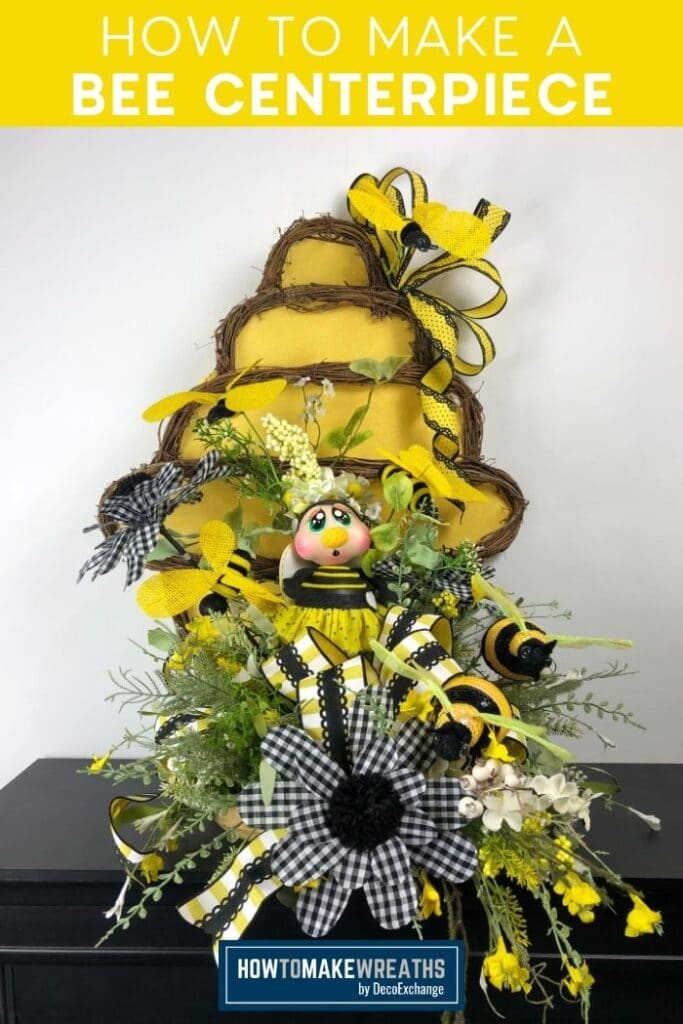
Centerpieces are hot! Bee Centerpieces like this one are perfect for spring and summer and will take your table (or mantle) from ho-hum to va-va-vroom! Coach Jordan is here to show us how to make a bumblebee centerpiece you (and your customers) can’t live without.
Hey, y’all! Let’s do another centerpiece tutorial. We’ve made a few centerpieces over the years, but we really haven’t done many.
Lately, we’ve been taking a (short) break from wreath-making to explore the world of centerpieces, and we’ve been having a blast with it! Not only do centerpieces complement wreaths in decorating, but they also sell like hotcakes!
Coach Jordan is here showing us how to make bee centerpieces that everyone will be buzzing about. It’s ideal to use all spring and summer long.
Let’s dive into this new bee theme centerpiece design!
Note: Want to see more centerpiece ideas? You can catch our everyday simple centerpiece, spring centerpiece, or our lovely magnolia centerpiece. Plus, we also have holiday selections, including a design for Mardi Gras, Valentine’s Day, and even Christmas.
How To Make Bumble Bee Centerpieces
Centerpieces like this one are a little more complex than our simple centerpiece, but still easy to create. With just a few supplies and around 30-45 minutes, you’ll accomplish great things.
Supplies Needed
Here’s everything you’ll need to complete this project. I have included links to some items to make them easier to find.
- 1 wooden dough bowl
- 1 foam block
- Faux moss
- 2 floral stakes
- Bumble bee figurine
- Pipe cleaners
- Scissors
- Zip ties
- 2 tall greenery sprays (with white florals)
- 2 small white floral sprays
- 3 black and white gingham faux flowers
- 2 bushy greenery sprays
- 2 greenery sprays (with yellow florals)
- (1) 2.5” yellow and black ribbon
- (1) 1.5” yellow and black ribbon
- (2) Bumble bee picks
- Beehive wreath base
- Bolt cutters
- Hot glue and glue gun
Instructions For Making Your Bee Centerpieces
Are you ready to be blown away at how easy it is to create your own centerpiece? Just follow this step-by-step guide.
Step 1
Hot glue the foam block into the wooden dough bowl. Then, add a line of hot glue all around the base where the foam meets the wood bowl to secure it firmly in place. Let it cool and set.
Step 2
Next, glue your faux moss around the sides of the foam block, leaving the top exposed. While it’s setting, position two floral stakes so that they would be behind the legs of your bee figurine and push into the top of the foam block.
Step 3
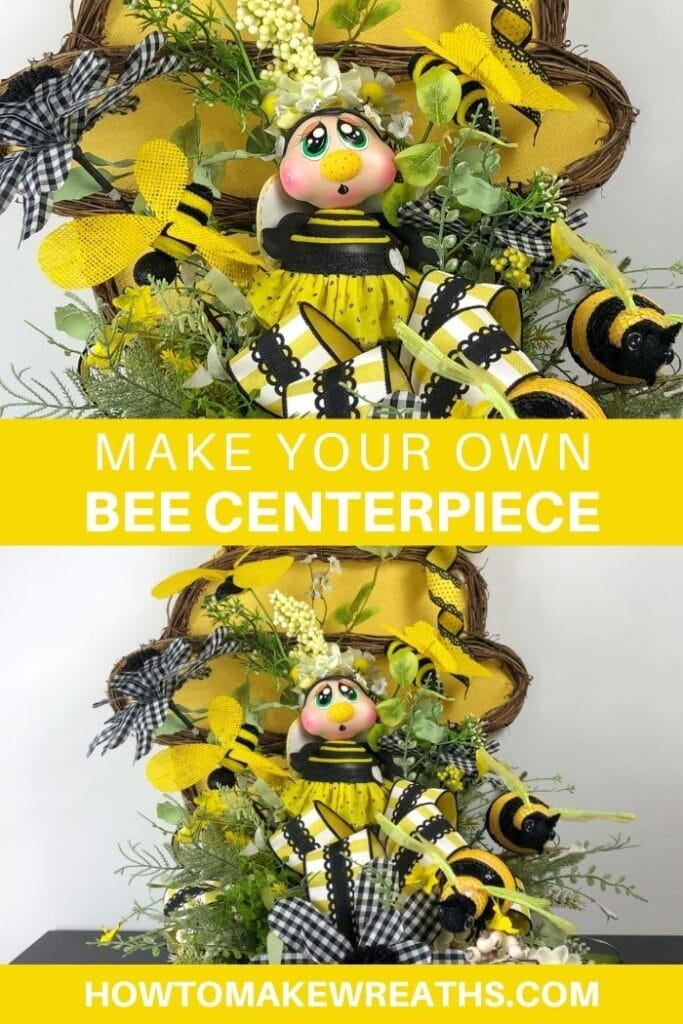
Add some hot glue to the bottom of your figurine’s feet and place it on the foam block, with the backs of the legs against the floral stakes.
Cut a pipe cleaner in half with the bolt cutters, then use each half to secure one leg to a floral stake. We used black pipe cleaners because they blended into the black stripes on the figurine’s legs.
Step 4
Take a tall greenery stem and spread out the white florals so that your spray looks nice and full.
Bend the bottom of the stem. Add hot glue to it. Then, insert the floral stem into the side of the foam block so that the florals are behind the figurine.
Cut another pipe cleaner in half and use one piece to attach the floral spray to one of the floral takes.
Step 5
Repeat Step 4 again, but this time insert the floral spray into the side of the foam block in the front.
You’re basically creating an “L” shape with your florals so that the eye sees the upright florals and travels down to the lower florals.
Step 6
Grab your bushy florals and spread them out. Add hot glue to the ends and insert one spray into each side of the foam block.
Step 7
Take your yellow floral sprays and trim the top portion of the florals off.
Take the bottom portions and add hot glue to the stems before inserting them into the front corners of the foam block (above and to the side of the larger white floral spray).
Repeat the same process for the back corners of the foam block.
Step 8
Next, grab your black and white gingham faux flowers, add glue to the stems, and insert the stems into the top of the foam block in a triangle pattern.
We cut them to different lengths so that our bee centerpiece had a tall flower and two shorter ones.
Step 9
Take your ribbon and create 4 loops (2 loops for each side) with two 15” tails.
Take a pipe cleaner and wrap it around the center of your bow nice and tight before attaching it to your bee centerpiece between the bee figurine and the front white florals to fill in that space.
Step 10
Grab the bumble bee pick, spread out the bees, and open up their wings. Add a dab of hot glue to the end of the stem and insert it into the foam block behind the figurine.
Adjust the bees above and around the figurine so that it looks like the bees are flying around.
Repeat the same process with the second bumble bee pick, inserting it into the foam block near the front of the bee centerpiece.
Step 11
Take your small white floral picks and add them into your design anywhere it looks a little bare.
Step 12
Use your ribbon to create another small bow with 2 loops and one long tail. Wrap a pipe cleaner around the center and attach it to the side of your bee centerpiece.
Step 13
Grab your beehive wreath base and use zip ties to attach it to the back of the foam block.
Step 14
To finish up your bee centerpiece, take your 1.5” ribbon and create a quick 4 loop bow with one short tail and one long tail. Use a zip tie to attach it to the top right part of the beehive with the long tail cascading down. Dovetail the ends of the ribbon.
Attach one more bee pick to the beehive up near the bow.
Bee Centerpieces Make For Great Decor!
And just like that, this bee centerpiece is complete! Isn’t it adorable?
While we specialize in wreaths and still love making them, we’re dipping our toes into centerpieces more because they sell extremely well since they’re almost a “one and done” decor piece.
Bee centerpieces like this one are great for spring and summer decor, which means they’ll sell well in your shop. Plus, they tend to have a high ROI since they’re quick and easy to make and people spend a good amount of money for them.
As always, feel free to take this fun design idea and transform it into something uniquely your own by adding your floral choices and personal touch to it.
If you love bee designs, check out our other popular bee-themed projects!
- Welcome To Our Honeycomb Floral Grapevine Wreath
- DIY Bumble Bee Wreath (Video Tutorial)
- DIY Beehive Door Hanger
- Make A Bumble Bee Mesh Wreath For Summer
- Cutest Bumblebee Wreath EVER!
- How To Make A Fun Bee Wreath with Sunflowers
How did your centerpiece turn out? Show us by sharing a picture of your creations with us over at the How To Make Wreaths Facebook Group.
If you are interested in more info on learning how to make wreaths, where to buy supplies, and being in a community of like-minded crafters, check out our Creative Coaching Subscription Group.

How To Make Bee Centerpieces
Materials
- 1 Wooden dough bowl
- 1 Foam block
- Faux moss
- 2 Floral stakes
- Bumble bee figurine
- Pipe cleaners
- Scissors
- Zip ties
- 8 picks and sprays 2-Tall greenery with white florals, 2-Greenery with yellow florals, 2-Small white floral, 2-Bushy greenery
- 3 floral picks Black and white gingham faux flowers
- 1 2.5" wired ribbon yellow and black ribbon
- 1 1.5 wired ribbon yellow and black ribbon
- 2 picks and sprays Bumble bee
- Beehive wreath base
- bolt cutters
- hot glue gun
Instructions
- Hot glue the foam block to the wooden dough bowl. Let it cool.
- Now glue the faux moss around the sides of the foam block, leaving the top uncovered. Push 2 floral stakes into the top of the foam block, positioned so that they'll meet up to the backs of the bumble bee figurine's legs.
- Hot glue the bottom of the figurine’s feet to the foam block, matching the backs of the legs against the floral stakes.Cut a pipe cleaner in half and use each half to tie one leg to a floral stake.
- Spread out the white florals on a tall greenery spray so that it looks nice and full.Add hot glue to the end of the stem and insert it into the side of the foam block with the florals positioned behind the figurine. Use a pipe cleaner to attach the floral spray to one of the floral stakes.
- Repeat the same process again, but insert the floral spray into the side of the foam block in the front.
- Spread out y our bushy florals. Add a dab of hot glue to the ends and insert one spray into each side of the foam block.
- Take your yellow floral sprays and add hot glue to the stems then insert them into the front corners of the foam block.Repeat the same process for the back corners of the foam block.
- Next, grab your black and white gingham faux flowers, add a dab of glue, and use a triangle pattern (one in the back, two on the sides) to insert the stems into the top of the foam block. Cut the stems to different lengths so that the bee centerpiece has a tall flower and two shorter ones of varying lengths.
- Grab the 2.5" ribbon and create 4 loops (2 loops for each side) with two 15” tails. Wrap a pipe cleaner through the center of your bow and attach it to your bee centerpiece between the bee figurine and the front white florals to fill in that open space.
- Open up the bumble bee pick and insert it into the foam block behind the figurine. Repeat the same process with the other bumble bee pick, this time inserting it into the foam block near the front of the bee centerpiece.
- Take your small white floral picks and add them into your design anywhere it looks a little bare.
- With the 2.5" ribbon, create another small bow with 2 loops and one long tail. Wrap a pipe cleaner around the center and attach it to the side of your centerpiece.
- Finally, take your 1.5” ribbon and create a quick 4 loop bow with one short tail and one long tail. Attach it to the top right part of the beehive so that the long tail hangs down. Dovetail the ends of the ribbon.Attach one more bee pick to the beehive up near the bow.
Video
Just pin this bee centerpiece tutorial below to find the instructions later!
If you’re a dog lover or know someone who is, check out our Support Dog Rescue t-shirts and click on the picture below!


